

Alright, you’ve got a photo you love, and you want to give it that classic, painted look. You're standing at a crossroads. Do you go the fast, digital route with an AI tool, or do you get your hands dirty and create a physical piece of art with a custom paint-by-numbers kit? The best path for you really just depends on what you're looking for: a quick digital image or a satisfying, tangible project.
Choosing Your Method: AI vs. Paint-by-Numbers
So, how do you decide between a digital filter and a physical canvas? It comes down to whether you value speed and convenience over a hands-on, creative experience. Both methods will transform your photo, but the journey—and the final result—are completely different.
AI-powered apps and websites, like those from Fotor or BeFunky, deliver results almost instantly. It’s pretty straightforward: upload your picture, click on a style like "Oil Painting" or "Watercolor," and the algorithm handles the rest in seconds. This is a fantastic option if you want a cool new profile picture, a unique image for social media, or just want to play around with different looks. What you get is a digital file, ready to share or print.
A custom paint-by-numbers kit, however, offers a much more immersive experience. This is a chance to unplug and create something with your own hands. The company takes your photo, turns it into a numbered outline on a canvas, and sends you a complete kit with all the paints and brushes you'll need.
The real magic of a paint-by-numbers kit isn't just the finished painting—it's the process. It’s a wonderfully meditative way to slow down, focus, and connect with a memory as you bring it to life stroke by stroke.
This side-by-side comparison should help clarify the key differences between the two approaches.
Choosing Your Method AI vs Paint-by-Numbers
| Feature | AI Photo-to-Painting Tool | Custom Paint-by-Numbers Kit |
|---|---|---|
| Effort & Skill | Minimal. Upload, click, and download. No artistic skill needed. | Requires time, patience, and steady hands. A fun challenge! |
| Time to Complete | Seconds or minutes. | Several hours or even days, depending on complexity. |
| Final Product | A digital image file (.JPG, .PNG). | A physical, hand-painted canvas to hang on your wall. |
| Experience | Quick and convenient digital fun. | Meditative, relaxing, and highly rewarding offline activity. |
| Cost | Often free or requires a low-cost subscription. | A one-time purchase, typically starting around $30-$50. |
Ultimately, both paths are great for different reasons. An AI tool is your best bet for a quick, shareable image, while a custom kit is perfect for anyone wanting to create a lasting, personal piece of art.
This infographic gives you a quick visual breakdown of how the two methods stack up.
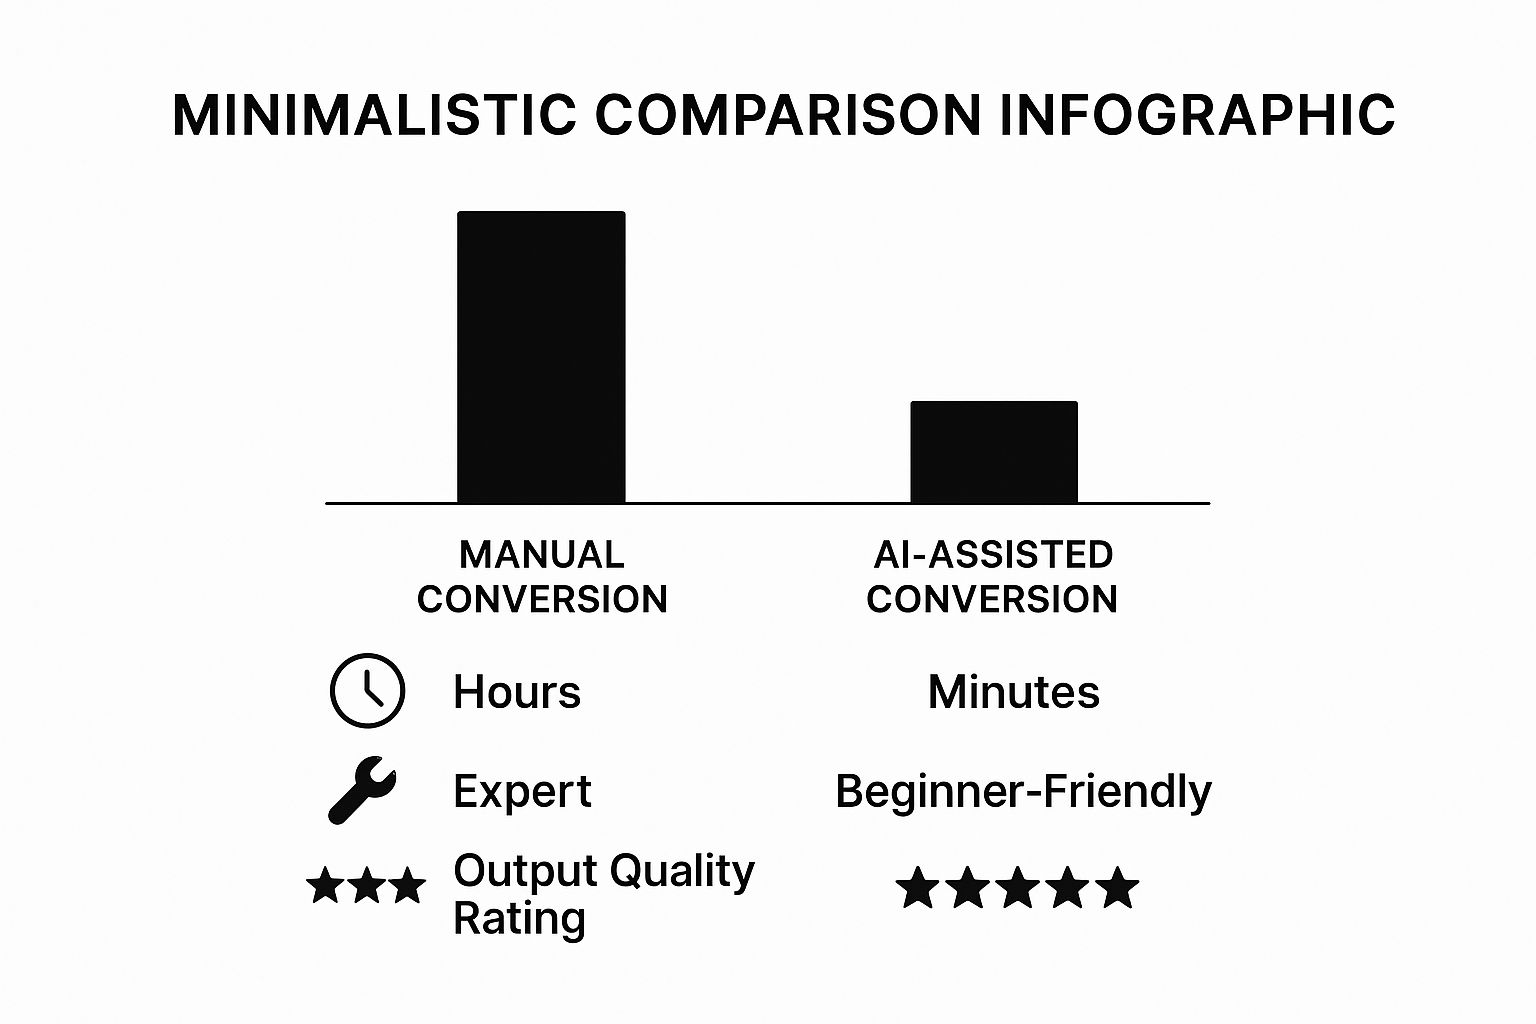
As you can see, AI is the clear winner for speed and ease of use, especially for beginners. But if you're after a deeply personal artwork and enjoy the creative process, the time spent on a paint-by-numbers canvas is well worth it. Your end goal—a quick digital graphic or a meaningful piece for your home—should make the choice an easy one.
Choosing and Preparing Your Perfect Photo
The secret to a stunning final painting often lies in the photo you start with. I've seen it time and again: a great photo almost always leads to a great painting. Think of it as laying a solid foundation before you build the house.
So, what makes a photo a good candidate? Look for a clear, well-defined subject. A portrait where the face is sharp and in focus, or a landscape with a strong focal point like a single tree, will translate much better than a busy, cluttered scene.
Good lighting is also your best friend. Photos with a nice balance of light and shadow have a natural depth that really makes a painting pop. Try to steer clear of images that are too dark, washed out, or lit with flat, harsh light, as those nuances tend to disappear in the painting process.
Simple Edits for a Stronger Foundation
Before you even think about applying a filter or ordering a kit, a few quick tweaks can work wonders. You don't need fancy software—the editing tools built into your smartphone are more than capable.
Here's what I recommend focusing on:
- Crop with purpose: This is your most powerful tool. Cropping out distracting background noise instantly puts the spotlight on your subject. It’s the fastest way to improve your composition.
- Boost the contrast: Gently increasing the contrast makes the colors richer and helps define the edges between light and dark areas.
- Adjust brightness: A slight nudge in brightness can bring out details lurking in the shadows, making sure they don’t get lost in the final piece.
If you want to take it a step further, some AI photo enhancers can really sharpen up details and improve overall clarity before you start.
The goal isn't to make the photo flawless, but to create a better reference for your painting. You're just highlighting the key features you want the final artwork to capture.
Finally, take a hard look at the background. Is there a random sign, a stray car, or an accidental photobomber stealing the show? If so, try blurring or even removing it. A simple, clean background lets your subject be the star, leading to a much more artistic and professional-looking painting.
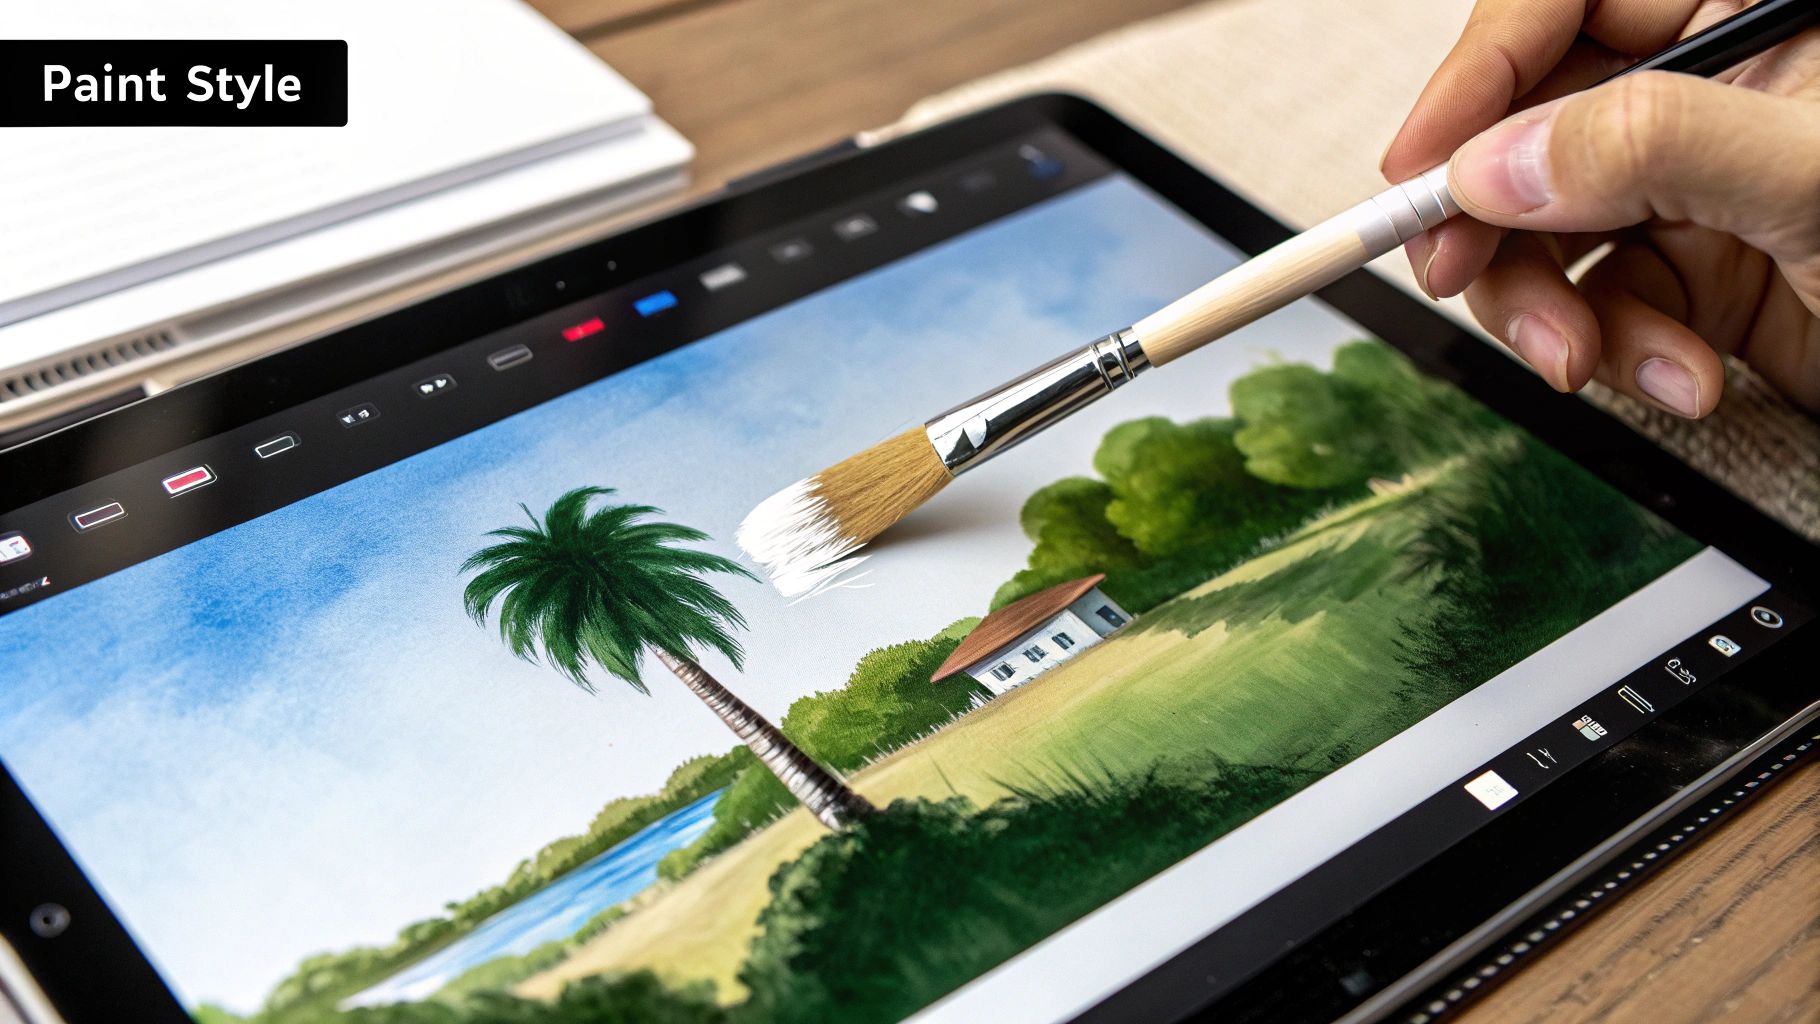
Turn Your Photo into a Digital Painting with AI
If you're looking for that painted look without picking up a brush, AI art generators are your new best friend. These tools can transform a simple photo into a digital painting in seconds, which is perfect for anyone who wants to get creative without a steep learning curve.
It's usually as simple as uploading your picture, picking an art style you like, and letting the AI do the heavy lifting. But the real magic happens when you start playing around. Don't just accept the first thing it spits out!
Go Beyond the Basics
Most platforms have a whole menu of styles to choose from—think classic oil and watercolor, or even more out-there options like Cubism or Pop Art.
My Favorite Trick: Don't stop at one filter. I once took a great sunset photo and ran it through an "Impressionist" style filter. The result was nice, but then I took that new image and applied a "Charcoal Sketch" filter on top of it. The layered effect was incredible—it had a depth and texture that felt completely original, not like a simple one-click edit.
Directing Your AI Artist
The best AI tools let you get more hands-on. Look for settings that let you control the "intensity" or "strength" of the style. A low setting might just add a subtle, painterly texture, while cranking it all the way up can create something bold and abstract, where the original photo is just a memory.
Think of yourself as the art director. You can guide the AI with more than just a style choice. Instead of just clicking "Van Gogh," try adding a text prompt like, "A photo of a boat on the water, painted in the style of Van Gogh with thick, impasto brushstrokes and a swirling, deep blue sky." This combination of an image and your own words gives you so much more creative say in the final piece.
This technique is often called AI image style transfer, and it’s what lets the software mimic the distinct look of famous artists.
This field is blowing up. The global market for AI-generated images is expected to reach $1.3 billion by 2025. It's not just for fun, either; one report predicts that 62% of marketing professionals will be using AI visuals in their campaigns by then. You can read more about what’s coming next in this report on AI illustration from Superagi.com.
With tools getting better all the time, there’s never been a better moment to jump in and see what kind of art you can create.
The Hands-On Approach with Custom Paint-By-Numbers
If digital filters and one-click effects feel a little too impersonal, there’s a wonderfully tactile alternative: a custom paint-by-numbers kit. This method turns a photo you love into a genuine, hands-on project. It’s a chance to unplug, slow down, and recreate a memory with your own two hands.
So, how does it work? You start by uploading your chosen photo to a company that creates custom kits. They use special software to analyze the image, breaking it down into a simplified map of colors and shapes. This map is then printed as a numbered outline on a canvas. We cover the nitty-gritty of this in our guide on how to make a paint by number from a photo.
The real fun begins when the kit arrives at your door. Opening that box is always a thrill. You’ll find everything you need to get started: the pre-printed canvas with all its numbered sections, tiny pots of acrylic paint for each number, and a few brushes.
Setting Up for Success
A little bit of prep work can make the entire experience so much more relaxing and enjoyable. I always tell people to find a comfortable, well-lit spot where you can leave your project out for a while. A corner of your desk or even the dining room table can work wonders.
Think of this as your personal art studio. It’s not just about painting; it's about carving out a peaceful, creative space for yourself. The process itself is a form of mindfulness.
Make sure you have a cup of water handy for rinsing your brushes and a paper towel for dabbing them dry. This simple setup is key to keeping your colors from getting muddy and ensuring your brushstrokes are clean and crisp.
Painting Techniques for a Polished Look
Once you start filling in the numbers, you'll find your own rhythm. For the larger, sweeping areas, use one of the bigger brushes to lay down smooth, even coats. If you can still see the number through the paint after it dries, don't hesitate to go over it with a second coat.
Those tiny, detailed sections might look intimidating, but your smallest brush is your best friend here. I find it helps to brace my painting hand with my other hand to keep it steady. Just take your time—patience really is the most important tool you have.
Here are a few more tips I've picked up to get that professional finish:
- Work from top to bottom. This is a classic artist’s trick to avoid smearing wet paint with your hand or sleeve as you work your way down the canvas.
- Start with the darks. It’s usually much easier to paint a lighter color over a dark one if you make a mistake, rather than the other way around.
- Blend the edges. Want a more "painted" look? While two adjacent color sections are still wet, you can use a clean brush to gently blur the line between them. This creates a softer, more natural transition.
Ultimately, this hands-on process is more than just a craft project. It’s an immersive journey that turns a favorite memory into a beautiful piece of art you can proudly hang on your wall.
Putting the Final Polish on Your Artwork
You’ve finished the creative part, but don't hang it up just yet! A few final touches are what truly elevate your project from a finished canvas into a polished piece of art that’s ready to show off. These last steps are crucial, whether you started with a digital file or a traditional paint-by-numbers kit.
From Digital File to Physical Print
If you went the digital route with an AI generator, your next move is to bring that creation into the physical world. The right paper makes all the difference. I've found that a textured canvas paper is fantastic for mimicking the feel of an actual painting. For a sleeker, more contemporary vibe, a smooth matte finish gives you that clean, gallery-style look.
Protecting Your Paint-by-Numbers Creation
For those who got their hands dirty with a paint-by-numbers canvas, your main goal now is preservation. This is a step many people skip, but it's essential. Applying a clear acrylic sealant or varnish is the best way to protect your hard work from dust, fading, and UV light. It’s a simple layer of insurance that keeps those colors looking just as vibrant as the day you painted them.
Frame It Like a Pro
The right frame is more than just a border; it’s part of the artwork itself. Think about both your painting’s style and the room where it will hang.
- A simple, thin black frame often works beautifully for modern or abstract pieces.
- A classic wooden frame can bring a lot of warmth to a portrait or landscape painting.
Don’t underestimate the power of a mat! A mat board adds that professional touch by creating visual space between the artwork and the frame. It really helps draw the eye inward.
AI tools have certainly sped up the process of turning a photo into a painting—what once took days can now be done in minutes. You can learn more about how these handy tools work and their benefits for artists on Photo2Painting.com. Regardless of the path you took, these finishing steps will ensure your artwork is something you can be proud to display for years to come.
Common Questions About Turning Photos to Paintings
As you get ready to start this fun project, you're bound to have a few questions. It’s totally normal! Let's clear up some of the most common ones so you can feel confident and just focus on creating.
One of the first things people ask, especially with all the new AI tools out there, is about commercial use. Can you sell the painting you create from a photo? The answer really comes down to the terms of service for whatever tool or platform you use. Some give you full commercial rights, no strings attached. Others might limit your creations to personal use only. Always take a minute to read the fine print.
The boom in AI-generated art has been incredible—people are now creating over 34 million AI images every single day. Public opinion is still catching up, though. While about 56% of people who’ve seen AI art say they like it, the debate about what counts as "real art" is still a hot topic. You can dive deeper into these trends with these fascinating AI art statistics on tripleareview.com.
What Kind of Photos Work Best?
I’ve found that the best paintings start with the best photos. You want something with good contrast and clear, even lighting. Photos with a well-defined subject against a simpler background almost always translate better into a painting.
- For portraits, aim for a shot where the face is in sharp focus.
- For landscapes, an image with a strong focal point—like a lone tree or a dramatic mountain peak—works much better than a busy, cluttered scene.
Think of it this way: the camera captures everything, but a painting directs the eye. Your goal is to choose a photo that already has a strong sense of direction and focus.
How Long Does a Custom Kit Take?
If you go the hands-on route with a custom paint-by-numbers kit, the time commitment can vary quite a bit. It really depends on you and the complexity of the image.
A small, simple design might only take 5-10 hours of relaxed painting. But if you’ve chosen a large, detailed portrait, be prepared to settle in for 20-40 hours or more.
The whole point is to enjoy the process. It’s meant to be a creative and almost meditative experience, so don't rush it. Savor the moments you spend bringing your photo to life on the canvas.
Ready to turn your favorite photo into a hands-on masterpiece? You can create your own unique art project with a kit from Custom Paint By Numbers. Start transforming your memories today at https://paint-by-number.com.


