

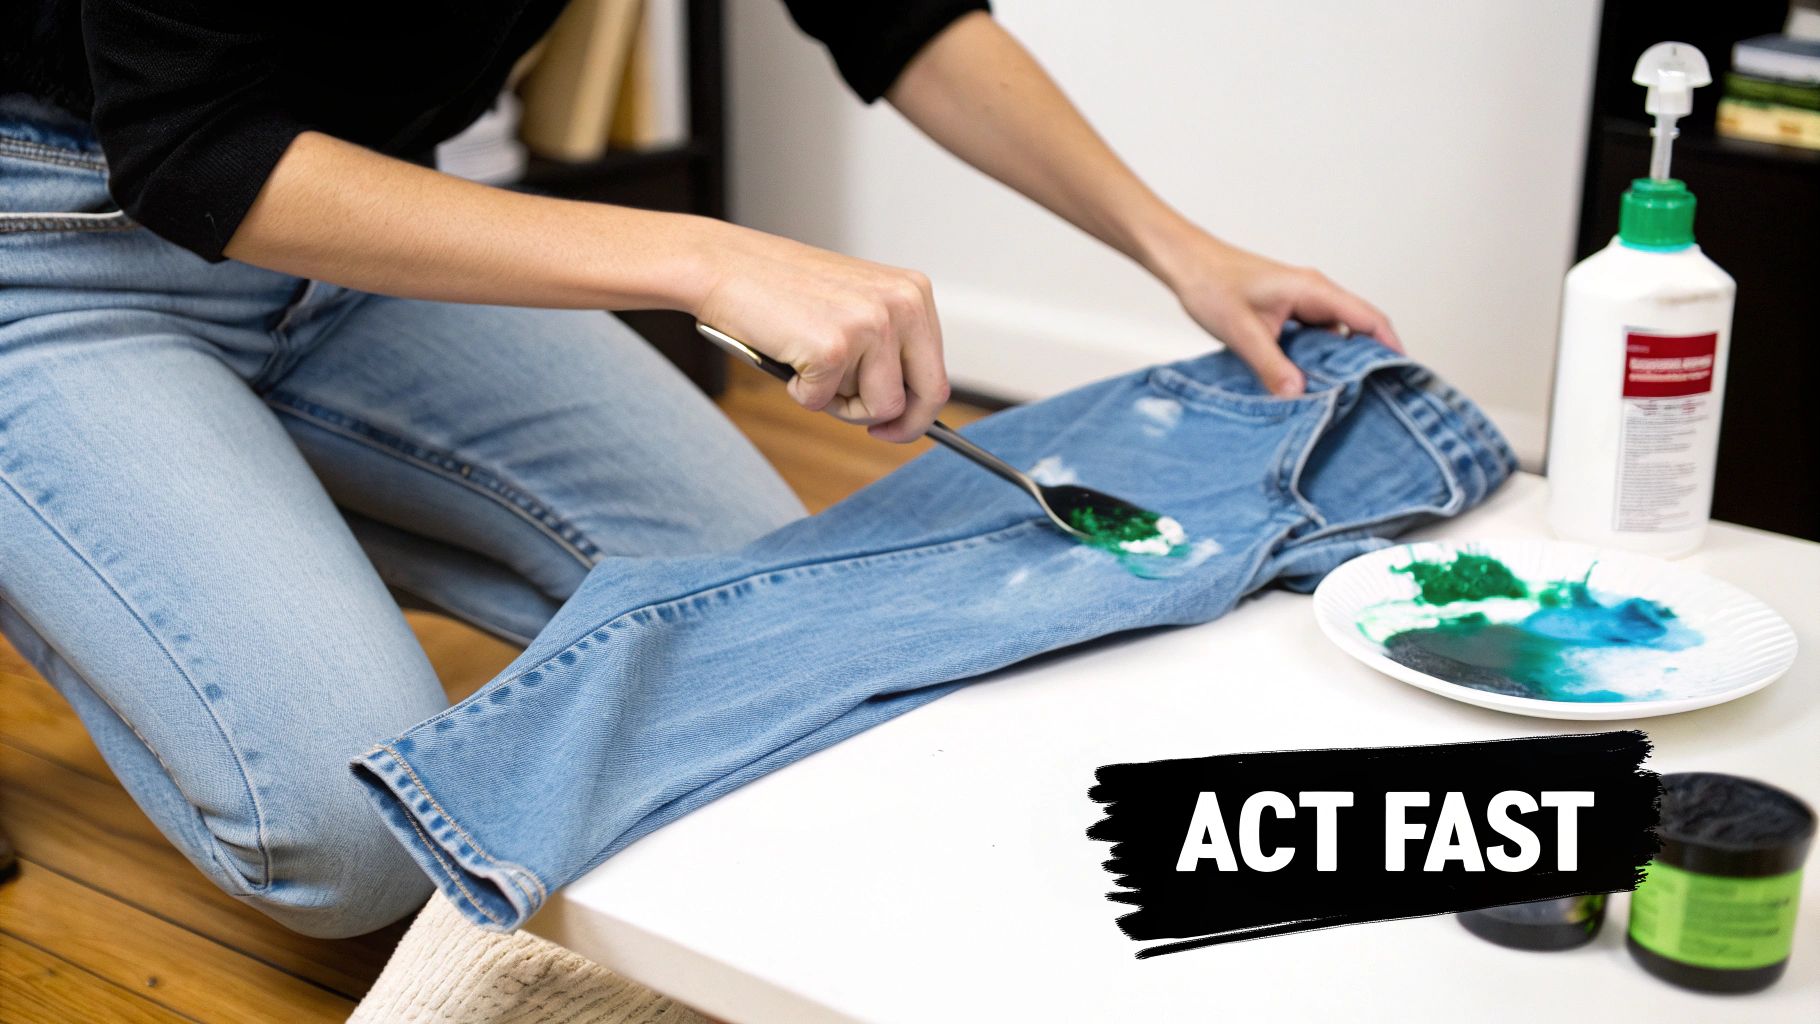
It's that heart-sinking moment every artist or DIY painter knows well: a rogue splash of acrylic paint lands right on your favorite pair of jeans. When it comes to removing acrylic paint from clothing, the single most important thing to remember is speed. Acting within the first five minutes is your best shot at preventing a permanent stain.
The trick is to scrape off the excess paint right away and immediately flush the spot with cold water from the back of the fabric.
Your Immediate Action Plan for Paint Spills
The second that dollop of acrylic paint hits your clothes, the clock is officially ticking. Acrylics are water-based, but don't let that fool you—they're polymers that dry into a plastic-like film incredibly fast. Once that happens, the paint bonds to the fabric fibers and becomes water-resistant, making your job a whole lot harder.
Your immediate response truly dictates whether you can save the garment. The goal isn't to get the stain out completely in those first few minutes, but to remove as much wet paint as you can before it has a chance to set.
Fresh vs Dried Acrylic Paint First Response Actions
Understanding the difference in how you tackle a wet versus a dried stain is crucial. Acting correctly from the start can save you a lot of scrubbing later. This table breaks down the essential first moves.
| Stain Condition | Critical First Step | Tools Needed | Common Mistake to Avoid |
|---|---|---|---|
| Fresh/Wet Paint | Immediately lift and scrape off excess paint from the surface. | Spoon, butter knife, or credit card. | Scrubbing the stain, which pushes paint deeper into the fibers. |
| Dried Paint | Moisten the stain first, then gently scrape or pick off the hardened paint. | Dull knife, old toothbrush, or your fingernail. | Using hot water, which can permanently set the stain. |
As you can see, the initial approach is quite different. For a fresh spill, it's all about gentle removal, while a dried stain requires a bit more mechanical effort to break up the hardened paint.
The Power of Cold Water Flushing
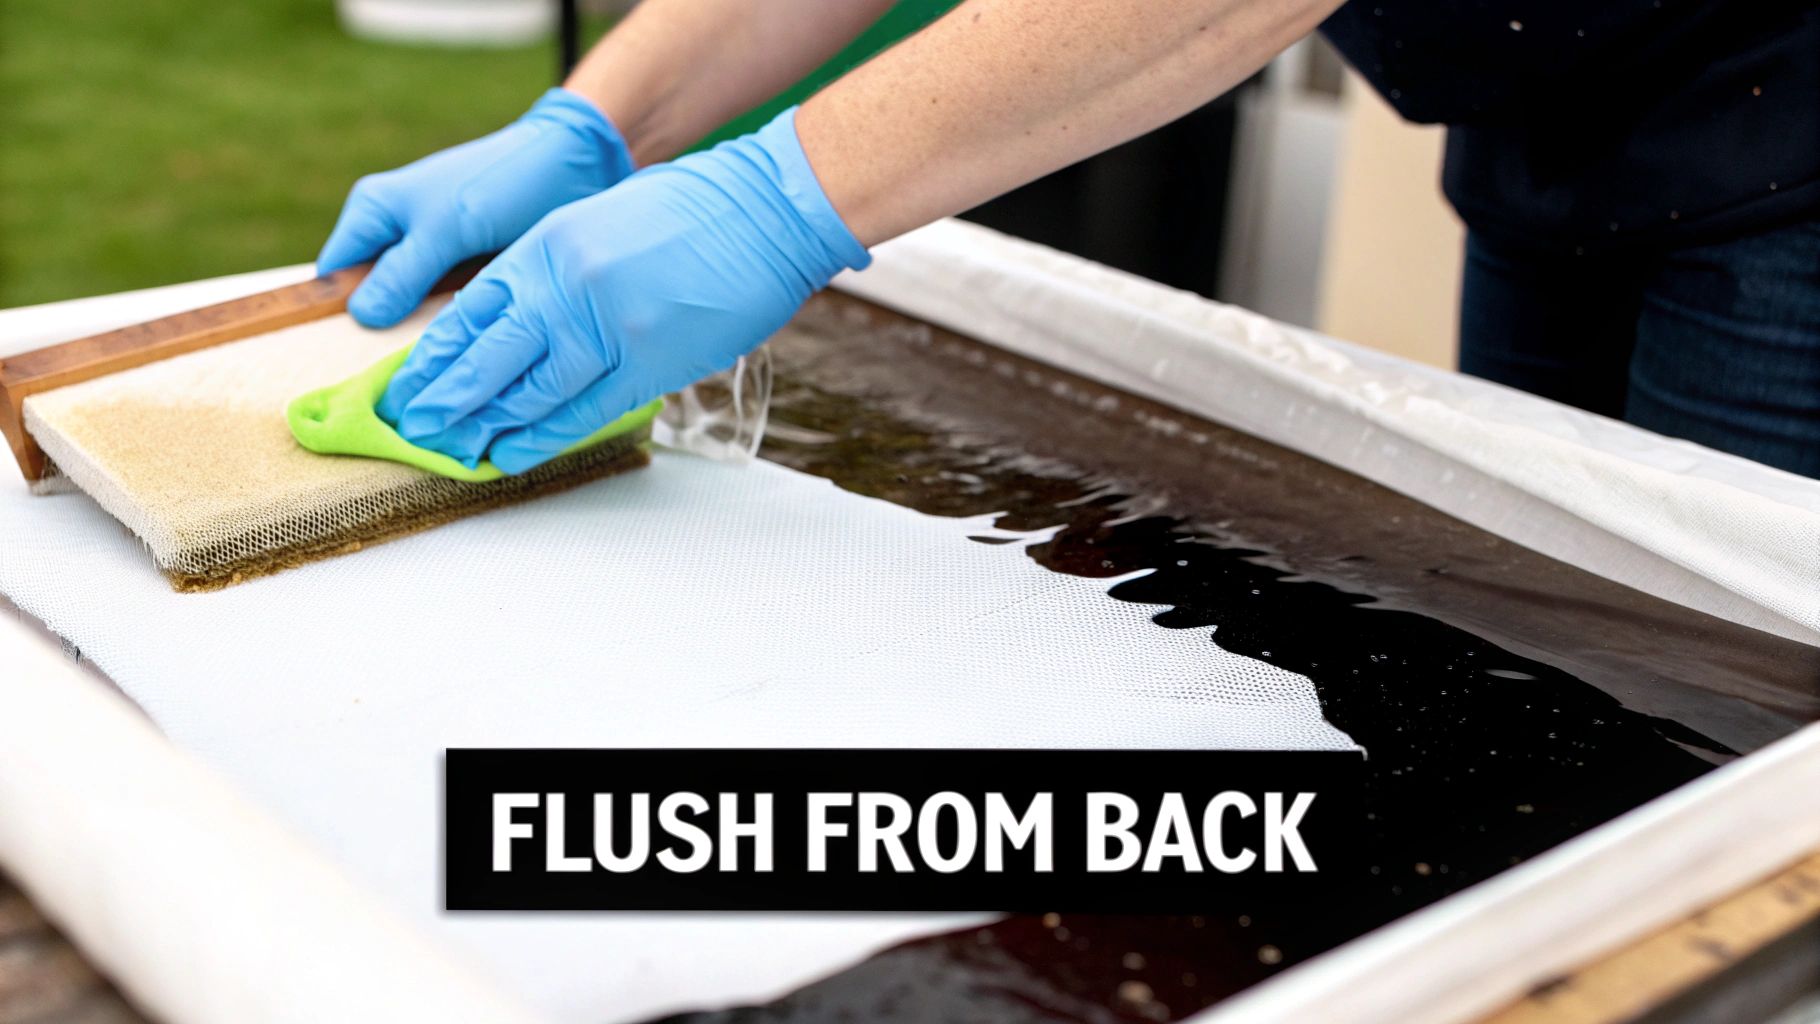
Once you've scraped away the excess paint, your next move is a game-changer. Turn the piece of clothing inside out and hold the stained area under cold running water.
Rinsing from the back of the fabric is key. This pushes the remaining paint particles out of the fibers, instead of driving them deeper in. It’s a simple technique, but it’s incredibly effective.
I’ve seen it a hundred times: the instinct is to panic and scrub with hot water. Resist! That will cook the paint right into the fabric, turning a manageable spill into a permanent plastic mark. Your mantra should be: lift, don't rub; cold, not hot.
In fact, fresh stains that are blotted and then rinsed from the reverse side with cold water within the first 5 minutes have a 90% removal rate, based on countless trials and painter experiences.
For more great easy tips for removing paint from clothing, you'll find the core principles are always the same. By focusing on these initial actions—scraping gently and flushing with cold water from behind—you give yourself the best possible odds of saving your clothes before the paint has a chance to cure. Think of it as first aid for your fabric.
How to Handle Wet Acrylic Paint Stains
When that drip of vibrant acrylic lands on your sleeve, that moment is critical. How you react in the next few minutes determines whether it's a minor cleanup or a permanent, colorful addition to your wardrobe. If you catch it while it's still wet, you're in the best-case scenario—total removal is almost always possible if you use the right technique.
Your first instinct might be to grab a paper towel and start scrubbing. Don't do it. Wiping a wet paint spill usually just grinds the pigment deeper into the fabric's fibers, turning a small blob into a much larger, more stubborn problem. The goal here isn't to wipe, but to lift.
Lifting Excess Paint the Right Way
First things first, get that blob of paint off the surface. A dull-edged tool is your best friend here. Grab a spoon, a butter knife, or even the edge of an old credit card.
Gently scrape the excess paint away from the fabric. Be careful not to press down too hard. You're trying to scoop the paint up and off, not smush it further in. Think of it like trying to get a dollop of frosting off a delicate cake—you want to remove the bulk of the mess without damaging what's underneath. This single step can prevent a small spot from becoming a huge smear.
Flush the Stain from Behind
With the worst of the paint gone, head to a sink. Turn the garment inside out and place the stained area directly under the faucet.
Now, run cold water through the stain from the back of the fabric. This is a non-negotiable step. Hot water can start to "cook" the paint, bonding it to the fibers and making it nearly impossible to remove.
By flushing from behind, you're literally pushing the paint particles back out the way they came in. It's a simple trick, but it's far more effective than rinsing from the front, which can just trap the paint. Keep the water running for a minute or two, or until you see it running clear.
The biggest mistake I see people make is blasting the stain with water from the front. That’s like trying to push a cork into a bottle instead of pulling it out. Flushing from the back pulls the stain away from the fabric, setting you up for success in the next steps.
Create a Simple Pre-Treatment Solution
Now it's time to tackle what’s left. You don't need a fancy, store-bought stain remover for this. A simple and surprisingly powerful solution is probably already in your kitchen.
Mix a few drops of standard dish soap with a little cold water to create a sudsy mix. Dish soap is designed to cut through grease, and it works wonders on the binders in acrylic paint while still being gentle on most fabrics.
Dab a bit of this soapy water directly onto the stain. Using your fingers or a soft brush (an old toothbrush is perfect), gently work the solution into the fabric with a circular motion. You should see the last of the color start to lift away. Once you're satisfied, rinse it thoroughly with more cold water.
Of course, preventing paint splatters in the first place is ideal. This often comes down to good habits, and knowing how to clean paint brushes correctly can stop accidental transfers from your tools to your clothes.
Wash and Air-Dry with Care
After pre-treating the stain, you can toss the garment in the laundry, but with a couple of important tweaks to your usual routine.
Washing Machine Settings
- Water Temperature: Stick with a cold water setting. Heat is your enemy at this stage.
- Cycle: A normal cycle should be fine.
- Detergent: Just use your regular laundry detergent.
Once the wash cycle is finished, here’s the most important part: do not put the clothing in the dryer. The intense heat from a machine dryer will permanently set any faint trace of paint that might be left.
Instead, hang the item up to air-dry, ideally away from direct sun. Once it's completely dry, give the area a close inspection. If the stain is gone, you’re all set. You can wash and dry it normally from now on. If you can still see a faint spot, simply repeat the pre-treatment and washing steps. Just be sure to avoid heat until you're certain the stain is 100% gone.
Conquering Stubborn Dried Acrylic Paint
We’ve all been there. You find a dried, crusty splotch of acrylic paint on your favorite jeans and your heart sinks. Unlike a fresh spill where water is your best friend, a dried stain is a whole different beast—it's essentially a thin layer of plastic bonded to the fabric.
At this point, water won’t make a dent. You need to bring in the big guns: solvents. The goal is to break down that hardened polymer without wrecking the fabric itself. Luckily, you probably have what you need in your bathroom cabinet. Simple household items like isopropyl (rubbing) alcohol, alcohol-based hand sanitizer, or even some hairsprays can work wonders. The alcohol is the key ingredient that gets in there and starts dissolving the paint.
Before You Start: The All-Important Spot Test
Hold on a second! Before you douse the stain in solvent, you absolutely must do a quick spot test. Even rubbing alcohol can sometimes lift the dye from certain fabrics, leaving you with a faded patch that’s just as bad as the paint.
Find a hidden spot on the garment, like an inside seam or the hem. Dab a little of your chosen solvent on with a cotton swab and let it sit for a minute. Now, press a clean white cloth against it. If no color from the garment transfers to the cloth, you’re in the clear. This two-minute check can save you a world of hurt.
Applying the Solvent and Breaking Down the Paint
Okay, spot test passed. Now it's time to get to work. Lay your clothing on a flat surface and slip an old towel or a few paper towels underneath the stain. This is crucial for preventing the solvent and paint from bleeding through to the other side.
Grab a clean cloth or cotton ball and saturate it with your solvent. Instead of pouring it right on the stain (which can make it spread), gently dab it onto the dried paint. Be generous here—you want the paint fully soaked so the solvent can do its job.
Don't rush it. The solvent needs time to penetrate and soften that hardened paint. Give it at least five to ten minutes. You should see the edges of the paint start to look softer and maybe even begin to lift.
Dried acrylic paint can harden into a plastic-like polymer in as little as 30 minutes, which is why a solvent-based attack is non-negotiable. It's an old-school trick for a reason: rubbing alcohol has been shown to break down up to 75% of acrylic residue on synthetic fabrics when dabbed on for five to ten minutes and followed by a gentle scrub with soap. For more on this, check out the tips over at plaidonline.com.
Agitating and Lifting the Softened Paint
Once the solvent has had a chance to work its magic, the paint should be much softer. Now, you need to gently persuade it to let go of the fabric fibers. An old toothbrush or a small, soft-bristled brush is perfect for this.
Scrub the stain gently in a circular motion. You should see the paint start to crumble and flake off. If you’re dealing with a really thick glob of paint, you might need to use a dull knife or the edge of a spoon to carefully scrape away the larger loosened bits.
Here's a good rhythm to get into:
- Re-apply solvent to keep the area damp as you work.
- Scrub gently with the toothbrush to work the softened paint out of the fabric’s weave.
- Blot the residue with a clean part of your cloth to lift the dissolved paint and solvent away.
Keep repeating this process—dabbing, scrubbing, and blotting—until the stain is gone. It takes patience, especially for an old, set-in stain, but this method effectively turns that plastic-like patch back into something your washing machine can handle.
Treating your clothes with this kind of care is just as important as protecting a finished piece of art. Speaking of which, if you’re an artist, you might find our guide on how to seal acrylic paint on canvas useful for preserving your work.
Finally, once you've gotten as much of the paint off as you can, rub a little heavy-duty liquid laundry detergent into the spot. Let it sit for a few minutes, then toss the garment in the wash on a cold cycle. And remember: always air-dry it afterward to make sure the stain is 100% gone before it ever sees the inside of a hot dryer.
Choosing the Right Method for Your Fabric
What works wonders on a pair of old denim jeans can absolutely wreck a silk blouse. When you're trying to figure out how to remove acrylic paint from clothing, the fabric you’re dealing with is your most important guide. If you jump in with the wrong chemical or scrub too hard, you can easily cause more damage than the paint did—think discoloration, thinned fabric, or even a hole.
Before you grab the first solvent you see, take a second to check the garment's tag. This one small step is the key to saving your clothes.
Durable Fabrics Like Cotton and Canvas
Good news if your paint mishap happened on something sturdy. Hearty fabrics like cotton, denim, and canvas are tough and can handle a bit more elbow grease and stronger solvents, which is exactly what you need for stubborn, dried-on paint.
For these tougher materials, you can usually reach for things like:
- Isopropyl (rubbing) alcohol: This is my go-to for breaking down the tough polymer bonds in dried acrylic. It’s incredibly effective.
- Acetone-based nail polish remover: This works, but proceed with caution. It's a very strong solvent, so you absolutely must do a spot test on an inside seam first.
- Hand sanitizer: It might sound odd, but the high alcohol content makes hand sanitizer a great, easy-to-find option for dissolving paint in a pinch.
With these fabrics, you can use a soft-bristled brush (an old toothbrush is perfect) to gently work the paint out once it starts to soften. The tight weave of cotton or denim can take the scrubbing without fraying.
Working with Synthetics Like Polyester and Rayon
Synthetic fabrics like polyester, nylon, and rayon are everywhere, but they can be a bit tricky. While they're generally durable, some react badly to harsh chemicals. Acetone, for instance, can literally melt certain synthetic fibers, leaving you with a permanent, hardened patch that's worse than the original stain.
Your best bet with synthetics is to start with the mildest option. Rubbing alcohol is often safe, but that spot test is non-negotiable. If you're nervous, try pre-soaking the stain in a mix of warm water, a little dish soap, and a splash of white vinegar before trying to lift the paint.
My rule of thumb is simple: always start with the least aggressive method. You can always move on to something stronger if the first attempt doesn't work. You can't, however, undo the damage from a chemical that was too harsh from the start.
This handy flowchart can help you map out your plan once you’ve confirmed the paint is fully dried.
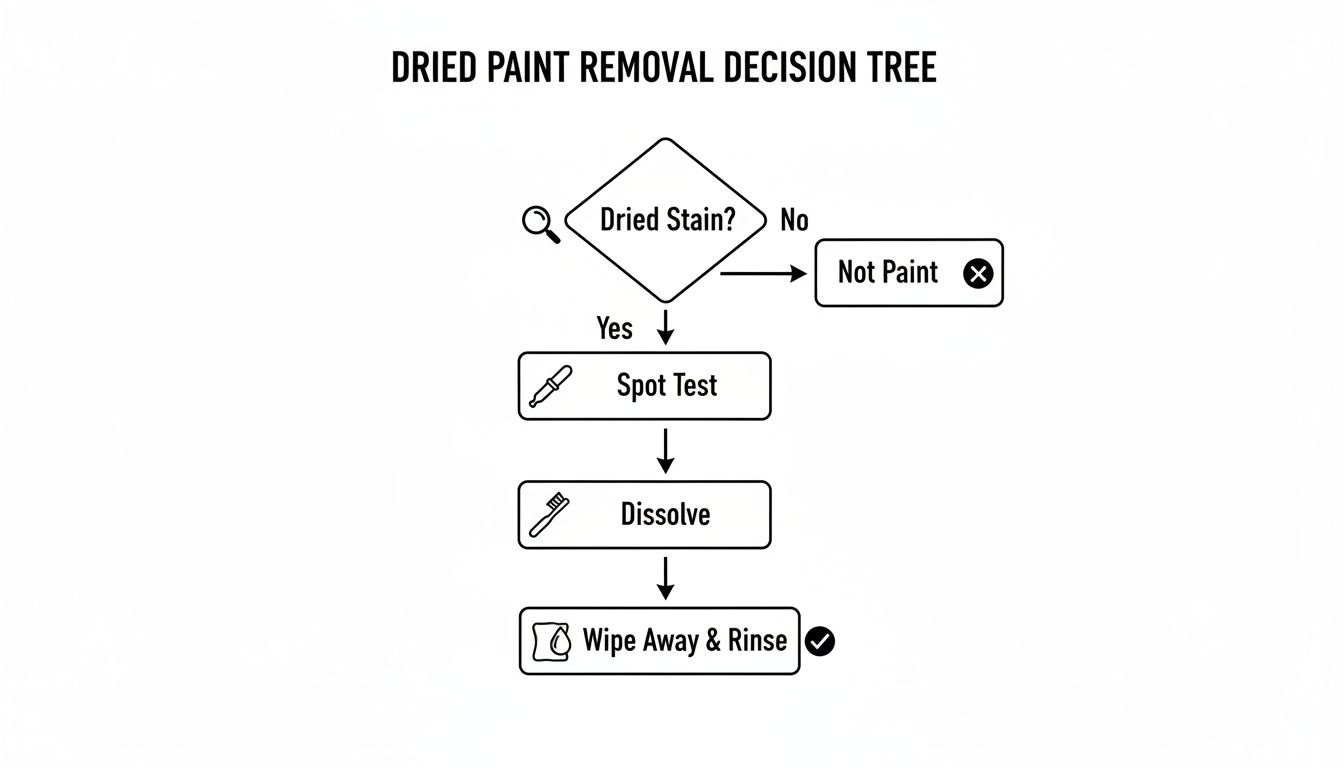
As you can see, no matter what you're working on, the spot test is your critical first move before you try to dissolve anything.
Handling Delicate Fabrics Like Silk and Wool
This is where you need to be extra careful. Materials like silk, wool, and cashmere can be ruined by strong chemicals and even gentle rubbing. For these fabrics, powerful solvents like acetone are completely out of the question.
You need a much gentler touch here. Mix a few drops of a pH-neutral detergent (like a special wool wash) into a bowl of lukewarm water. Dip a clean white cloth into the solution and gently blot the stain. Don't rub or scrub! That will only stretch and damage the delicate fibers. Patience is everything; slow and steady blotting is the only safe way to lift the paint.
The table below provides a quick reference for which solvents are generally safe for different types of fabric.
Safe Stain Removal Methods by Fabric Type
| Fabric Type | Recommended Safe Solvents | Solvents to Avoid | Special Handling Instructions |
|---|---|---|---|
| Cotton & Denim | Isopropyl Alcohol, Mild Detergent, Hand Sanitizer, White Vinegar | Potentially Acetone (Spot Test is Crucial) | Can withstand gentle scrubbing with a soft brush once the paint has softened. |
| Canvas | Isopropyl Alcohol, Hand Sanitizer, Gentle Detergent | Harsh Solvents without testing | Tougher weave allows for more mechanical cleaning, but always check for colorfastness. |
| Polyester & Nylon | Dish Soap & Water, Isopropyl Alcohol (with caution), White Vinegar | Acetone (can melt fibers), Bleach | Always spot test alcohol. Avoid high heat when treating or drying. |
| Rayon | pH-Neutral Detergent, Diluted White Vinegar | Acetone, Alcohol, Ammonia | Very weak when wet. Blot gently; do not twist or wring the fabric. |
| Silk & Wool | pH-Neutral Detergent (Wool Wash), Lukewarm Water | All Solvents (Alcohol, Acetone, Vinegar, Ammonia) | Blot only; never rub. Work from the outside of the stain inward to prevent spreading. |
Remember, this is a general guide. Always defer to your garment's care label and perform a spot test on a hidden area first.
While this guide focuses on clothes, the core principles apply elsewhere. For example, learning how to get paint out of carpet involves the same logic of matching your method to the material. And if you're just getting into painting, preventing messes is the best strategy! Setting yourself up with the right beginner acrylic painting supplies from the start can save you a lot of cleanup later.
When to Call a Professional Dry Cleaner
Look, while most acrylic paint splatters can be tackled with some household supplies and a little elbow grease, it’s crucial to know when to throw in the towel. Sometimes, trying to fix it yourself can do more harm than good, especially with a favorite piece of clothing.
Knowing the difference between a DIY-able stain and a job for the pros can save your garment from a cleaning attempt gone wrong.
When the Fabric Is Too Delicate
Not all fabrics can handle the scrubbing and solvents required for paint removal. If the paint has landed on something expensive or notoriously fussy, take a deep breath and step away from the rubbing alcohol.
You should seriously consider a trip to the dry cleaner for materials like:
- Velvet or Velour: It's incredibly easy to crush or mat the pile on these fabrics. The wrong chemical or too much rubbing can leave a permanent bald or discolored spot.
- Silk or Satin: These delicate weaves are prone to water spots and color bleeding. Solvents like alcohol can weaken the fibers, leading to tears or pulls.
- Cashmere or Fine Wool: Harsh cleaners will strip the natural lanolin from these fibers, making them feel brittle and harsh. Plus, any aggressive rubbing can cause felting—a change you can't undo.
- Leather or Suede: These are in a league of their own. They require specialized cleaning techniques that you simply can't replicate at home.
And if that little tag on the inside says "Dry Clean Only," believe it. It's not a suggestion. Garments with this label are not built to survive at-home stain treatments.
When the Stain Is Too Large or Stubborn
A small drop of paint is one thing, but a massive spill that has soaked through the fabric is a whole different beast. A professional cleaner has the equipment to handle large, saturated areas without leaving rings or faded spots.
It's also time to stop if you've already tried the gentle stuff. If you’ve given it a go with soap and water or a light dabbing of alcohol and the stain isn't budging, don't escalate. Pushing harder or trying stronger chemicals is more likely to grind the pigment deeper into the fibers or damage the fabric itself.
Handing a stained shirt over to a professional isn't giving up. It's a smart move to give your clothes the best shot at a full recovery. They can identify the fabric and paint type to choose a treatment that works without wrecking the garment.
When you take it in, give the cleaner all the details. Be sure to tell them the stain is acrylic paint and explain every method and product you’ve already used. This information is gold—it helps them avoid mixing the wrong chemicals and choose the best strategy right from the start. A little bit of context can dramatically increase the odds of success.
Got Questions? We've Got Answers
Even with a solid plan, getting paint out of clothes can throw you a curveball. Let's tackle some of the questions I hear all the time from fellow artists and DIYers.
Does Hairspray or Hand Sanitizer Actually Get Paint Out?
You bet they can. It sounds like an old wives' tale, but there's real science behind it. The secret ingredient in both is alcohol, which is a fantastic solvent for breaking down dried acrylic paint.
Hairspray became the go-to hack for this exact reason. Just make sure you grab one with a high alcohol content listed in the ingredients. But a word of caution: always test it on an inside seam first. You want to make sure the other stuff in the can doesn't end up bleaching or staining your fabric.
Help! The Paint Stain Went Through the Dryer.
Ah, the dreaded dryer-set stain. This is, without a doubt, the toughest situation you can face. The heat from the dryer basically bakes the paint into the fabric, curing it just like an artist would to make a design permanent.
A heat-set stain is a real challenge, but don't give up on your garment just yet. The key is patience. Think of it less like a quick fix and more like a restoration project that requires repeated, gentle treatments.
Your chances of complete removal are lower, but it's not always a lost cause. You can still try the rubbing alcohol method for dried stains, but be prepared to apply it several times, letting it work its magic each time. Just know that sometimes, a heat-set stain becomes a permanent part of the shirt's story.
Can I Use Vinegar to Remove Acrylic Paint?
Vinegar is a great, gentle option to try first, especially for fresh splatters or stains that haven't fully cured. Its acidity works to loosen the paint's bond with the fabric fibers.
Here’s a simple way to give it a shot:
- Give it a good soak. Pour some white vinegar into a bowl and let the stained part of the clothing sit in it for 15 to 20 minutes.
- Scrub gently. Once the paint has softened up, use an old toothbrush to lightly work at the stain.
- Rinse and wash. After scrubbing, rinse the spot with cool water and toss the item in the washing machine like you normally would.
While vinegar is a lifesaver for more delicate fabrics, it might not have the muscle to tackle an old, rock-hard paint stain. For those stubborn spots, you'll likely need to bring out the big guns, like rubbing alcohol.
Ready to turn your favorite photos into a work of art? At Custom Paint By Numbers, we make it easy to create a personalized masterpiece with our high-quality kits. Start your creative journey today!


