

Turning a rolled-up canvas into a gallery-ready piece of art is one of the most satisfying parts of the creative process. It's that final, hands-on step that proves you can get a truly professional finish right at home. The secret isn't brute force; it's starting with the right tools and a solid plan.
At its core, the process is about stretching your canvas evenly over a wooden frame and stapling it down securely on the back. Get this part right, and your artwork will look incredible for years to come.
Gathering Your Canvas Framing Essentials
Before you even think about stretching that canvas, let's get your toolkit in order. Having everything you need laid out and ready to go makes the job so much smoother. It’s the difference between a frustrating afternoon and a successful project. Think of it like a chef's mise en place—preparation is everything.
The most important piece of the puzzle is the stretcher bar frame. These are the wooden bars that join together to create the rigid skeleton for your art. It’s absolutely critical that the frame is the right size for your canvas, leaving you with enough extra fabric to wrap around the edges and staple to the back. For non-standard artwork, you might need to look into getting the right https://paint-by-number.com/blogs/learn-about-paint-by-numbers/custom-canvas-size to guarantee a perfect fit.
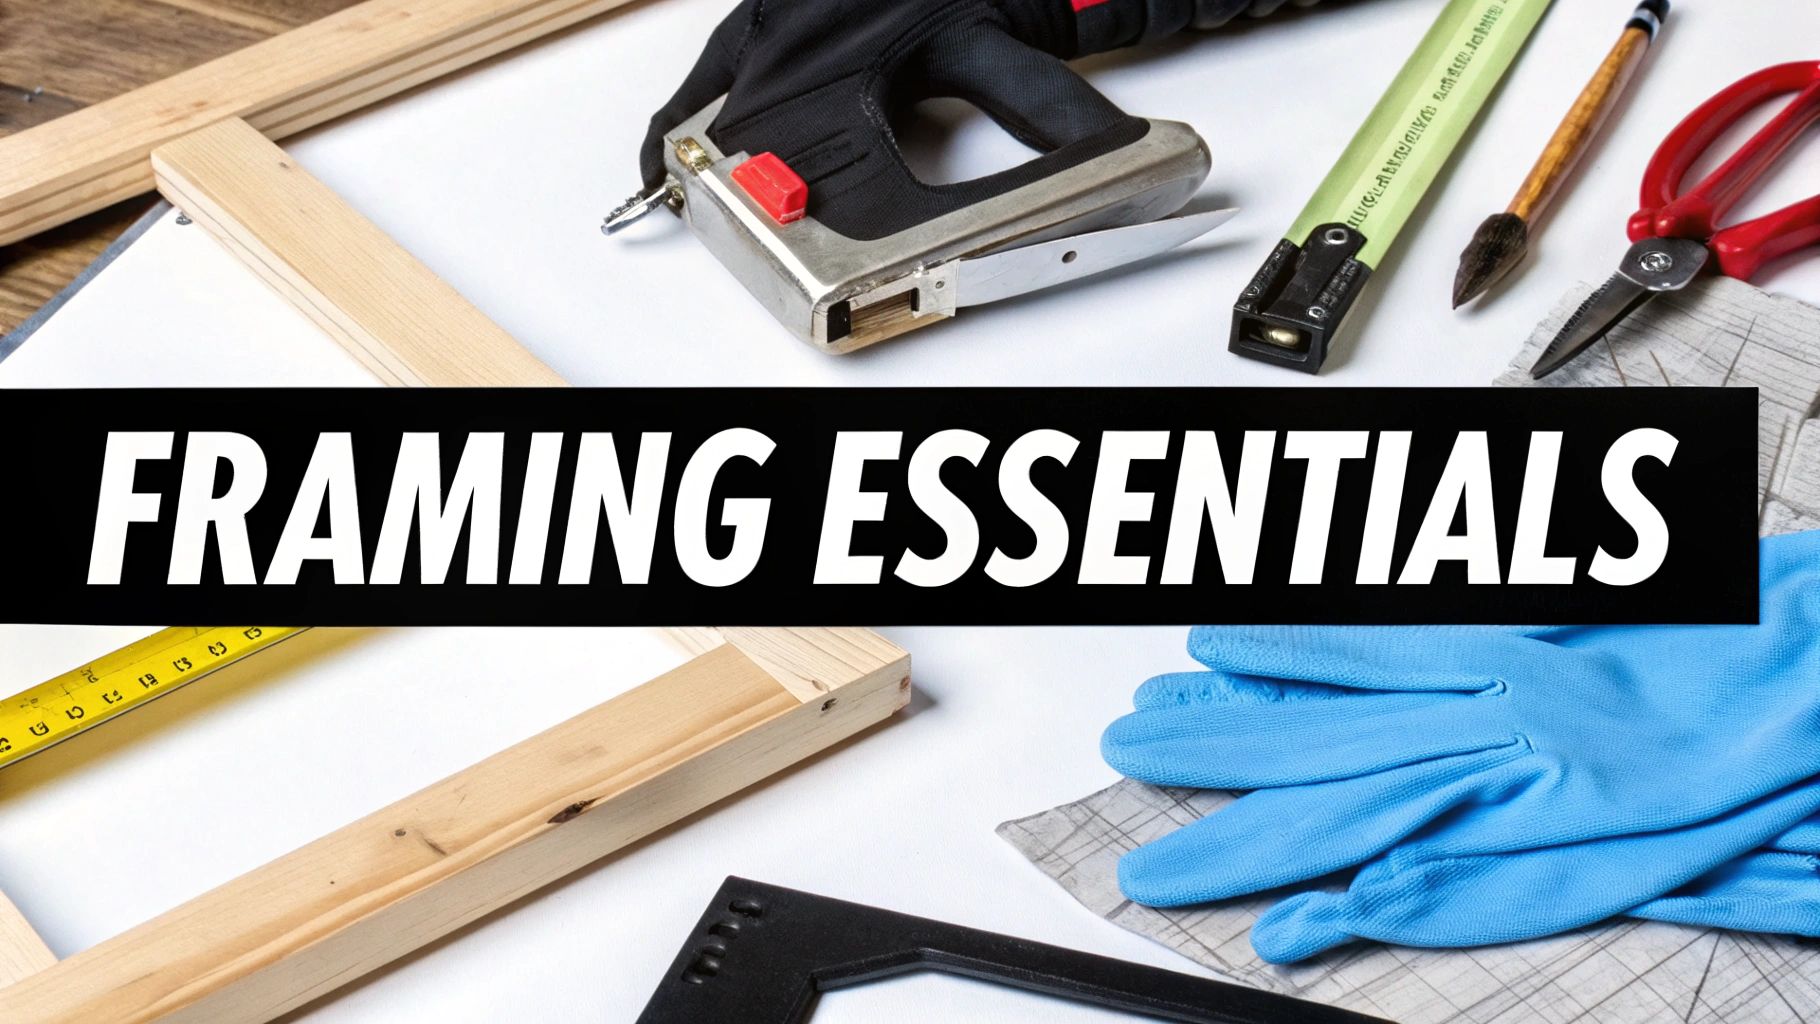
Your Canvas Stretching Toolkit
Here's a quick rundown of the gear you'll want to have on hand. Trust me, gathering these items first will save you a lot of headaches later.
| Item | Why It's Essential | Insider Tip |
|---|---|---|
| Stretcher Bars | This is the wooden skeleton of your artwork. | Always check that the bars are straight and not warped before you start. A wonky frame means a wonky final piece. |
| Heavy-Duty Staple Gun | You need enough power to drive staples firmly into the wood. | An electric model is fantastic, but a good quality manual T50-style staple gun will do the job perfectly. |
| Staples | The fasteners holding your art in place. | Choose a size that won't poke through the front—¼-inch or ⅜-inch staples are usually a safe bet for standard stretcher bars. |
| Canvas Pliers | Gives you the leverage for a super-tight, drum-like stretch. | This is the one tool that separates amateur results from professional ones. The wide, padded jaws grip the canvas without tearing it. |
| Tape Measure & Pencil | For finding and marking the center points for perfect alignment. | Don't eyeball it! Marking your center points on both the canvas and frame is a simple step that prevents crooked results. |
With these tools, you're pretty much set for success. The right equipment does most of the heavy lifting for you.
What Really Makes a Difference
So, what are the absolute must-haves?
- Stretcher Bars: The foundation. Make sure they’re sturdy and square.
- A Good Staple Gun: Don't skimp here. A weak staple gun will just cause frustration.
- The Right Staples: Again, ¼" or ⅜" are your go-to sizes. Too long, and they'll come through the front.
- Canvas Pliers: Seriously, this is a game-changer. While you can stretch a canvas by hand, these specialized pliers give you the grip and leverage to get a truly tight, professional-looking finish that won't sag.
A common mistake I see all the time is underestimating the tension needed. People pull with their hands, and it feels tight at first, but over time, the canvas relaxes and starts to sag. Investing in a pair of canvas pliers is the single best thing you can do to get that pro-level, drum-tight surface.
Once you’ve got your main tools, remember to grab a tape measure and a pencil. Finding and marking the center point on each side of your frame and canvas is the key to keeping your image perfectly aligned.
As you get more into DIY art projects, you might find inspiration for other displays by checking out other creative craft gifts. But for now, with this toolkit assembled, you're all set to create a beautifully finished piece.
Preparing Your Workspace and Canvas
A great stretching job starts long before you pick up a staple gun. Taking a few minutes to set up your space and get the canvas ready will save you from the biggest headaches later—think wrinkles, crooked images, and that dreaded lopsided look. This isn't just about being neat; it's about setting yourself up for a clean, professional finish.
First things first, find a good spot to work. You need a large, flat, and totally clean surface. A big dining table or even a spotless section of the floor will do the trick. I always lay down a protective layer, like an old bedsheet or some kraft paper, especially if the canvas is already painted. You don't want a stray crumb or piece of grit indenting your artwork.
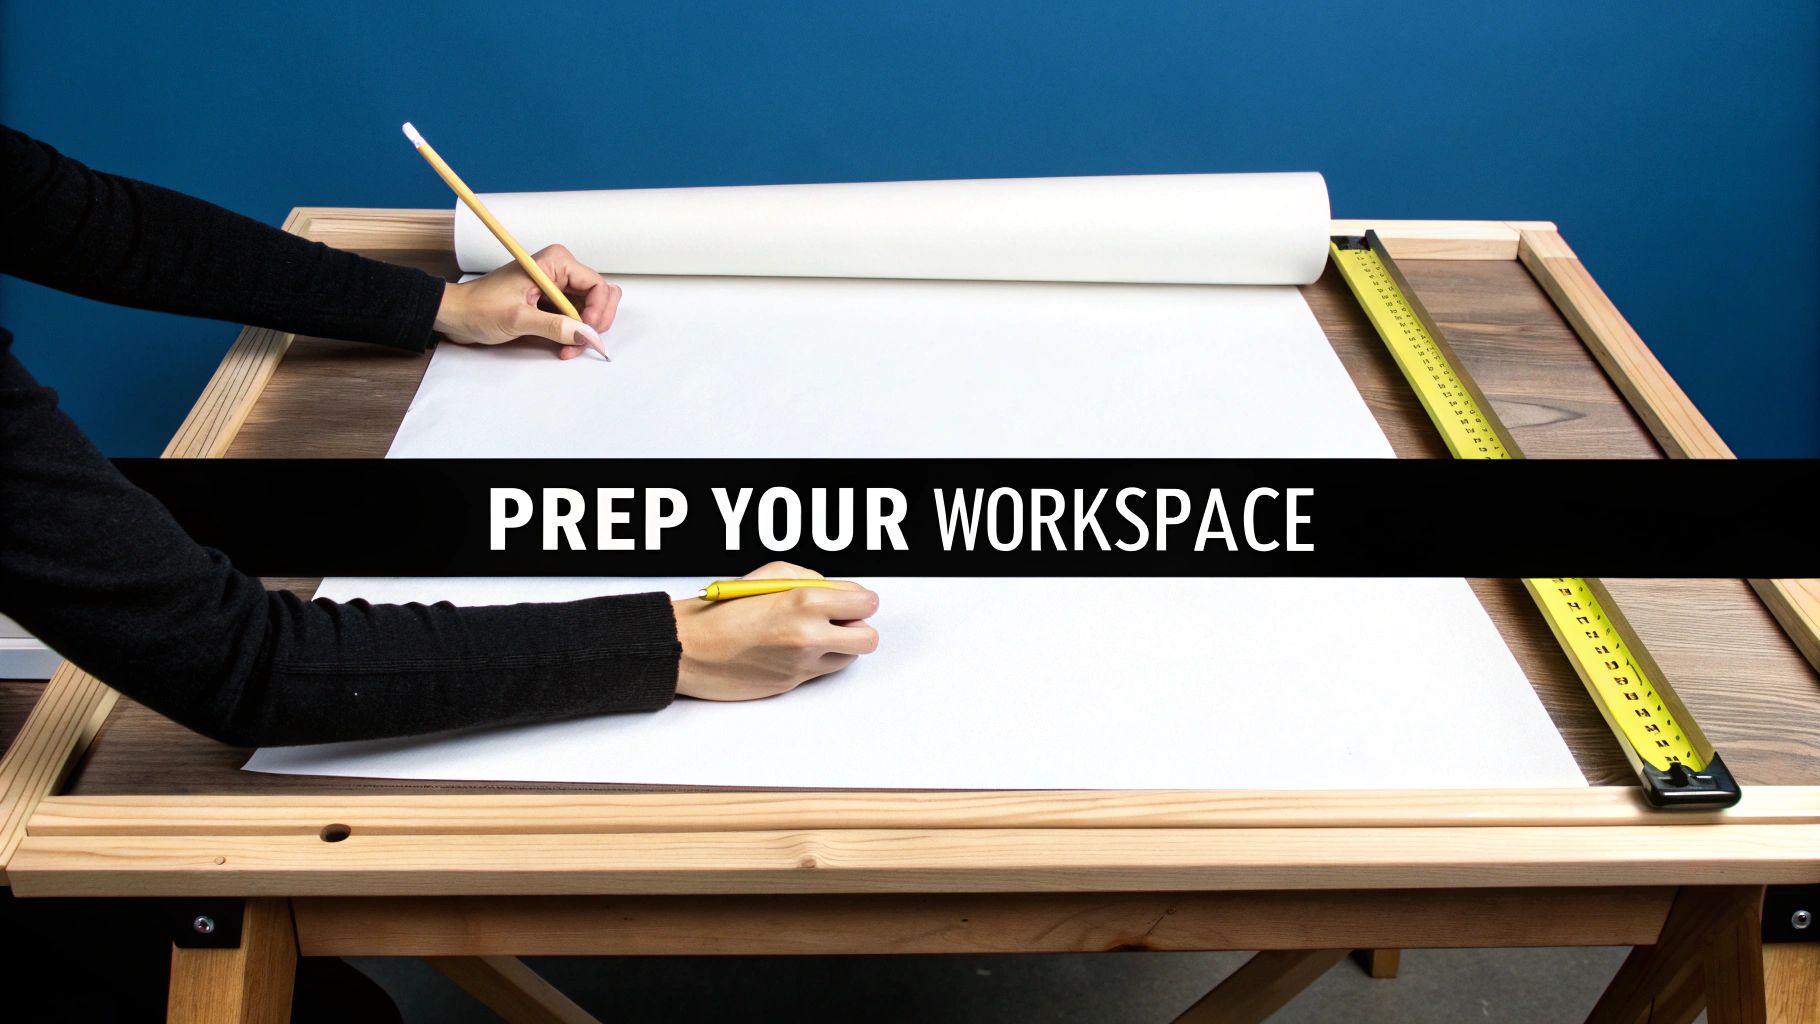
Good lighting is just as crucial. Working in a bright area helps you catch subtle ripples or alignment issues as they happen. It’s far easier to pull out one staple and adjust than to realize the whole thing is off-kilter after you’re finished.
Prepping the Canvas for Stretching
Once your workspace is ready, let's get the canvas itself sorted out. If it’s been rolled up or folded, you'll probably have some creases to deal with. For a blank, unpainted canvas, you can gently iron the back of it. Just use a low-to-medium heat setting and absolutely no steam. Never, ever iron the printed or painted side.
Dealing with a finished paint-by-numbers or custom-printed canvas? There are a couple of extra things to keep in mind:
- Make sure the paint is totally cured. I recommend waiting at least 48 hours for it to dry completely. The last thing you want is to smudge or crack your hard work while stretching it.
- Handle with care. Always lay the artwork face down on your clean, protected surface to avoid any damage.
If there's one step you absolutely cannot skip, it's centering. I've seen more canvases ruined by poor alignment than anything else. Take your time here—it really pays off.
To nail the alignment, you'll need to find and mark the center of all four sides of both the canvas and the stretcher frame.
Start by laying your canvas face down. Grab a ruler and a pencil, measure the full length of one side, and make a small, light mark right at the halfway point. Do this on the excess fabric border, not the artwork itself. Repeat for the other three sides.
Now, do the exact same thing on the back of your wooden frame, marking the center of each of the four stretcher bars.
This simple process gives you eight crucial reference points. When you start stretching, you’ll just line up the mark on the canvas with the corresponding mark on the frame. It’s the easiest way to guarantee your image is perfectly centered and the secret to getting that balanced, gallery-worthy look every single time.
Stretching for a Drum-Tight Finish
This is where the magic happens. We're about to take your flat canvas and turn it into a gallery-ready piece of art. The goal is to get that satisfying, drum-like surface, and the key is to do it systematically. If you just start stapling randomly, you'll end up with frustrating ripples and loose spots. The professional's secret? It's all about working on opposite sides.
This whole process boils down to one simple idea: balance. By working from the center of each stretcher bar outwards and always stapling in opposing pairs, you distribute the tension perfectly. This keeps the canvas from warping and ensures your image stays straight and true.
Nailing the First Four Staples
Lay your frame on top of the canvas, with the back of the canvas facing up. Those center marks you made earlier are about to become your best friends.
-
First Staple: Pick one of the long sides to start. Grab the edge of the canvas and pull it just enough to line up its center mark with the mark on the wood. Pop a single staple right in the middle.
-
Second Staple: Now, go directly to the opposite side. This is where your canvas pliers really shine. Get a firm grip on the canvas edge, using the inside of the frame to get some leverage. Pull until it feels snug and taut, line up the center marks, and fire in your second staple. You’ve just set the main line of tension.
-
Third and Fourth Staples: You've got the hang of it now. Do the exact same thing for the two shorter sides. Pull and staple the center of one side, then move to the opposite side, pull it tight with the pliers, and place your fourth and final anchor staple.
Your canvas should now be held in place by just four staples, one in the middle of each bar. This simple four-point anchor is the foundation that keeps everything centered and straight as you add more staples.
Working From the Center Out
With the canvas anchored, the next step is to work your way from those center staples out toward the corners. You'll keep using the same "opposite pairs" method to maintain that all-important tension balance.
Pick a side and place a staple about two inches away from your center staple. Now, jump over to the opposite stretcher bar. Use your pliers to pull the canvas with the same amount of force and place a staple in the matching spot. Head back to the first side and add another staple two inches on the other side of the center one, then repeat on the opposite bar.
Think of it like you're zipping up the canvas from the middle. You'll continue this back-and-forth pattern—stapling on one side, then its opposite—for all four sides, keeping your staples about two inches apart. Each pair of staples you add pulls the canvas tighter and systematically smooths out any slack. If you're working with a piece you've already painted, you can find more specific advice on how to stretch a painted canvas.
It’s no surprise the DIY art world is booming. It's empowering to take a project from start to finish. In fact, over 75% of DIY painters are now stretching their own canvases, often cutting the cost by 40% compared to having it done professionally. It’s a rewarding task that usually takes an hour or two and makes the artwork feel truly yours. With the paint-by-numbers market expected to reach an incredible USD 2.87 billion by 2033, knowing this skill means your custom pieces will always look their best. You can read more about the digital artwork market on coherentmarketinsights.com.
How to Fold Corners for a Flawless Finish
Once you’ve stapled your way out from the center on all four sides, you'll have a few inches of loose canvas at each corner. This is where the real magic happens. Getting the corners right is what separates a homemade project from a professional-looking piece of art.
The goal is to get those edges looking sharp and clean, without any lumpy fabric bunched up on the back. It's a small detail, but it makes all the difference.
Choosing Your Corner Style
You've got two great options here: the classic gallery fold or a simpler diagonal fold. Which one you pick really just depends on how you plan to display your art.
A gallery fold—sometimes called a "hospital corner"—is the go-to choice if you're hanging the canvas as-is, without an outer frame. This technique tucks the fold away neatly, so the sides of your canvas look completely smooth and professional.
If you know your canvas is going into a decorative or float frame, the simpler diagonal fold is a fantastic shortcut. It’s faster, less fussy, and still keeps the back flat so the canvas sits snugly inside the frame.
A clean corner fold is more than just aesthetics. It ensures the canvas hangs flat against the wall or fits perfectly into a float frame. It's the finishing touch that gives your art that polished, gallery-ready look.
This flowchart breaks down the basic rhythm of stretching your canvas, which is all about building tension methodically as you work your way toward these corners.
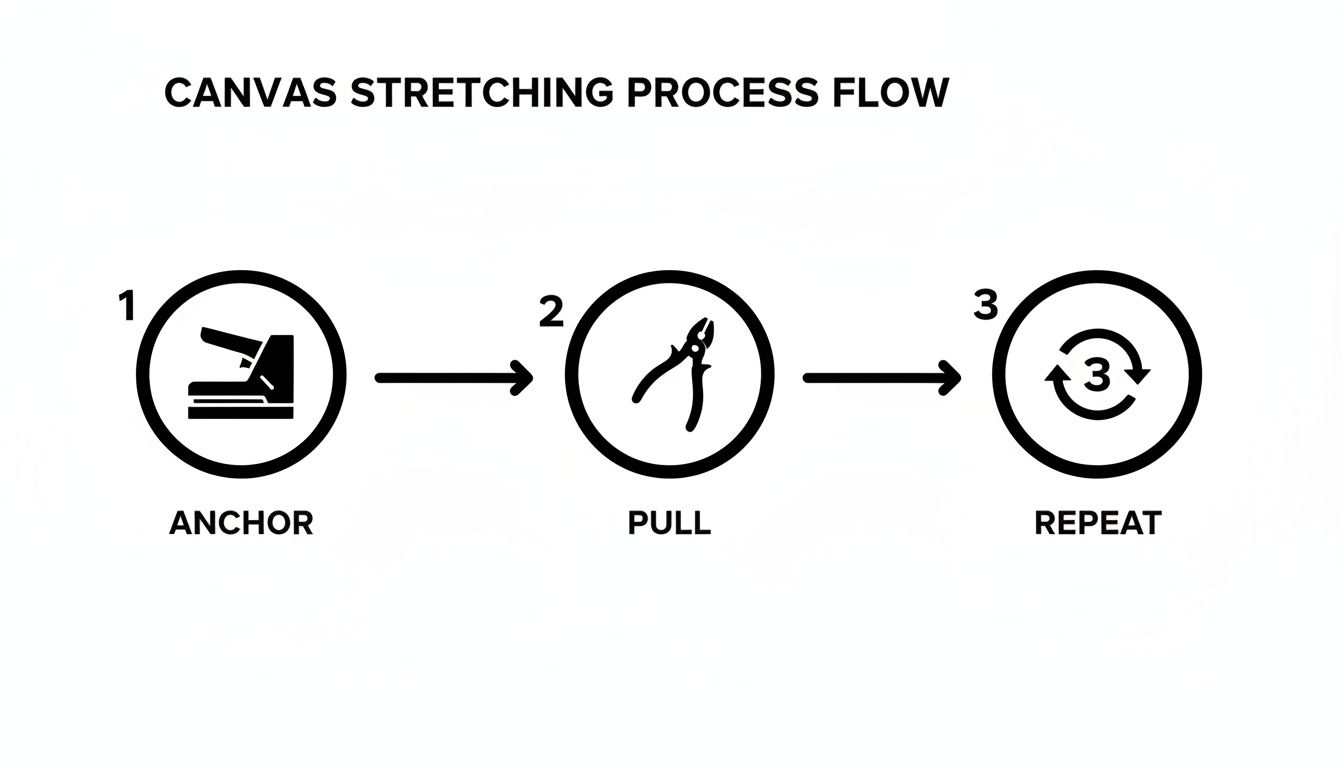
The whole process boils down to that anchor, pull, and repeat method. You're just systematically working that tension from the middle all the way to the corners.
Creating the Perfect Gallery Fold
Alright, let's walk through the gallery fold. Keep stapling along one side until you’re about two inches from the corner—then stop.
- Grab the corner of the canvas fabric and pull it straight out from the frame, creating a 45-degree angle. You'll see two little triangular "wings" of fabric form along the sides.
- Pick one of those wings and fold it down flat against the stretcher bar. This should create a clean, angled crease.
- Now, pull the rest of the corner flap tightly over that first fold. You should be left with a crisp, straight edge along the side of the frame.
- Hold everything down firmly and pop a staple into the back of the frame, getting as close to the corner as you can. I always add a second one just to be safe.
By taking the time to frame your art, you're tapping into a massive trend. The global art paint market hit a value of USD 2.9 billion in 2025. This really highlights why so many people are framing their own work—it turns a fun project into something you'd be proud to hang on your wall.
And with 72% of consumers now buying art supplies online, it's never been easier to get everything you need delivered right to your door. You can find more interesting stats in the full art supplies market report on businessresearchinsights.com.
Putting on the Finishing Touches and Solving Common Problems
You’ve done the hard part—your canvas is stretched tight, and the corners look sharp. Now it’s time for those final details that take your project from a simple DIY to a truly professional-looking piece of art. This is also the perfect time to spot and fix any little issues that might have cropped up along the way.
First things first, let's think about how you'll hang your new masterpiece. Adding the right hardware is a small step that makes a world of difference. For a smaller, lightweight frame, a single sawtooth hanger is usually all you need. Just tap it into the center of the top stretcher bar, and you're good to go.
If you’re working with a larger or heavier canvas, you’ll want something a bit more robust. The standard approach is to use two D-rings. Screw one into each of the vertical bars, placing them about a third of the way down from the top. Then, just string a piece of picture wire between them.
A dust cover on the back is another excellent touch that really says "finished." Simply cut a sheet of kraft paper to fit the back of the frame and glue or tape it down. This not only looks clean and professional but also protects the back of your canvas from dust and moisture.
Troubleshooting Common Canvas Stretching Issues
Even when you're incredibly careful, things can still go slightly wrong. Don’t panic. Most common stretching problems are surprisingly easy to fix, as long as you catch them before the artwork goes up on the wall.
Here’s a quick guide to solving the most frequent problems you might encounter while framing.
| The Problem | What Might Be Wrong | The Quick Fix |
|---|---|---|
| Slight Sagging | Canvas has lost a bit of tension after stapling. | Lightly mist the back of the canvas with clean water. As it dries, the fibers will shrink and tighten up. |
| Visible Ripples/Waves | The tension is uneven across one or more sides. | Find the loose area, carefully remove a few staples, and use your pliers to pull that section taut before re-stapling. |
| Skewed Image | You pulled one side much harder than the others, distorting the image. | You'll likely need to remove all the staples and start over, focusing on balanced, even tension. |
| Staples Showing | Staples were placed on the side of the frame instead of the back. | This is an aesthetic choice, but for a gallery wrap, always staple on the back of the stretcher bars. |
Tackling these issues right away saves you a lot of headaches later. A few minutes of adjustment now ensures your art will hang perfectly for years to come.
A Framer's Secret: Never ignore the small stuff. A minor ripple or a slightly loose corner is simple to fix right after you’ve stretched the canvas. If you leave it, it will only get worse over time.
Protecting Your Finished Artwork
With your canvas stretched perfectly, there’s one last crucial step: protecting the paint itself. This is especially important for acrylics, like those in paint-by-number kits, which can be vulnerable to dust and fading from UV light.
Applying a good-quality varnish or sealer does two things: it shields the paint and can also make the colors pop with added depth and richness. To get the best results, you'll want to explore a detailed guide on how to seal acrylic paint on canvas.
This final protective layer is what truly brings your project to a close, ensuring your hard work stays vibrant and beautiful.
The global paint-by-numbers kit market is on track to hit USD 2.87 billion by 2033, which shows just how many people are getting into this rewarding hobby. DIY artists often find that a properly stretched and finished canvas can increase the perceived value of their work by 25-30% when displayed at home. Taking these last steps makes your project look like it belongs in that booming market.
Once your masterpiece is framed and ready, you can explore other creative ways to display your achievements, turning your finished art and other memorabilia into a stunning home gallery.
Canvas Stretching FAQ: Your Questions Answered
Even with the best guide, a few questions always pop up when you're about to stretch a canvas for the first time. Let’s tackle some of the most common ones I hear from artists and DIYers to clear things up before you dive in.
Can I Stretch a Canvas After It's Painted?
This is probably the most frequent question, and the answer is a definite yes! In fact, that's exactly how it's done for custom paint-by-numbers and many original pieces. The crucial thing is patience.
You absolutely must let the paint cure completely. For acrylics, I recommend waiting at least 48 hours after your last brushstroke. If you jump the gun, you risk cracking or smudging your beautiful work.
When you're ready, just be gentle. I always lay a clean, soft cloth (an old t-shirt works great) over the painted surface to protect it from smudges and pressure while I'm flipping it around. The actual stretching technique doesn't change—just pull evenly and firmly, but don't try to hulk-out on any one spot.
A gallery wrap is a framing style where the canvas wraps all the way around the stretcher bars and gets stapled to the back. It gives the art a clean, modern, three-dimensional look that’s ready to hang as-is, no decorative frame needed.
The big difference is that a gallery wrap needs more canvas to work with. You’ll need an extra margin of at least 2-3 inches of blank canvas on every side. This extra material is what you'll be pulling around the frame to cover the sides and secure it out of sight on the back.
How Do I Get Rid of Wrinkles and Creases?
Got a canvas that’s been rolled up or folded? Don't worry, those creases can usually be ironed out, but you have to be careful.
Lay the canvas face-down on a clean, flat surface. Set your iron to a low or medium heat setting with zero steam. The steam can damage the gesso or the canvas itself.
Gently press the back of the canvas, and keep the iron moving. Never let it sit in one spot. And whatever you do, never, ever iron the painted or printed side. The direct heat will ruin the art. If you have a really stubborn crease, you can try a very light mist of water on the back before ironing, but make sure it’s bone dry before you start stretching.
Are Canvas Pliers a Must-Have?
Look, can you stretch a canvas with just your hands? Technically, yes. Should you? Probably not if you want a great result.
Canvas pliers are one of those tools that make a world of difference. Their wide, padded jaws let you get a death grip on the canvas without tearing it. But the real magic is the leverage. That little bump on the bottom jaw acts as a fulcrum against the frame, letting you pull the canvas tighter than you ever could by hand.
This is what gives you that taut, drum-like surface that stays tight and won't sag over the years. If you think you'll be stretching more than one or two canvases in your life, they are an investment you won't regret.
Ready to turn your favorite photo into a masterpiece? At Custom Paint By Numbers, we make it easy to create a personalized kit complete with a high-quality canvas, paints, brushes, and an optional DIY frame. Start your artistic journey today by visiting https://paint-by-number.com.


