

Your camera roll is likely filled with precious moments, from sun-drenched vacations to candid family smiles. But how many of those memories are hidden away on a hard drive or lost in the endless digital scroll? It's time to bring your favorite photos into the light and make them a central part of your home. While traditional frames certainly have their place, true personalization comes from thinking beyond the standard 4x6 print. This guide explores nine creative ways to display photos, transforming your cherished images from simple snapshots into stunning home decor.
We will move beyond generic advice to provide actionable steps, fresh ideas, and practical tips that will help you curate a space that is uniquely yours. Whether you are a dedicated DIY enthusiast, prefer a modern and minimalist solution, or are looking for a project the whole family can enjoy, these methods will inspire you to turn your walls into a compelling visual story. A thoughtful photo display does more than just fill a blank wall; it infuses your home with personality and warmth. To learn more about how thoughtful displays can transform your living space, explore broader interior design concepts. Let’s get started.
1. The Curated Classic: Mastering Gallery Wall Arrangements
A well-executed gallery wall transforms a collection of individual pictures into a single, stunning piece of art. It’s a visual narrative that expresses your personality, turning a blank wall into a dynamic focal point. By mixing different frame sizes, styles, and orientations, you can create one of the most classic and creative ways to display photos. The secret is strategic planning, ensuring the final result is a cohesive masterpiece, not a cluttered mess.
Planning Your Perfect Layout
The best gallery walls, like those curated by designers like Joanna Gaines or Emily Henderson, start with a plan. Don't reach for the hammer just yet. First, lay your frames out on the floor to visualize the arrangement. A great pro-tip is to create paper templates of each frame and tape them to the wall. This allows you to experiment with different layouts without making unnecessary holes.
Start by placing your largest frame, your "anchor piece," slightly off-center. Then, build the rest of your arrangement around it.
- Anchor First: Position your largest or most important photo to ground the display.
- Maintain Spacing: Keep a consistent distance, typically 2-3 inches, between each frame for a polished, intentional look.
- Use Tools: A level and measuring tape are your best friends for achieving perfectly straight lines and precise spacing.
For a summary of key layout principles, this quick reference guide breaks down the core elements.
These principles provide a framework, whether you prefer a clean, symmetrical grid or a more organic, eclectic collection. By combining these ideas with other DIY home decor projects, you can create a truly personalized space. A gallery wall is more than a photo display; it’s a reflection of your story, beautifully told.
2. Floating Photo Displays
For a truly modern and minimalist aesthetic, floating photo displays offer a sophisticated alternative to traditional frames. This technique creates the illusion that your photographs are levitating just off the wall, producing a clean, gallery-inspired look. By using mounting systems like clear acrylic blocks, invisible wires, or magnetic hangers, the focus remains entirely on the image itself. This approach, often seen in contemporary art galleries and high-end retail spaces like Apple stores, provides one of the most striking creative ways to display photos.
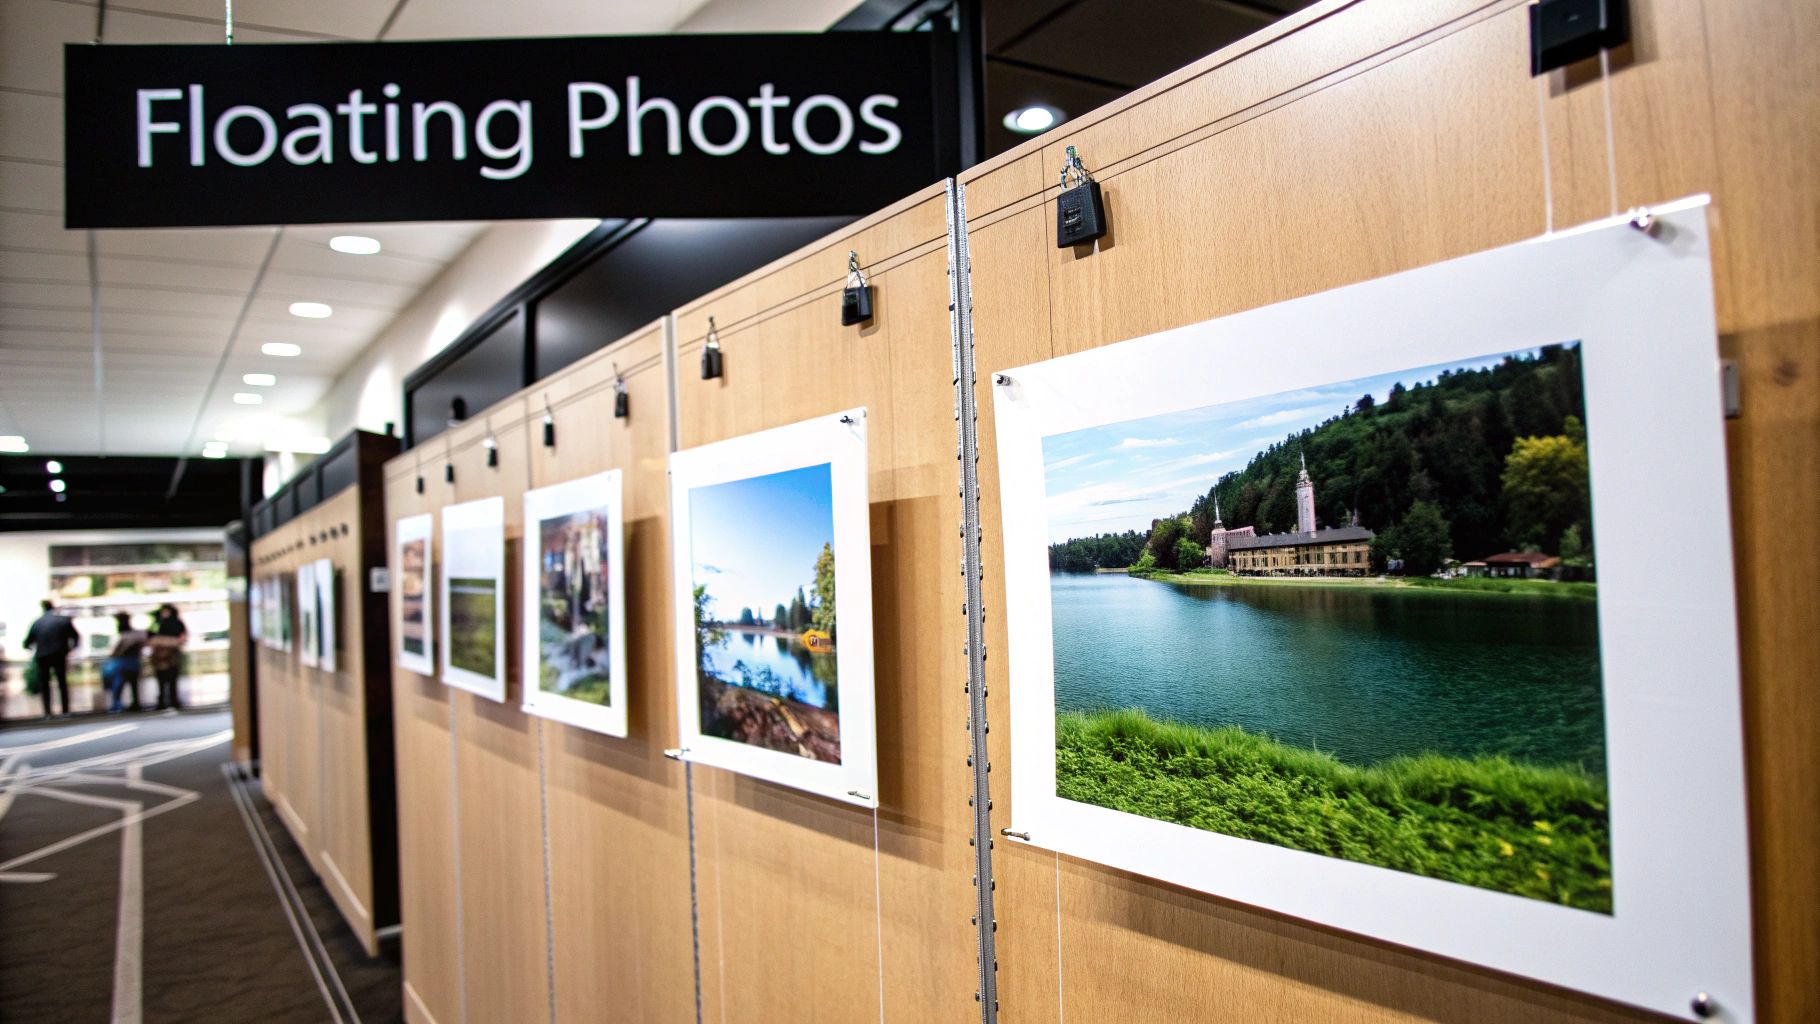
Achieving the Weightless Look
Creating a successful floating display depends on precision and choosing the right materials. The goal is to make the mounting hardware disappear, allowing the photograph to be the undisputed hero. For this method, high-quality, vibrant prints work best, as they have the visual strength to stand on their own without the embellishment of a frame.
Start with a smooth, clean wall surface to ensure the mounting system adheres properly and looks seamless.
- Highlight with Light: Position your display where it can catch light, either natural or artificial. This will create subtle shadows behind the photos, enhancing the floating effect.
- Balance in Numbers: Group photos in odd numbers, like three or five, for a more dynamic and visually pleasing arrangement.
- Test Your Mounts: Before committing your most cherished pictures, test the mounting system with a less valuable print to ensure it holds securely and is easy to install.
This frameless approach directs all attention to the photograph’s color, composition, and emotion. It’s an ideal solution for showcasing professional portraits, breathtaking landscapes, or abstract art, transforming your personal images into high-impact decor. By embracing this clean presentation, you create a display that feels both personal and exceptionally curated.
3. Photo Ledges and Shelving Systems
For those who love to refresh their decor, photo ledges offer a stylish and flexible alternative to traditional wall arrangements. These narrow shelves, popularized by brands like IKEA and Restoration Hardware, provide one of the most creative ways to display photos without the commitment of dozens of nail holes. Their design allows you to layer frames, mix in small decorative objects, and easily swap out pictures to match the season or your mood, creating an ever-evolving personal gallery.
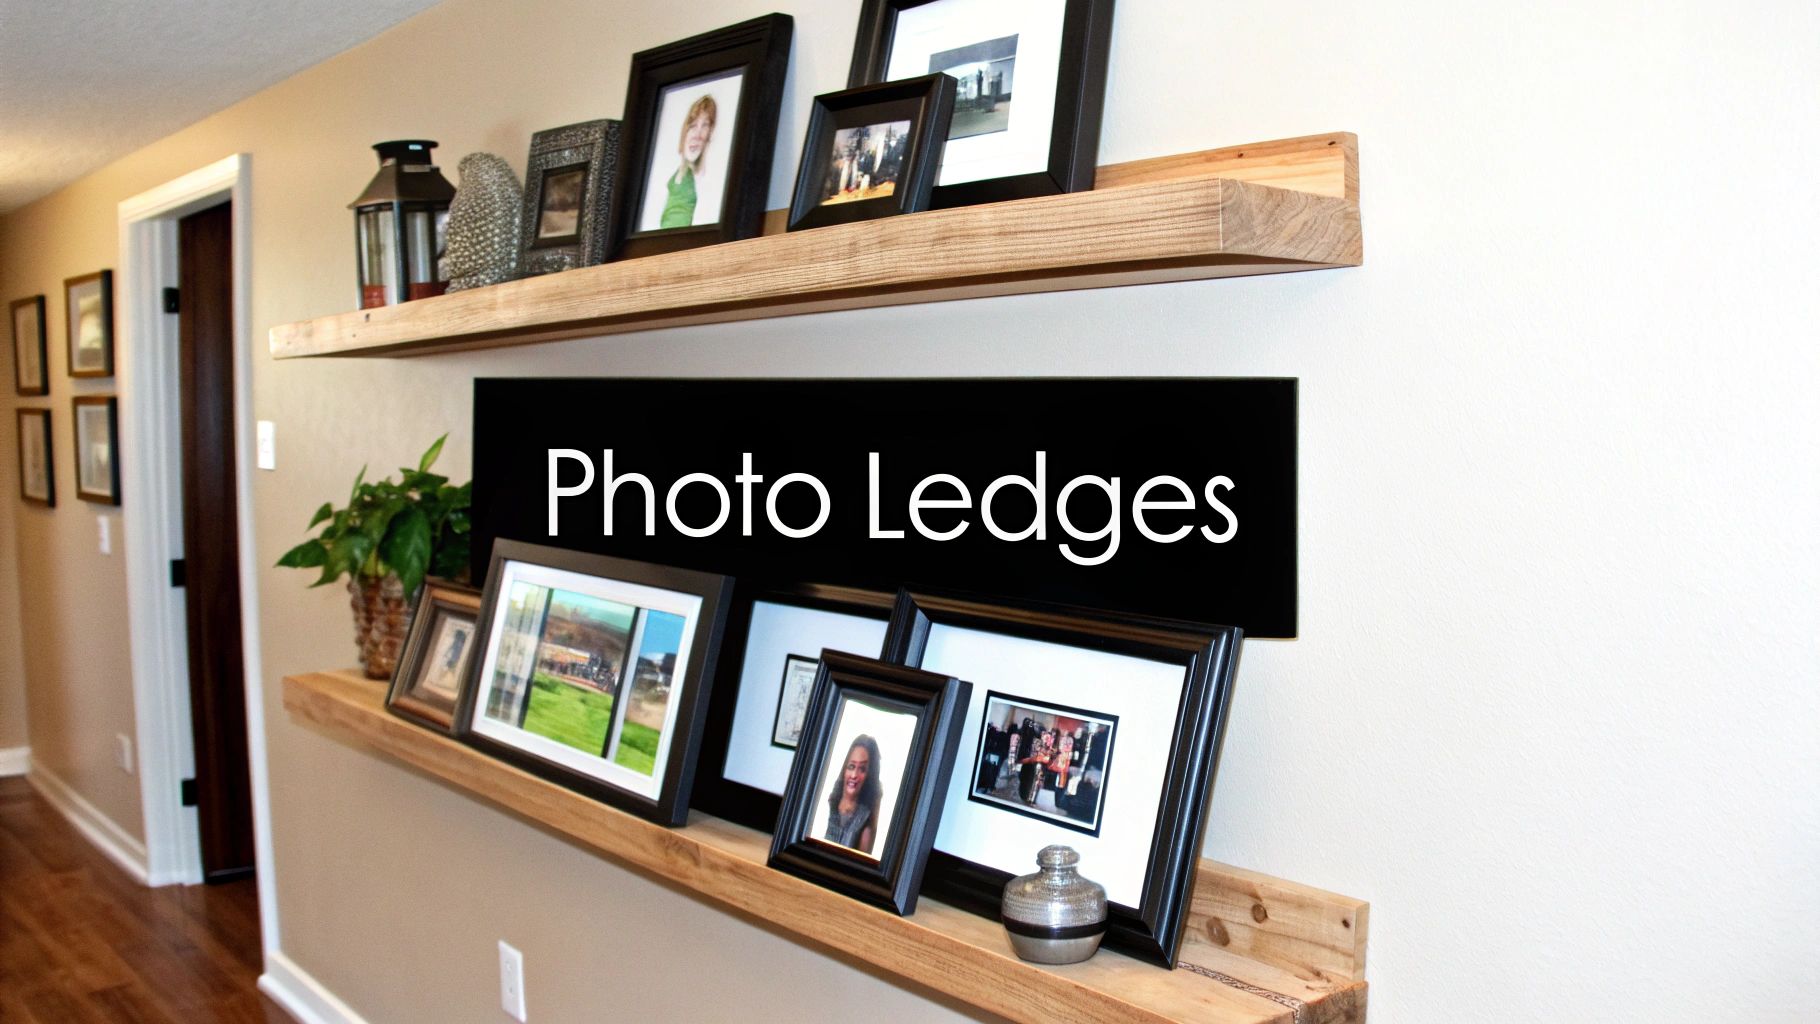
Crafting Your Layered Look
The beauty of a photo ledge system is its simplicity and adaptability. You can achieve a high-end, curated look with minimal effort. Start by installing one or more ledges, then enjoy the freedom of arranging your favorite pieces. The front lip on most picture ledges, like IKEA’s famous MOSSLANDA, ensures your frames stay securely in place.
For a dynamic and balanced display, consider these key strategies.
- Vary Your Heights: Install multiple ledges at different heights to draw the eye upward and add vertical interest.
- Layer with Purpose: Place larger frames at the back and smaller ones in front, overlapping them slightly for depth.
- Mix It Up: Combine photos with small plants, candles, or keepsakes to add personality and texture.
- Leave Breathing Room: Avoid overcrowding the shelves. Leaving some empty space creates a more sophisticated, less cluttered feel.
This method gives you the organized appeal of a gallery wall with unparalleled freedom to experiment. By following these tips, you can transform a plain wall into a sophisticated and easily updateable showcase of your most cherished memories.
4. Photo Mobile and Hanging Installations
Break away from the flat, two-dimensional world of wall art by creating a floating, kinetic display. A photo mobile or hanging installation turns your favorite pictures into a three-dimensional art piece that gently moves with the air currents. This dynamic approach adds an element of whimsical charm and visual interest to a room, making it one of the most uniquely creative ways to display photos, especially in spaces like nurseries, home offices, or cozy reading nooks.
Crafting Your Kinetic Art
The magic of a hanging installation lies in its delicate balance and seemingly weightless appearance. Inspired by the iconic work of artist Alexander Calder and the imaginative displays seen in Anthropologie stores, this method transforms photos into an interactive experience. The key is using lightweight materials and planning the structure to ensure it is both beautiful and stable.
Start with a simple hoop, a natural branch, or a geometric frame as your base. From there, you can suspend your photos at varying lengths.
- Go Invisible: Use clear fishing line or thin metallic thread to create the illusion that your photos are floating in mid-air.
- Balance is Key: Distribute the weight of your photos evenly around the base to prevent tilting. Start with heavier items near the center and work outward.
- Mind the Flow: Consider room traffic patterns when choosing a location. You want the mobile to catch gentle breezes, not get knocked around in a busy hallway.
This method is perfect for showcasing a series of photos from an event or a collection of cherished family moments. By suspending memories in space, a photo mobile brings your story to life in a way that is truly captivating and unexpected.
5. Vintage and Repurposed Frame Displays
Breathing new life into old objects is one of the most creative ways to display photos, adding a layer of history and character to your memories. This approach involves repurposing unconventional items like vintage window panes, antique shutters, or even old ladders to serve as unique frames. The result is a display that’s not just personal but also sustainable and full of rustic charm, turning found treasures into functional art for your home.
Sourcing and Prepping Your Finds
The beauty of this method, often seen in the work of designers like Joanna Gaines, lies in the story behind the repurposed item. Scour flea markets, antique shops, or even your own attic for pieces with potential. An old six-pane window can perfectly frame a series of family portraits, while a rustic wooden ladder can hold a cascading collection of moments. Before displaying your photos, proper preparation is key.
- Clean Thoroughly: Gently clean the item to remove dust and grime, being careful not to damage its aged patina.
- Ensure Safety: Check for splinters, sharp edges, or loose parts. Sand down rough spots and secure any wobbly components.
- Protect Your Photos: Use acid-free backing and adhesives to prevent your pictures from yellowing or getting damaged over time.
- Seal for Longevity: Apply a clear sealant to wood items to protect them from moisture and wear, preserving both the frame and the photo.
This method is perfect for achieving a farmhouse, shabby-chic, or eclectic look. Just as you would carefully consider how to frame canvas paintings, giving thought to the material and condition of your repurposed frame ensures your display is both beautiful and lasting. A vintage display does more than just hold a picture; it becomes a meaningful part of the story you're telling.
6. Digital Photo Frames and Smart Displays
For those with a vast digital library, a digital photo frame or smart display offers a dynamic and modern solution. This method moves beyond static prints, creating a living album that cycles through your favorite memories automatically. It’s one of the most versatile and creative ways to display photos, blending technology seamlessly with home decor. Instead of choosing just one picture, you can enjoy an endless slideshow of moments, from family vacations to everyday snapshots.
Setting Up Your Dynamic Display
The beauty of a digital frame, like those from Aura or smart hubs like the Google Nest Hub, lies in its simplicity and connectivity. Most models allow you to upload photos directly from your phone or cloud storage, making it effortless to keep your display fresh. The key is to curate your digital collection for the best viewing experience, ensuring your memories are shown in the best possible light.
Start by selecting a high-quality frame that complements your room's aesthetic. Then, focus on the content and placement.
- Optimize Photos: Crop or resize your photos to match the frame's aspect ratio to avoid awkward black bars or distortion.
- Consider Placement: Place the frame where it can be seen easily but won't be affected by direct sunlight, which can cause glare on the screen.
- Create Themed Albums: Use scheduling features to display different collections at different times, such as holiday photos in December or birthday pictures during a family member's special month.
These devices offer a fantastic way to keep cherished memories in rotation without the clutter of numerous physical frames. While digital displays are modern, you can balance them with tangible art by exploring how to turn a photo into a painting through custom paint-by-number kits. A smart display is more than a gadget; it’s a constantly evolving window into the moments that matter most.
7. Photo String and Wire Systems
For a display that’s both charmingly casual and effortlessly adaptable, a photo string or wire system is an excellent choice. This method transforms your pictures into a dynamic, linear installation that can be updated in seconds. By hanging photos from a taut string, wire, or cable using clips or clothespins, you create one of the most flexible and creative ways to display photos. It’s perfect for capturing an informal, work-in-progress aesthetic popular in spaces like dorm rooms, studios, and home offices.
Setting Up Your Linear Display
The beauty of a photo string system lies in its simplicity and low cost. You can install one in minutes with minimal tools, making it an ideal DIY project. The key is to ensure the line is properly tensioned to prevent sagging, especially when displaying a large number of prints. This approach is fantastic for showcasing Polaroids, postcards, or prints from an event like a wedding or party, as they can be easily swapped out.
- Secure Your Anchors: Install small hooks, nails, or adhesive clips on the wall at your desired start and end points.
- Tension the Line: Stretch your string, twine, or wire tightly between the two anchor points and secure it firmly.
- Clip and Arrange: Use decorative clothespins, binder clips, or magnetic attachments to hang your photos along the line.
This method allows your photo collection to evolve over time. As you capture new memories, you can simply add them to the line, creating an ever-changing visual diary. It’s a wonderfully personal and interactive way to decorate a room, keeping your favorite moments front and center without the permanence of traditional frames.
8. Shadow Box and Dimensional Displays
A shadow box moves beyond the flat, two-dimensional world of standard frames, transforming your photos into a rich, three-dimensional story. It’s a deep-set frame that allows you to layer pictures with meaningful objects and memorabilia, creating a visual vignette that captures a moment in time. This approach adds depth and context, turning a collection of items into a cohesive and deeply personal exhibit, making it one of the most creative ways to display photos.
Building Your Personal Museum
The magic of a shadow box is in its storytelling ability. It’s not just about a photo; it’s about the tangible memories associated with it. Think of a wedding display combining a photo with dried flowers from the bouquet and a ribbon from the invitation. Or, a travel box featuring snapshots alongside ticket stubs, a seashell, and a foreign coin. The key is curating objects that complement your photos to tell a complete story.
- Plan Your Layout: Arrange all your items, including photos and objects, on a flat surface before you start gluing. This helps you balance the visual weight.
- Create Depth: Use archival mounting foam or small pins to place photos and lighter objects at different depths, enhancing the 3D effect.
- Preserve Your Memories: Always use acid-free paper, tape, and backdrops to protect your photos and memorabilia from yellowing over time.
This method allows you to encapsulate a specific memory, like military service or a family vacation, in a way that a simple frame cannot. It's a contained narrative that honors the objects and photos within, offering a unique and powerful way to revisit your most cherished moments.
9. Photo Wall Murals and Large-Scale Prints
For a truly dramatic and immersive statement, a photo wall mural or large-scale print transforms an image from a simple decoration into an architectural feature. This approach takes one of your most stunning, high-resolution photographs and expands it to cover an entire wall, creating a bold and captivating focal point. It’s one of the most impactful and creative ways to display photos, merging personal memories with high-end interior design. Seen in luxury hotels and designer homes, this method turns your space into a personalized gallery.
Making a Big Impression
The success of a photo mural hinges on image quality and careful planning. A low-resolution photo will appear pixelated and blurry when enlarged, so starting with the highest quality source file is non-negotiable. Professional installation is often recommended to ensure a seamless, bubble-free application, especially for peel-and-stick or traditional wallpaper murals. This technique is perfect for a feature wall in a living room, bedroom, or even a commercial space like a restaurant or office.
- Resolution is Key: Always use an ultra-high-resolution photo to maintain clarity and sharpness when scaled.
- Test a Sample: Before committing, order a smaller sample print to check the colors and detail in your room's specific lighting.
- Consider Composition: Choose an image with a strong composition that works on a grand scale, avoiding overly busy photos that might overwhelm the space.
This method isn’t just about displaying a photo; it's about creating an environment. By thoughtfully selecting an image that complements your decor, such as a serene landscape for a bedroom or a vibrant cityscape for a living area, you can redefine the entire atmosphere of a room. A large-scale print is a powerful storytelling tool that makes a lasting impression.
Creative Photo Display Methods Comparison
| Item | Implementation Complexity 🔄 | Resource Requirements 💡 | Expected Outcomes 📊 | Ideal Use Cases 💡 | Key Advantages ⭐ |
|---|---|---|---|---|---|
| Gallery Wall Arrangements | Medium – requires planning, measuring | Moderate – frames, wall anchors | Strong visual impact, personal vibe | Home decor, personal expression | Customizable, cost-effective, update-friendly |
| Floating Photo Displays | High – precise, careful installation | High – specialized mounting hardware | Sophisticated, minimalist look | Modern interiors, galleries | Contemporary aesthetic, easy image swaps |
| Photo Ledges and Shelving Systems | Low to medium – simple mounting | Moderate – shelves, anchors | Flexible, layered photo displays | Renters, frequent rearrangers | Very flexible, no holes in photos, decor mix |
| Photo Mobile and Hanging Installations | High – complex suspension setup | Moderate – ceiling mounts, light materials | Dynamic, kinetic displays | High ceilings, unique art pieces | Eye-catching, space maximizing |
| Vintage and Repurposed Frame Displays | Medium to high – DIY skills required | Low to moderate – sourced vintage items | Unique, character-filled displays | Sustainability, rustic/vintage style | Eco-friendly, personalized, cost-effective |
| Digital Photo Frames and Smart Displays | Medium – tech setup and connectivity | High – electronic device, power & Wi-Fi | Dynamic, rotating photo shows | Tech-savvy homes, large photo libraries | Unlimited photos, remote control, video display |
| Photo String and Wire Systems | Low – simple, flexible hanging | Low – string, clips, clips | Casual, informal photo presentation | Temporary or informal spaces | Extremely easy to change, cost-effective |
| Shadow Box and Dimensional Displays | High – time-consuming assembly | Moderate – specialty frames, materials | Rich, storytelling layered displays | Memorabilia, keepsakes | Protects photos & objects, museum-quality look |
| Photo Wall Murals and Large-Scale Prints | High – professional printing & installation | High – large prints, special materials | Dramatic, immersive room transformation | Feature walls, commercial spaces | Stunning impact, gallery-like, space-enhancing |
Start Your Photo Display Journey Today
Your most cherished photos are more than just pixels on a screen or prints tucked away in a box. They are vibrant, tangible pieces of your life story, each one a gateway to a precious memory. Throughout this guide, we've explored a diverse range of creative ways to display photos, moving far beyond the conventional single frame on a shelf. From the structured elegance of a gallery wall to the dynamic movement of a hanging mobile, each method offers a unique canvas to showcase the moments that define you.
The true beauty of decorating with photographs lies in its limitless potential for personalization. You have the power to curate a visual narrative that is entirely your own. Whether you're drawn to the minimalist appeal of photo ledges, the rustic charm of repurposed frames, or the high-tech convenience of a digital display, the core principle remains the same: transforming your living space into a deeply personal sanctuary filled with warmth and character.
Key Takeaways for Your Photo Display Project
As you embark on your own project, remember these essential insights:
- Storytelling is Paramount: Don't just hang pictures; tell a story. Group photos by event, color scheme, or emotional theme. A well-curated collection has a much greater impact than a random assortment of images.
- Embrace Asymmetry and Variety: Perfection isn't always the goal. Mixing frame sizes, styles, and orientations can create a more dynamic and visually interesting display. The key is to find a balance that feels intentional, not chaotic.
- Think Beyond the Wall: Your walls are just the beginning. Consider creating dimensional shadow boxes, stringing photos with fairy lights for a whimsical touch, or even designing a large-scale wall mural for a dramatic statement piece. The most memorable displays often break from tradition.
Your Actionable Next Steps
Feeling inspired? The next step is to turn that inspiration into action. Start small to build momentum. Select just three to five of your absolute favorite photographs and choose one of the methods we've discussed that truly excites you. Gather your materials, clear a space, and dedicate an afternoon to bringing your vision to life.
If the technical aspects of creating a perfectly level and secure gallery wall feel overwhelming, don't let that stop you. For complex arrangements or heavy pieces, you can always explore professional picture hanging services to ensure your display is both beautiful and safely installed.
Ultimately, mastering these creative ways to display photos is about more than just home decor. It’s about celebrating your journey, honoring your relationships, and creating an environment that continually reminds you of the joy and love in your life. Your home should be a reflection of you, and there is no better way to achieve that than by surrounding yourself with the moments that matter most.
Ready to turn your favorite photo into a true work of art? With Custom Paint By Numbers, you can transform any picture into a fun, relaxing, and personalized painting project. It’s a uniquely creative way to not only display your memories but to actively engage with them in a brand new way. Start your custom kit today and create a masterpiece that is 100% you.


