

If you've ever thought about painting but felt intimidated by a blank canvas, paint by numbers for adults might be exactly what you're looking for. It’s a wonderfully rewarding hobby that guides you toward creating a beautiful piece of art, no experience necessary.
Everything you need comes right in the box, making it an incredibly accessible and low-stress way to unplug and unwind.
Your Guide to Mindful Painting
The recent boom in paint by numbers isn't just about childhood nostalgia. It’s a modern way for adults to find a bit of calm and step away from their screens. This simple activity has become a fantastic tool for anyone needing to relax and feel a sense of accomplishment.
The real magic is how straightforward it is. Your kit comes with a canvas pre-printed with numbered sections. Each number corresponds to a specific pot of paint. Your job is simple: match the paint to the number and fill in the area. As you patiently work your way across the canvas, a surprisingly complex and beautiful image begins to appear.
What Makes This Hobby So Appealing
The draw of DIY paint by numbers for adults goes way beyond just making a pretty picture. It’s a true exercise in mindfulness. You have to concentrate on the present moment—the feel of the brush, the texture of the paint, the tiny section you’re filling in. This kind of focus can help quiet the constant mental chatter that often feeds stress.
Many people find the methodical process incredibly soothing, much like solving a puzzle or knitting. It offers a structured escape from the pressures of daily life. If this sounds appealing, you might also enjoy finding calm through adult coloring books, which offers a similar creative release.
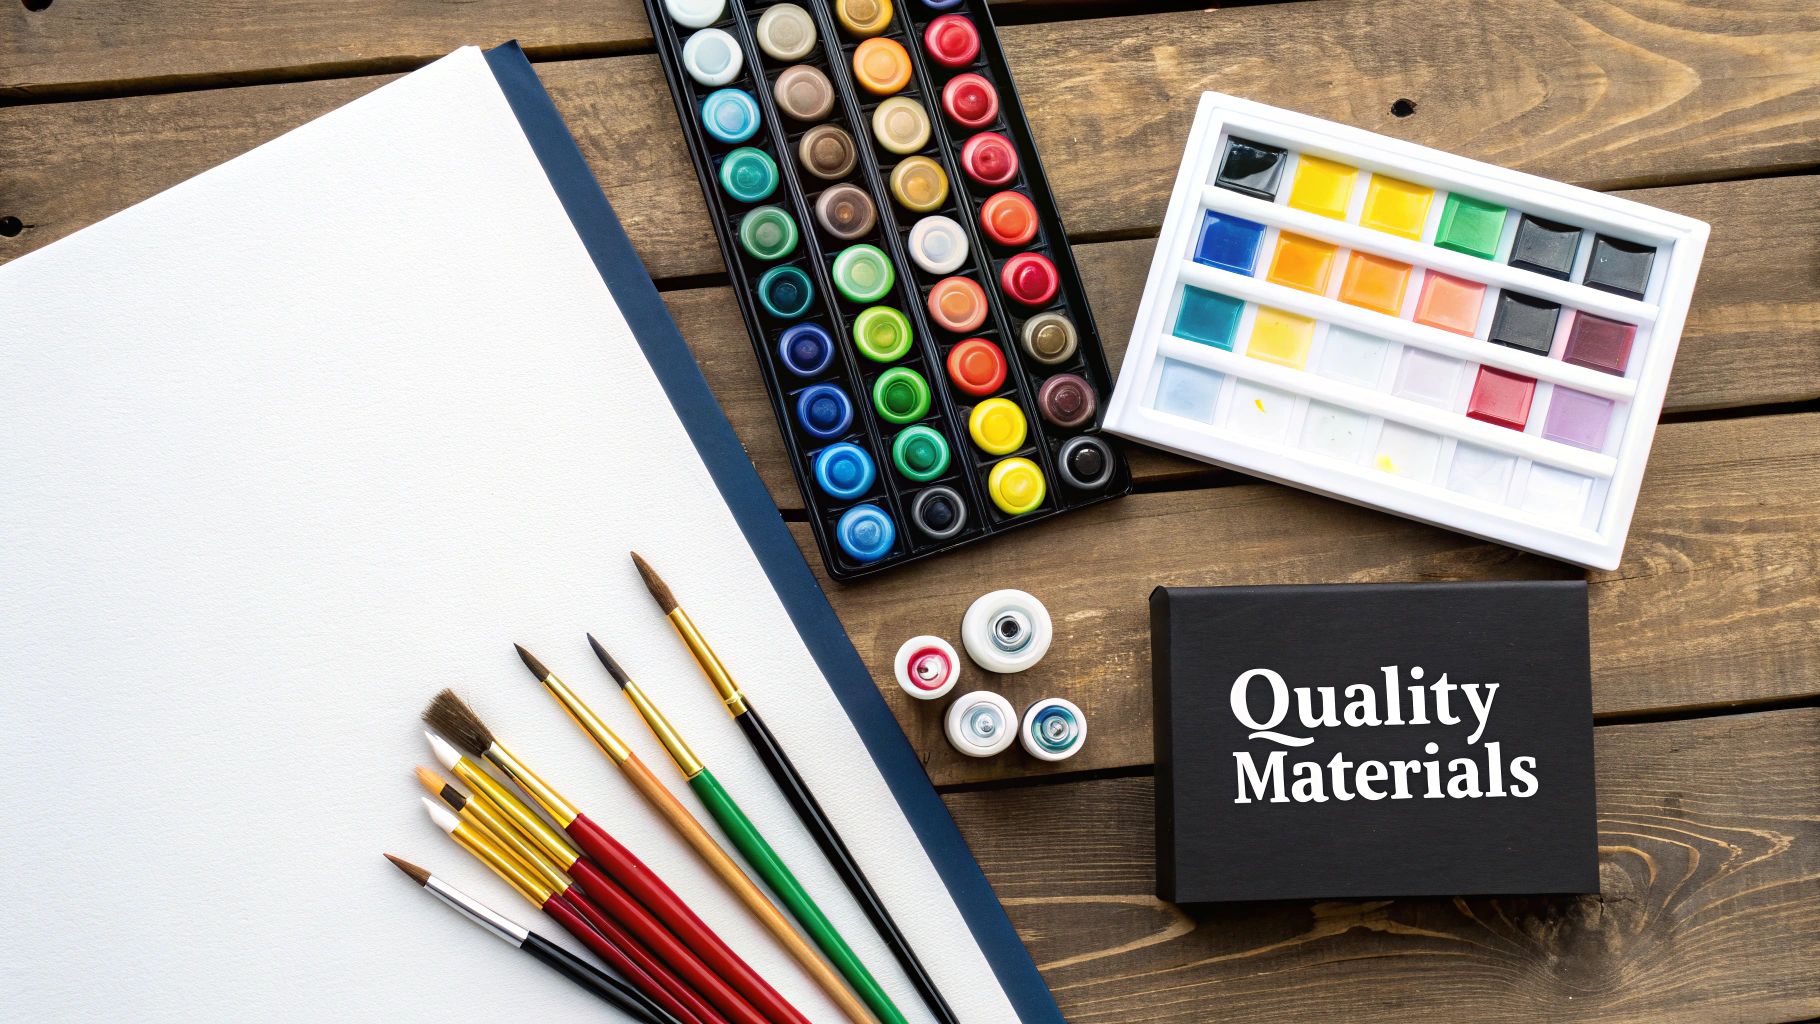
Understanding What's in the Box
When you get your first kit, you’ll notice it’s designed to be an all-in-one experience. That’s a huge part of the appeal—no need to get lost in an art supply store.
Here's a quick look at the typical components you'll find inside.
What to Expect in Your First Paint by Numbers Kit
| Component | What It Is | Pro Tip for Beginners |
|---|---|---|
| Pre-printed Linen Canvas | Your guide to the painting, with all areas numbered. It might be rolled or stretched on a frame. | If it's rolled, lay it flat under some heavy books for a day or two to remove creases before you start. |
| Numbered Acrylic Paints | A set of small pots, each labeled with a number that matches a section on your canvas. | Make sure to close the lids tightly after each use to keep the paint from drying out! |
| Paintbrushes | Usually a small set of 3 brushes with different tips for broad strokes and tiny details. | Use the smallest brush for the most intricate areas. It takes patience but makes a huge difference. |
As you can see, everything is there to help you get started right away. The market for these kits has exploded, and people are definitely paying attention to quality. Customer feedback often points to the importance of good materials. In fact, mentions of a 'wrinkle-free canvas' show up in 42% of positive reviews, which tells you how much a good starting surface matters.
This hobby is less about raw artistic talent and more about enjoying the process. The beauty of DIY paint by numbers for adults is that it guarantees a great result, building your creative confidence one numbered section at a time.
How to Choose the Right Kit for You
Picking out your first DIY paint by numbers for adults kit is half the fun, but it's easy to get a little lost in all the choices. Trust me, not all kits are created equal, and spending a few minutes choosing the right one can make the difference between a relaxing, creative escape and a frustrating chore.
A good place to start is the canvas. You'll usually find two options: a rolled canvas or one that’s already stretched on a wooden frame. The framed ones are great because they're ready to hang the second you finish painting, and they provide a nice, firm surface to work on. A rolled canvas is typically a bit more budget-friendly and gives you the flexibility to frame it however you like later on.
Decoding Image Complexity
The design you pick is probably the single biggest factor in how much you'll enjoy the process. It's so tempting to grab that stunning, super-detailed landscape, but if you're just starting out, biting off more than you can chew can be really discouraging.
So, what makes an image complex? It usually boils down to two things:
- The number of colors: A beginner-friendly kit might have around 24 colors. More advanced ones can jump to 36 or even more, which means more paint pots to keep track of and a lot more brush rinsing.
- The size of the sections: Take a close look at the design. Do you see big, open spaces of color, or is it filled with tons of tiny, numbered slivers? Those tiny sections require a very steady hand and a lot of patience.
My advice? Start with something a bit simpler. It lets you get the hang of the techniques and build up your confidence. Once you've got a feel for it, you can graduate to that epic masterpiece you've been eyeing. For more ideas, check out our guide on the best paint by number kits for every skill level.
The Rise of Custom Kits
Lately, one of the coolest developments in the paint-by-numbers world is the custom kit. You can now take a personal photo you love—a picture of your dog, a wedding photo, that amazing sunset from your last vacation—and turn it into a unique paint-by-numbers canvas. This has really changed the game, turning a fun craft into a genuinely meaningful and personal project.
Pro Tip: If you're going the custom route, pick a photo with good, clear lighting and decent contrast. A sharp, high-quality picture with a clear subject will translate much better onto the canvas. It makes the painting process way smoother and the final piece will look incredible.
Don't Overlook the Materials
Finally, take a peek at the quality of the supplies that come in the box. A good kit will have vibrant, non-toxic acrylic paints with good coverage—nothing’s worse than watery paint that doesn't cover the numbers. The same goes for brushes. Cheap, flimsy brushes that shed bristles all over your masterpiece are just a headache.
Look for a kit that includes at least three different brushes: a small, fine-tipped one for all those tiny details, a medium one for most of the work, and a larger flat brush for filling in the bigger background areas. Quality materials really do make a huge difference, helping you create a polished, professional-looking painting you’ll be proud to show off.
Setting Up Your Painting Space
Before you even think about dipping a brush into that first pot of paint, let's talk about your workspace. Carving out a dedicated, organized spot is the real secret to a relaxing session. Trust me, a little prep work now will save you from a lot of headaches later, making the whole experience smooth, focused, and free of any "oops" moments.
First things first: lighting is everything. Trying to paint in a dimly lit room is a recipe for eye strain, and you’ll struggle to see those tiny numbers and lines. If you can, set up near a window for some nice, natural daylight. Painting at night? No problem. A good desk lamp with a neutral or cool-toned bulb will be your best friend. Just make sure to position it so your hand doesn't cast annoying shadows over the spot you're trying to paint.
This image gives a great overview of those initial steps, starting with how you might pick a design that speaks to you.

It’s a nice reminder that the creative process kicks off way before you start painting—it begins the moment you choose a design you're excited to bring to life.
Preparing Your Canvas and Supplies
Your canvas probably arrived rolled up, which means you're likely staring at some stubborn creases. Whatever you do, don't try to paint over them! Here's an easy fix: lay the canvas flat, place a clean towel over it, and gently iron it on a low to medium setting. The wrinkles will disappear, leaving you with a perfectly smooth surface to work on.
Next, let's get your supplies sorted. I’ve learned a simple but game-changing trick over the years: use two cups of water, not just one.
- Cup One: This is for your first, dirty rinse. It gets the bulk of the old color off your brush.
- Cup Two: Use this for a final, clean rinse. This keeps your colors from getting muddy when you switch, which is key for a crisp-looking painting.
Keep a few paper towels handy, too. They're perfect for dabbing excess water from your brush right before you dip into a new color.
Here's a pro tip: Arrange your paint pots in numerical order. It sounds simple, but it saves a surprising amount of time and keeps you from breaking your focus to hunt for a specific number. You'll stay in that creative flow state much more easily.
Finally, protect your table! Lay down some old newspaper or a plastic tablecloth to catch any stray drips. With a smooth canvas, organized paints, and a protected workspace, you’re all set to dive into the art of painting without a single worry.
Painting Techniques to Make Your Artwork Pop
You’ve got your space set up and the canvas is waiting. Now for the best part of any DIY paint by numbers for adults project: actually painting! The idea is simple—just match the numbers to the paints—but a few simple techniques can really take your work from a basic craft to a piece you’ll be proud to hang on the wall. The way you approach the painting process makes a huge difference, not just in the final look but in how much you enjoy it.
One of the first things to decide is how you'll tackle the canvas. A lot of people, especially when they're starting out, like to paint one color at a time. You just pick a number, fill in every single spot with that number, and then move on to the next one. This gets you into a nice rhythm and means you're not constantly stopping to wash your brushes.
Another popular strategy is the top-down method. If you’re right-handed, start painting in the top-left corner and work your way down and across. If you’re a lefty, start in the top-right. This simple trick is a lifesaver for preventing your hand from accidentally smudging wet paint—something that's incredibly easy to do on a canvas packed with tiny sections.
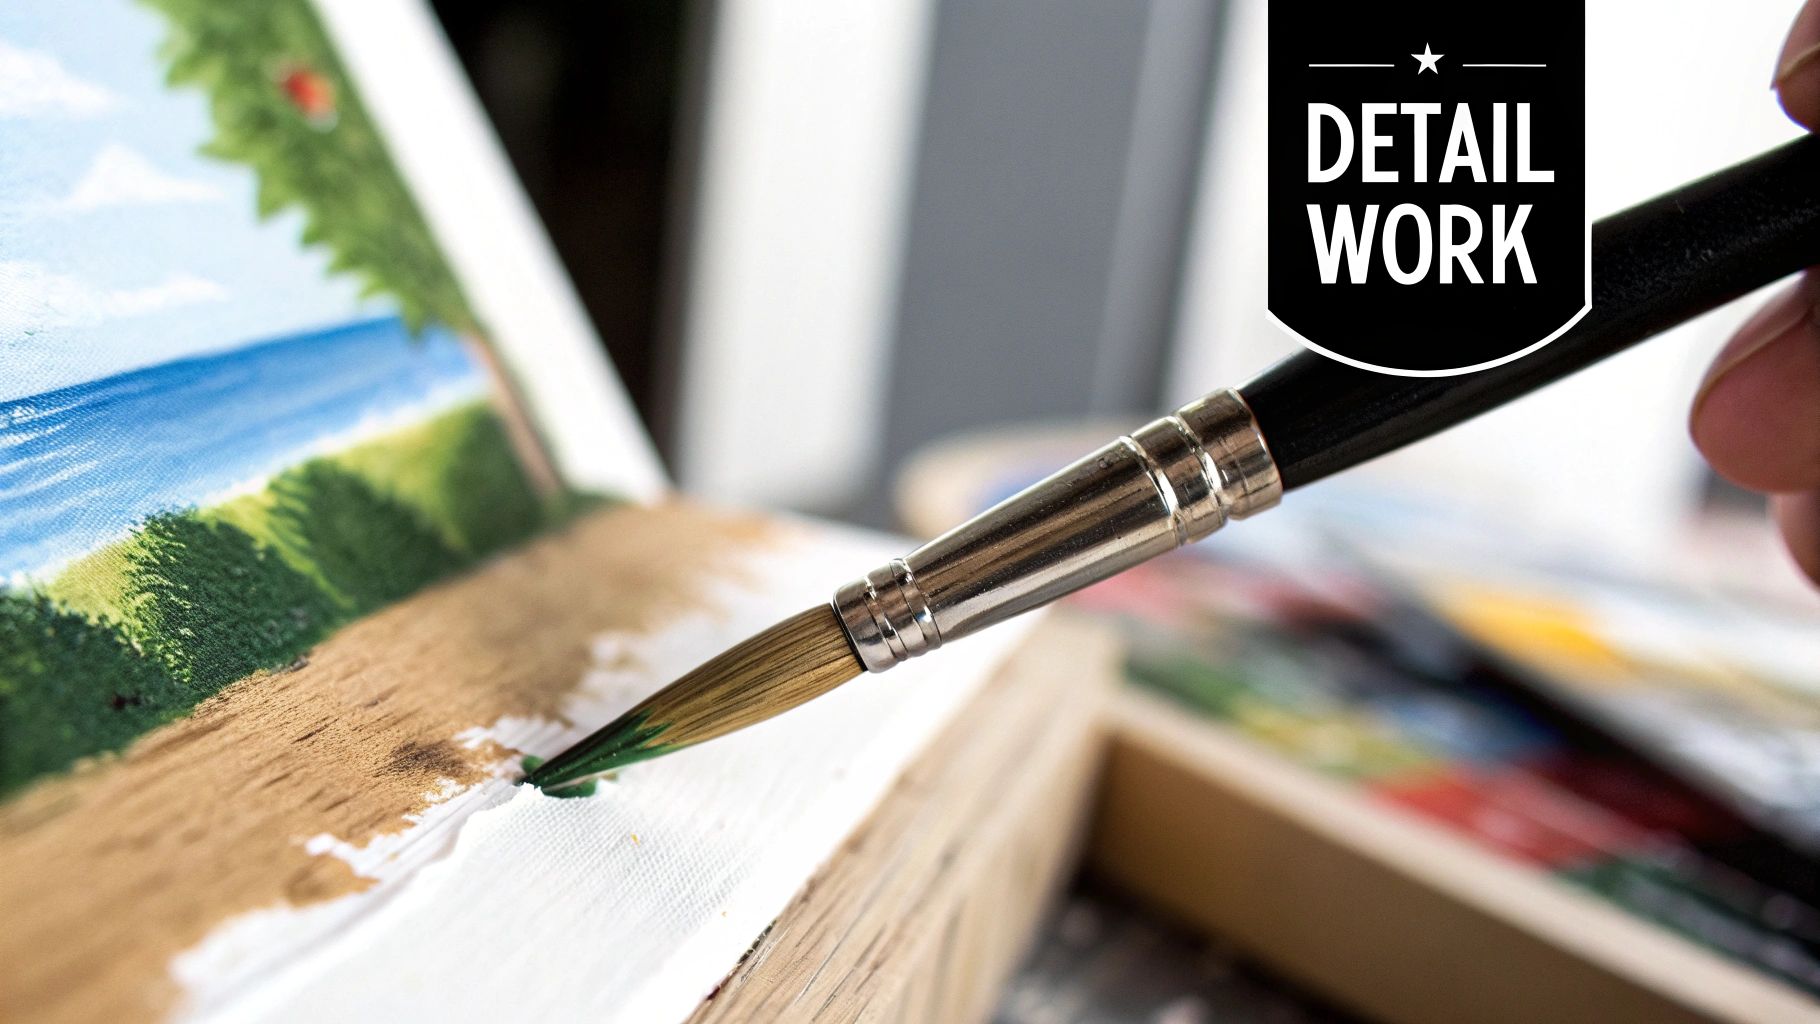
Mastering Clean Lines and Tiny Details
Getting those crisp, clean edges between colors is what really makes a paint-by-numbers piece look polished and professional. It all comes down to a steady hand and using the right brush for the job. Your kit probably included a tiny, fine-tipped brush—that little guy is your best friend for getting into all the super small, detailed spots. Just take your time.
Here are a few tips I've picked up for getting the details just right:
- Bring in a Magnifying Glass: For those ridiculously small areas, a simple magnifying glass or even a pair of reading glasses can be a game-changer. It saves you from squinting and helps you see exactly where the lines are.
- Get a Grip on Your Brush: Hold the brush close to the bristles, almost like you're holding a pencil. This gives you way more control. You can also rest your painting hand on your other hand to keep it from shaking.
- Thin Your Paint (Just a Little): Sometimes a paint pot can be a bit thick or goopy. If that happens, just add a single drop of water and stir it with a toothpick. It'll thin the paint just enough to make it flow smoothly into those tight corners.
The most important thing to remember is that patience beats speed every time. Rushing through the small stuff is a surefire way to get messy lines and feel frustrated. Just embrace the slow, careful process, and you'll love the results.
Try Blending for a Softer, More Realistic Look
Sharp, defined lines are the classic paint-by-numbers look, but what if you want a softer transition between colors? This is perfect for areas like a sunset sky or the surface of the water. The technique is called feathering, and it's easier than it sounds.
To do it, you'll need to work on two neighboring sections while the paint is still wet. Fill in the first color, then quickly paint the section right next to it with its color. Now, take a clean, dry brush and gently sweep it back and forth where the two colors meet. The idea is to blur that hard edge into a soft, subtle gradient. For a closer look at this and other techniques, check out our guide on acrylic painting techniques for beginners.
It's fascinating to see how hobbies like this drive bigger trends. The global art paint market has seen huge growth, mostly because more and more people are getting into DIY crafts. Hobbyists want paints that are vibrant and easy to work with, and the market is responding.
Even though you're following a pre-drawn design, it can be fun to understand why the artist made certain choices. Learning a few essential composition rules can give you a new appreciation for the artwork you're bringing to life, making the whole experience feel more connected and meaningful.
How to Frame and Display Your Art
That final brushstroke is an amazing feeling, isn't it? But before you hang your masterpiece, a few simple finishing touches can turn your DIY paint by numbers for adults project into a piece of art you'll be genuinely proud of.
Once the paint is completely dry—and I mean completely—it's time to seal it. This is a step I see a lot of people skip, but it makes a huge difference. A clear acrylic sealer or varnish protects your hard work from dust, moisture, and fading from UV light, keeping those colors looking fresh for years.
Applying it couldn't be easier. Just grab a soft, wide brush and sweep a thin, even coat over the whole canvas. You can go for a matte finish if you want a subtle, non-reflective look, or a gloss finish to make the colors really pop. Give it a few hours to dry thoroughly.
Choosing the Perfect Frame
Now for the fun part: picking a frame. The right frame is more than just a border; it enhances the painting and helps it feel at home with your decor. What you choose really depends on the look you want and the type of canvas you have.
If your kit came with a rolled canvas, you have a couple of solid options:
- Traditional Frame: This is the most straightforward route. Just find a standard-size frame that fits your canvas, and you're good to go.
- Stretcher Bars: For a more professional, gallery-style look, you can stretch the canvas over wooden stretcher bars. This gives you that classic "wrapped" edge where the painting continues around the sides.
I'm a big fan of the modern, clean look of a floating frame. It creates a small gap between the canvas and the frame, which makes the artwork look like it's floating inside. It's a sophisticated touch that really draws your eye to the painting itself.
Making Your Art Part of Your Home
With your artwork framed and ready, think about where you want it to live. How will the colors in the painting play off your wall color? A bold, vibrant piece can be a fantastic focal point against a neutral wall, while a serene landscape might be the perfect fit for a cozy reading corner.
Don't be afraid to create a gallery wall! I love mixing my own painted pieces with other photos, prints, and art. It’s a great way to tell a visual story and showcase your creative journey.
If you want a more detailed walkthrough of the framing process, check out our complete guide on how to frame canvas paintings for more step-by-step instructions.
Answering Your Paint by Numbers Questions
Even with a hobby as relaxing as paint by numbers, a few questions are bound to come up. It's totally normal. The good news is that most of the common little hiccups have super simple fixes. Knowing them ahead of time can be the difference between a frustrating moment and a smooth, creative flow.
Let's walk through some of the most frequent questions I hear. These tips will help you handle just about anything that comes your way.
What Should I Do if My Paint Is Too Thick or Drying Out?
This is, without a doubt, the number one issue people run into. Those little acrylic paint pots are designed to dry fast, which is great on the canvas but not so great in the pot. Sometimes you'll pop one open and find the paint is more like a thick paste than a creamy liquid.
Don't panic! The fix is surprisingly simple. Because acrylics are water-based, all you need is a little H2O.
Grab a clean toothpick and add one single drop of water to the pot. Stir it in really well, scraping the sides and bottom. If it's still too clumpy, add just one more drop. The trick is to go slow—dumping in too much water at once will make your paint thin and watery, and it won't be opaque enough to cover the numbers.
To avoid this problem altogether, get into the habit of snapping the lids shut the second you're done with a color. A tight seal is your best defense against dried-out paint.
I Painted Over a Number by Mistake—How Can I Fix It?
We've all been there. You're in the zone, flowing with the brush, and suddenly a splotch of green ends up in a section that was supposed to be yellow. It feels like a disaster, but it's an incredibly easy mistake to fix.
First things first: let the wrong color dry completely. If you try to wipe it away while it's wet, you'll just smear it into the canvas and make a muddy mess.
Once it's dry, find a light color in your kit—white is ideal, but a very light beige or gray will also do the trick. Carefully paint a thin layer right over the mistake. You may need a second coat to fully hide the darker color underneath. Let that dry, and then you can paint right over it with the correct color. It'll be like it never even happened.
Pro Tip: Before you even dip a brush in paint, snap a quick photo of the numbered canvas with your phone. This creates a perfect digital map you can zoom in on if you ever cover a number and can't remember what was there.
Is It Better to Paint Light or Dark Colors First?
You'll find painters on both sides of this debate, and honestly, there's no single "right" way to do it. It really comes down to personal preference. That said, most experienced painters follow one of two main strategies to keep the process clean and simple.
Here’s how they break down:
- Dark to Light: This is probably the most common advice for beginners. It's much, much easier to paint a light color over a dark one if you make a mistake than it is to do the reverse. Starting with your darkest shades gives you a nice safety net.
- Top to Bottom: This method is all about preventing smudges. If you're right-handed, you'd start painting in the top-left corner and work your way down and across to the bottom-right. For lefties, it’s the opposite: start in the top-right and move down and left. This keeps your hand from resting on wet paint and smearing your beautiful work.
My advice? Try both on different DIY paint by numbers for adults kits and see which one feels more natural to you. There's no wrong answer here.
Ready to turn your favorite photo into a masterpiece? Custom Paint By Numbers makes it easy to create a personalized kit from any image. Start your custom painting journey today at paint-by-number.com


