

Are you ready to give your living space a fresh, personal touch without breaking the bank? The best way to infuse your home with personality is by creating it yourself. This guide explores nine creative and achievable DIY home decor projects that will transform any room from ordinary to inspired. Forget generic, store-bought items; the most impactful decor tells a story, and these projects empower you to write your own.
From building a stunning gallery wall with mixed frames to crafting bohemian macrame hangings, we've curated projects for every skill level and interior style. Each idea in this listicle includes a detailed project overview, a complete materials list, and practical styling tips to ensure your creation looks professional and polished. We will cover everything from a pallet wood accent wall to custom terrarium garden displays and even unique lighting solutions.
These hands-on activities are not just for decorating your main living areas. Many can be adapted for other spaces, and for those looking to extend their creative touch, exploring specific decorating tips for kid's bedrooms can spark even more family-friendly ideas. Let's get started on making your home uniquely yours.
1. Gallery Wall with Mixed Frames and Art
A gallery wall is one of the most impactful DIY home decor projects, transforming a blank space into a personalized statement. It involves creating a curated collection of art, photos, and even three-dimensional objects, all arranged in a cohesive and visually pleasing layout. This project offers immense creative freedom, allowing you to tell a story that reflects your personality and experiences.
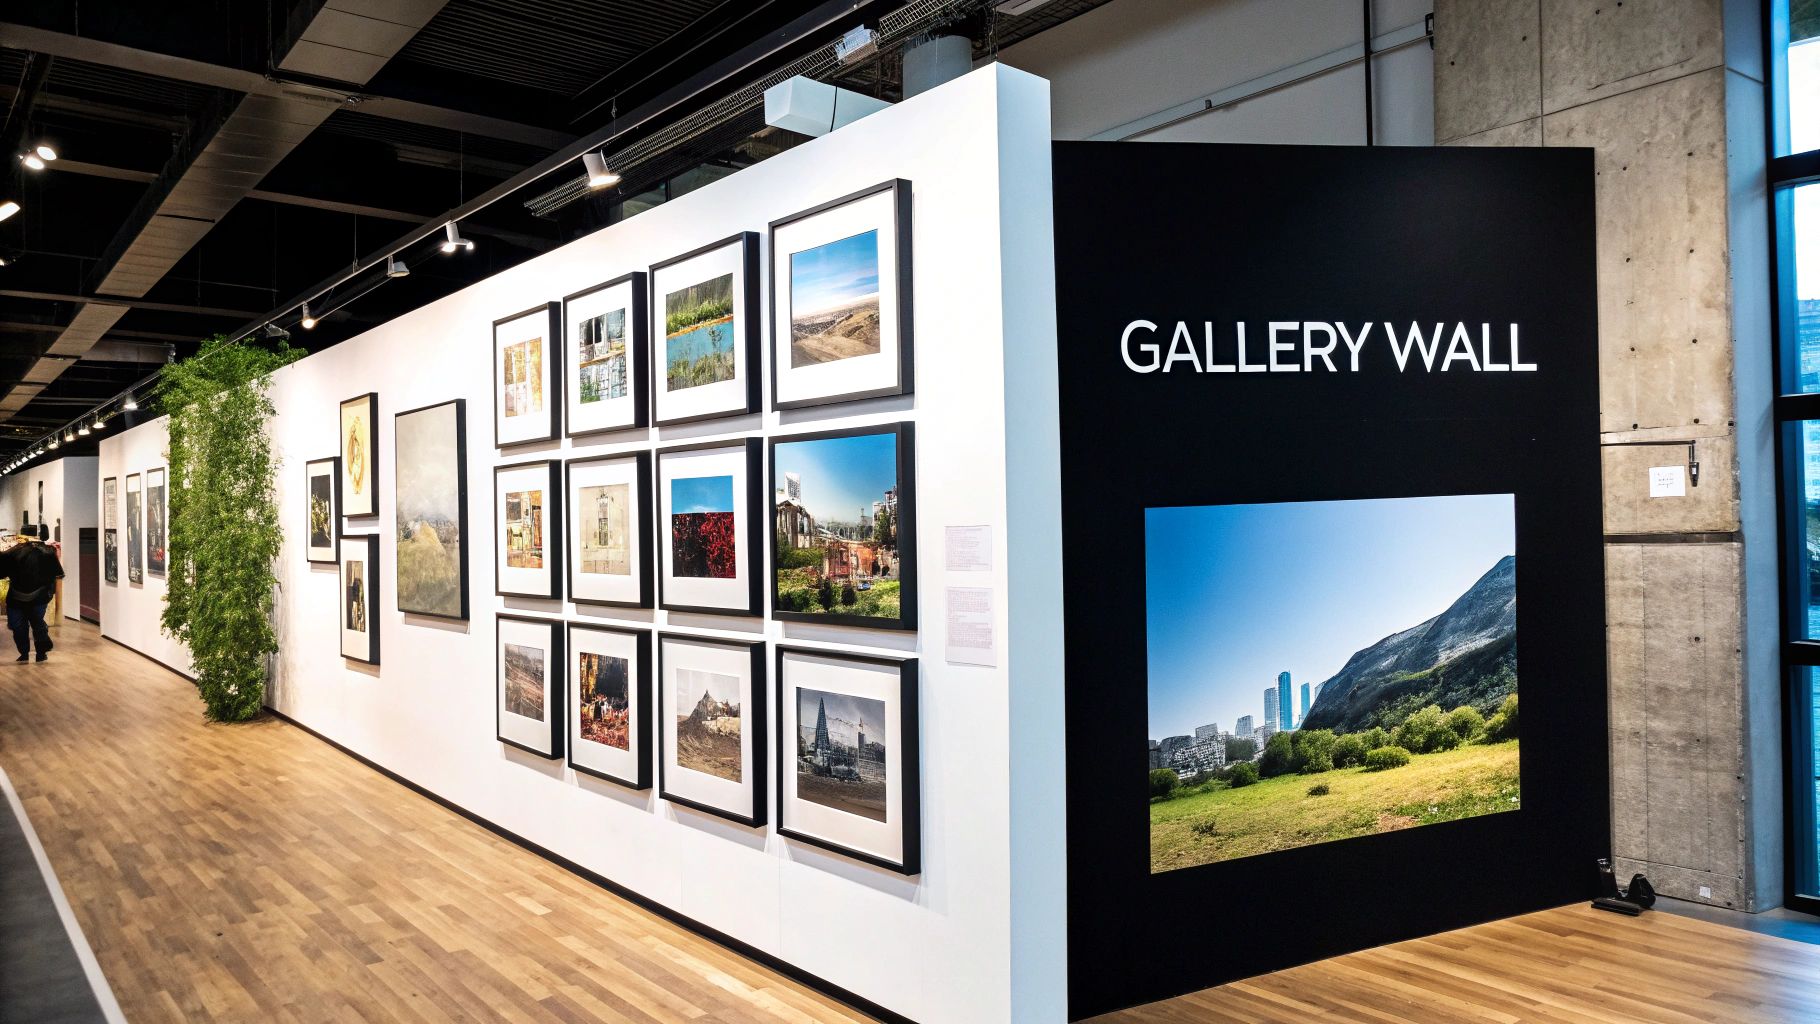
From a stairway showcasing family photos in matching black frames to a living room featuring an eclectic mix of abstract art, botanical prints, and mirrors, the possibilities are endless. This approach works in almost any room, adding character and warmth. You can even include your own creations, like custom paint-by-numbers canvases. For more inspiration on this, explore how to frame canvas paintings.
Pro-Tips for a Perfect Layout
- Create Templates: Before hammering any nails, trace each frame onto craft paper and cut out the shapes. Tape these paper templates to the wall to experiment with your layout until it feels right.
- Anchor Your Design: Start by placing your largest or most significant piece slightly off-center. This will act as the anchor, and you can build the rest of your arrangement around it.
- Maintain Consistent Spacing: A general rule is to keep about 2-3 inches of space between each frame. This ensures the arrangement looks unified rather than cluttered. While a DIY gallery wall offers creative freedom, achieving perfect alignment can be challenging. For an alternative approach to achieving a flawless display, consider professional picture hanging services.
2. Macrame Wall Hangings
Macrame wall hangings are handcrafted textile art created using the ancient technique of knotting cord into intricate, decorative patterns. As one of the most accessible diy home decor projects, macrame adds immediate texture, warmth, and artisanal charm to any room. This bohemian-style craft provides a calming, meditative process and results in a stunning, unique piece of decor.
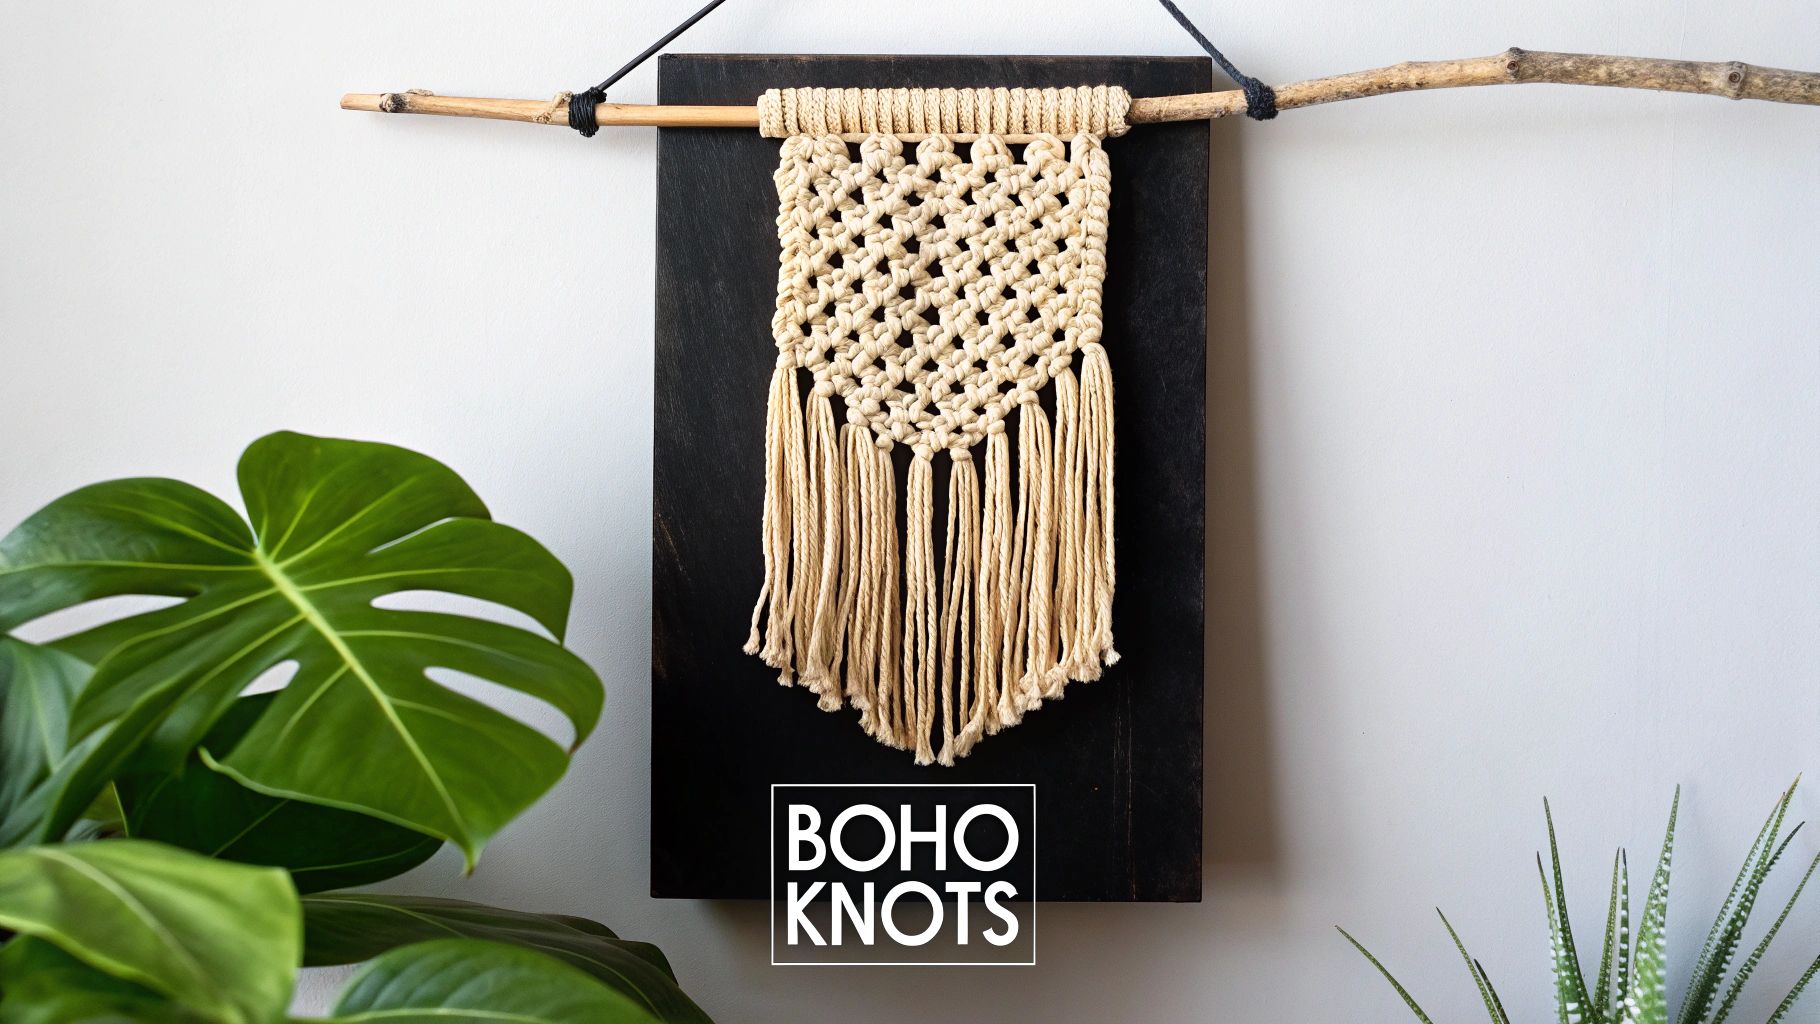
The versatility of macrame allows for countless applications, from large statement pieces hanging above a living room sofa to smaller, delicate hangings used as a creative headboard alternative in a bedroom. You can also craft functional items, like plant hangers that bring greenery and life into a bathroom or kitchen. The revival of this 1970s craft by modern makers and Etsy artisans has made it easier than ever to find inspiration and materials.
Pro-Tips for Perfect Knots
- Start Simple: Begin with basic knots like the square knot and lark's head before tackling more complex patterns. Mastering the fundamentals will build your confidence for larger, more ambitious designs.
- Secure Your Work: Use masking tape or a clipboard to hold your anchor cord (the cord you tie other knots onto) firmly in place. This stability makes the knotting process much easier and more precise.
- Create a Polished Fringe: For a professional, uniform look on your fringe, use a pet brush or a fine-tooth comb to gently brush out the twisted fibers of the cord. Once combed, you can trim the ends for a clean, sharp line.
- Visualize the Process: Watching tutorials is one of the best ways to learn macrame, as it allows you to see exactly how each knot is formed. Visual guides can clarify written instructions that may seem confusing at first.
3. Pallet Wood Accent Wall
Creating a pallet wood accent wall is a fantastic way to introduce texture, warmth, and a rustic-industrial charm into any room. This popular DIY home decor project involves mounting reclaimed or new wood planks to a wall, instantly turning a plain surface into a stunning focal point. It’s a sustainable choice that embraces the natural beauty of wood grain while adding significant character and depth to your space.
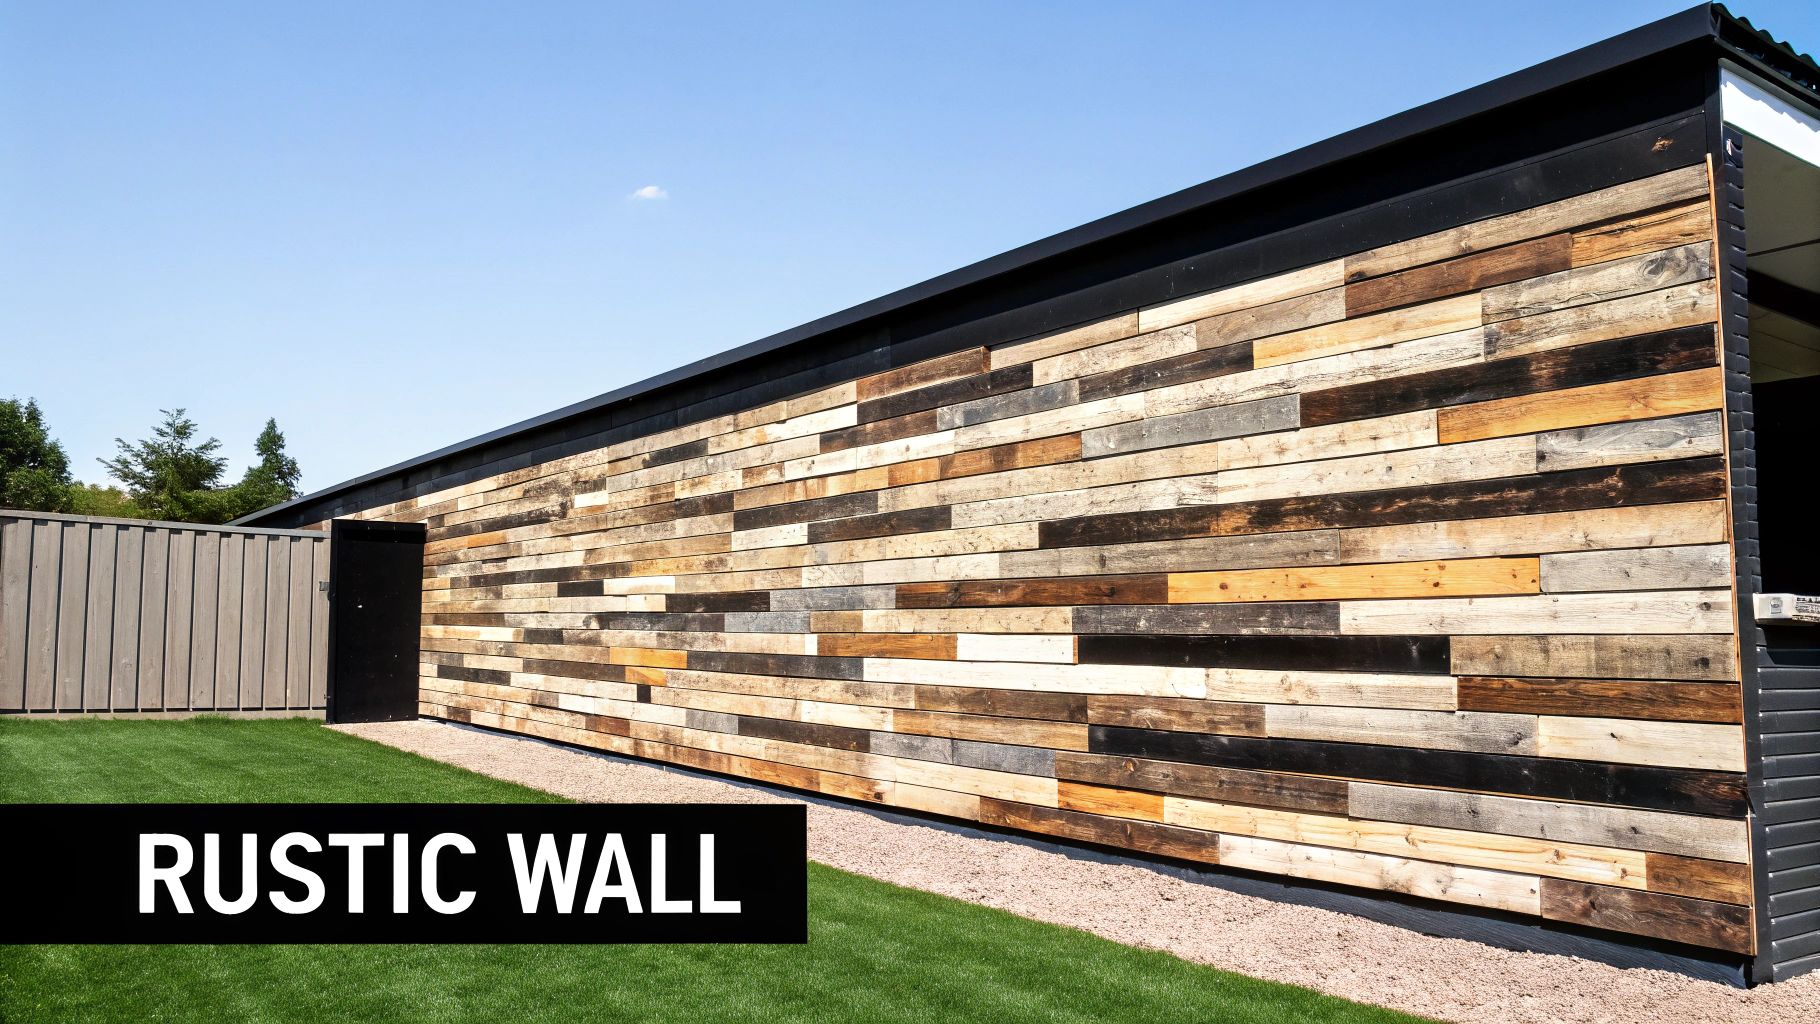
Popularized by farmhouse design trends, this project works beautifully behind a bed to create a built-in headboard, around a fireplace for a cozy feel, or in a home office to define the workspace. The varied tones and imperfections of the wood add a unique, organic element that complements both modern and traditional decor styles. For a polished yet reclaimed look, you can find specialty pre-finished wood wall planks designed for easy installation.
Pro-Tips for a Flawless Finish
- Prep Your Planks: Before installation, thoroughly sand every plank to remove splinters and smooth the surface. Apply a sealant or stain to protect the wood and achieve your desired color.
- Plan for Utilities: Identify and mark the locations of all electrical outlets and light switches. It is much easier to cut holes in the planks before you mount them to the wall.
- Use the Right Tools: A nail gun is highly recommended for this project. It provides a much cleaner, more efficient, and secure installation compared to using a hammer and nails.
- Create Visual Interest: For a more dynamic and authentic look, vary the widths and lengths of your wood planks. A staggered, random pattern often looks more natural than a perfectly uniform one.
4. Floating Shelves with LED Lighting
Floating shelves offer a minimalist approach to storage and display, and integrating LED lighting elevates them from simple shelves to a sophisticated design feature. This project involves mounting shelves so that the hardware is hidden, creating a clean, modern look. The addition of LED strip lights under the shelves provides ambient illumination, highlighting decorative objects and adding a warm, inviting glow to any room.
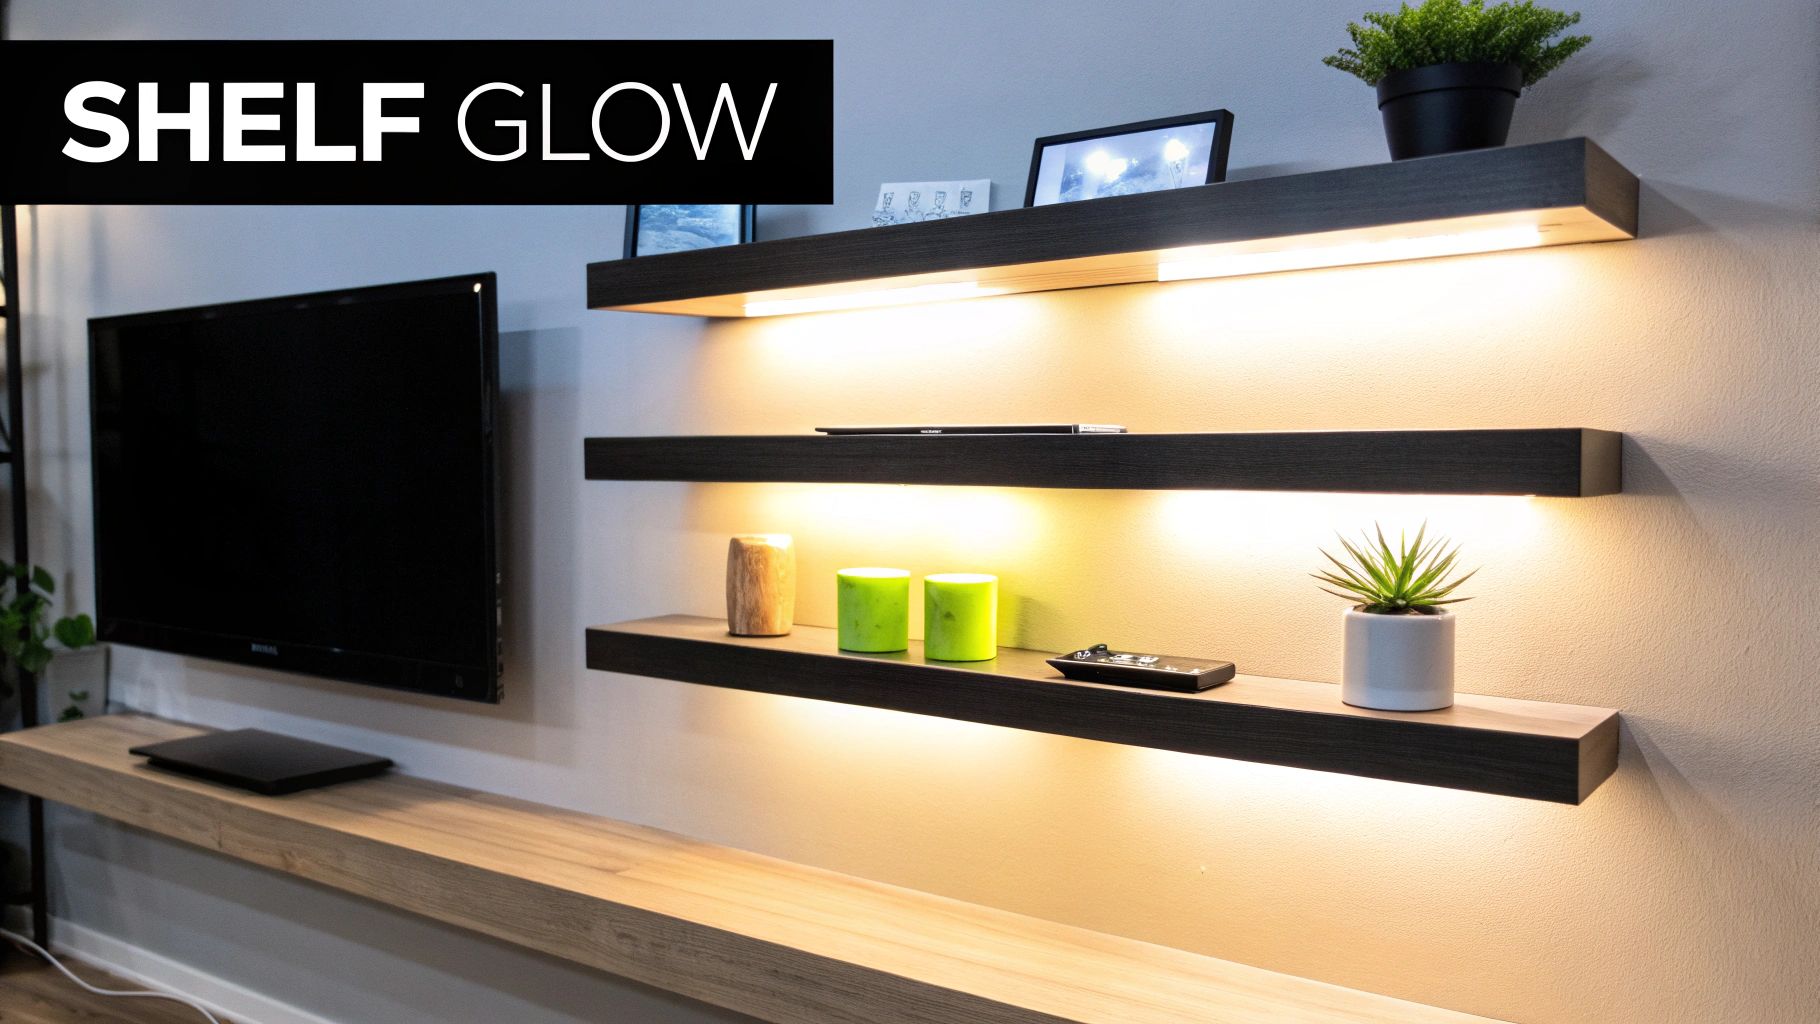
This versatile DIY home decor project is perfect for various spaces. In the kitchen, they can beautifully showcase glassware and dishes. In a living room or home office, they provide the perfect perch for books, plants, and art. They also work wonderfully in a bathroom to hold toiletries or in a home bar area to display bottles and glassware, combining practical storage with atmospheric lighting.
Pro-Tips for a Flawless Installation
- Secure Your Mounts: For shelves intended to hold heavier items like books or dishes, always locate and drill into wall studs. This provides the necessary support and prevents the shelves from sagging or pulling away from the wall.
- Choose the Right Glow: The color temperature of your LEDs matters. For a cozy, relaxing ambiance ideal for living rooms or bedrooms, opt for warm white LEDs. For kitchens or workspaces where brighter light is needed, a cool white might be more appropriate.
- Conceal the Controls: Plan ahead to hide the LED power supply and controller for a seamless look. You can often tuck these components behind nearby furniture, inside a cabinet, or even recess them into the wall if you're comfortable with more advanced DIY work.
5. Terrarium Garden Displays
Terrarium garden displays are miniature, self-contained ecosystems that bring a touch of living nature into your home decor. These living art pieces involve arranging small plants like succulents, air plants, or tropicals inside open or closed glass containers. Complemented by decorative layers of rock, moss, and soil, they create a stunning, low-maintenance focal point that adds a serene, organic feel to any space.
This versatile DIY home decor project can be adapted to fit any style or location. Picture a geometric glass container on your desk filled with colorful succulents, a delicate hanging glass orb with a single air plant, or a large, enclosed vessel on a coffee table creating a lush, tropical scene. Even a bathroom counter can host a terrarium with humidity-loving plants, thriving in the steamy environment. The creative possibilities allow you to build a tiny world that reflects your personal aesthetic.
Pro-Tips for a Thriving Micro-Ecosystem
- Layer for Drainage: Start with a base layer of small stones or gravel, followed by a thin layer of activated charcoal to keep the environment fresh. Top this with a quality potting mix suitable for your chosen plants. This foundation prevents root rot.
- Choose Compatible Plants: Select plants that share similar light and humidity requirements. Grouping succulents with other succulents, or tropicals with other tropicals, ensures all your plants will thrive in the same microclimate.
- Water with Care: Overwatering is the most common terrarium mistake. Most terrariums, especially those with succulents, need very little water. Use a mister or a small watering can with a narrow spout to lightly moisten the soil, avoiding a full soak.
6. Rope and Wood Hanging Shelves
Rope and wood hanging shelves are a brilliant DIY home decor project that combines functionality with a distinct aesthetic. Instead of traditional brackets, these shelves are suspended by rope, creating a floating effect that feels both rustic and modern. This design introduces a light, airy quality to your storage, making it perfect for smaller spaces or rooms where you want to add vertical interest without visual bulk.
This versatile project is highly customizable and can be adapted to fit numerous styles, from nautical and coastal to bohemian and Scandinavian. You can use them in a bathroom to hold rolled towels and toiletries, in the kitchen for a small herb garden, or as a unique nightstand alternative in the bedroom. They are especially effective for displaying small decorative objects and plants, turning simple storage into a curated display. For those who enjoy hands-on creativity, this project is as rewarding as other art projects for beginners.
Pro-Tips for a Sturdy and Stylish Display
- Secure Your Anchor Points: For ceiling-mounted shelves, always screw heavy-duty eye bolts directly into ceiling joists, not just the drywall. Use a stud finder to locate the joists to ensure your shelves can safely bear weight.
- Prevent Wood from Splitting: Always pre-drill the holes for the rope in your wooden planks. Make the drill bit slightly larger than the rope's diameter to allow it to pass through easily without fraying.
- Leave Extra Rope for Adjustments: Cut your rope longer than you think you will need. This gives you plenty of slack to make adjustments and ensure the shelves hang perfectly level before you trim the excess.
- Test Weight Capacity First: Before loading your shelves with your favorite decor, test their stability with items of a similar weight, like books. This helps you confirm the knots are secure and the anchors are holding strong.
7. Vintage Window Frame Mirror
Transforming an old, discarded window frame into a stunning mirror is one of the most charming diy home decor projects you can tackle. This upcycling project breathes new life into architectural salvage, creating a statement piece that adds vintage character and reflects light to make any room feel brighter and more spacious. It’s a perfect way to introduce a touch of farmhouse or shabby chic style into your home.
The beauty of this project lies in its versatility. A multi-paned window frame can become a striking focal point above an entryway console table, a unique vanity mirror in a bathroom, or a romantic accent in a bedroom. In a dining room, it can beautifully reflect candlelight, adding depth and ambiance to your gatherings. The history embedded in the aged wood brings a story and a sense of timelessness that modern decor can't replicate.
Pro-Tips for a Flawless Upcycle
- Safety First: Before you start sanding or scraping, test the paint on older frames for lead, especially if they predate the 1980s. Use a lead test kit and take appropriate safety precautions if lead is present.
- Prepare the Frame: Thoroughly clean the frame to remove dirt and grime. Make any necessary repairs to the wood, like filling cracks with wood filler, before you begin painting or sealing it to match your room’s style.
- Secure the Mirror: For a secure fit, use a strong mirror adhesive specifically designed for this purpose. For added safety, especially with larger panes, use mirror clips on the back of the frame to hold the mirror firmly in place. This ensures your creation is not only beautiful but also durable.
8. Fabric Wall Art Panels
Creating large-scale, custom artwork can be surprisingly simple and affordable with fabric wall art panels. This DIY home decor project involves stretching decorative fabric over a wooden frame or a blank canvas, instantly producing a high-impact piece. It’s an ideal solution for adding color, pattern, and texture to a room without the expense of a traditional painting. The result is a soft, sophisticated piece of art that can be perfectly tailored to your existing decor.
This versatile project works wonderfully in various settings. You can create a stunning triptych with bold geometric prints above a sofa, design a serene headboard alternative for a master bedroom, or make playful, child-friendly panels for a nursery. The ability to choose any fabric means your options are limitless, from botanical prints to abstract patterns. If you prefer to feature a more personal image, you can explore services that turn a photo into a custom art piece for a similar personalized effect.
Pro-Tips for a Flawless Finish
- Add Dimension: Place a thin layer of quilt batting over the frame before adding your fabric. This gives the finished panel a slightly padded, more substantial, and professional look.
- Choose the Right Fabric: Tightly woven fabrics like cotton, canvas, or linen work best as they are less likely to stretch or distort when pulled taut. Always iron the fabric thoroughly beforehand to remove any wrinkles or creases.
- Secure with a Staple Gun: Start by stapling the center of one side, then pull the fabric taut and staple the center of the opposite side. Work your way out toward the corners, alternating sides to ensure the fabric remains smooth and evenly stretched.
9. Mason Jar Organizers and Lighting
Mason jars are the ultimate chameleon in the world of DIY home decor projects, effortlessly transforming from simple storage to stunning accent pieces. This project harnesses their rustic charm and versatility to create functional organizers and ambient lighting. By mounting, hanging, or arranging these glass jars, you can craft bespoke solutions that add character and declutter your space, proving that practical items can also be beautiful.
The applications are wonderfully diverse, fitting into nearly any room's aesthetic. Imagine a plank-mounted trio in the bathroom neatly holding cotton balls, Q-tips, and makeup brushes, or a series of jars in the craft room keeping buttons and beads sorted. In the kitchen, they can become a charming wall-mounted herb garden, while outdoors, solar-powered LED lights inside suspended jars can cast a magical glow over a patio.
Pro-Tips for Perfect Jar Projects
- Prioritize Safety and Function: When using jars for plants, be sure to drill small drainage holes in the bottom to prevent root rot. For kitchen storage, always use food-grade jars to ensure safety and freshness.
- Ensure a Secure Mount: When mounting jars to a wall or board, use hose clamps or heavy-duty adhesive for a secure hold, especially if they will contain heavier items. If hanging jars upside down for lighting, double-check that the lids and fixtures are fastened tightly.
- Prepare Your Jars: Before painting, decorating, or filling, clean the jars thoroughly with soap and water and let them dry completely. This simple step ensures that any paint or labels will adhere properly and gives your project a polished, professional look.
9 DIY Home Decor Projects Comparison
| Item | Implementation Complexity 🔄 | Resource Requirements ⚡ | Expected Outcomes 📊 | Ideal Use Cases 💡 | Key Advantages ⭐ |
|---|---|---|---|---|---|
| Gallery Wall with Mixed Frames and Art | Medium to High (planning & layout) | Medium (frames, art, hanging hardware) | High visual impact, personalized decor | Living rooms, bedrooms, stairways | Highly customizable, budget adaptable |
| Macrame Wall Hangings | Medium (practice knots) | Low (rope, minimal tools) | Handmade textured art, boho style | Bohemian interiors, relaxed spaces | Inexpensive, meditative craft |
| Pallet Wood Accent Wall | High (carpentry skills required) | Medium to High (wood, tools) | Rustic, warm textured accent wall | Feature walls, farmhouse/industrial styles | Cost-effective, sustainable material use |
| Floating Shelves with LED Lighting | High (electrical and mounting) | Medium to High (lighting, materials) | Functional storage with ambient lighting | Modern interiors, display & storage combination | Adds mood lighting, sleek & modern |
| Terrarium Garden Displays | Low (simple assembly) | Low to Medium (plants, glass containers) | Natural decor, low maintenance greenery | Small spaces, beginners in plant care | Low maintenance, space-efficient |
| Rope and Wood Hanging Shelves | Medium (secure mounting needed) | Low to Medium (rope, wood) | Unique suspended shelving | Nautical, boho styles, variable storage | Adjustable height, visually interesting |
| Vintage Window Frame Mirror | Medium (glass installation) | Medium (vintage frames, mirror panes) | Vintage charm, light-enhancing mirrors | Entryways, bathrooms, vintage-themed rooms | Unique upcycling, architectural detail |
| Fabric Wall Art Panels | Low to Medium (stretching fabric) | Low (fabric, frames) | Customizable large wall art, soft texture | Budget-friendly art, seasonal decor changes | Cost-effective, customizable, sound-dampening |
| Mason Jar Organizers and Lighting | Low to Medium (mounting & wiring) | Low to Medium (jars, mounts, lights) | Versatile storage and rustic lighting | Kitchens, craft rooms, patios | Versatile, inexpensive, rustic charm |
Your Home, Your Masterpiece
The journey through these nine distinct DIY home decor projects reveals a powerful truth: your home is not just a place to live, it is a canvas for your creativity and a reflection of your unique personality. We have explored a wide range of ideas, from the rustic charm of a pallet wood accent wall and the organic beauty of terrarium gardens to the modern elegance of floating shelves with integrated LED lighting. Each project, whether it’s the bohemian flair of a macrame hanging or the clever functionality of mason jar organizers, offers a pathway to transform your space with your own two hands.
The core value of DIY goes far beyond saving money. It is about the immense satisfaction that comes from creating something tangible, the pride in seeing your vision come to life, and the personal stories embedded in every handmade object. These projects are more than just decor; they are milestones of your creative journey.
Turning Inspiration into Action
The most important step is the next one you take. Feeling inspired is wonderful, but turning that inspiration into a finished project is where the real magic happens. To get started, consider these actionable takeaways:
- Start with What Excites You: Don't feel pressured to tackle the most complex project first. Did the simplicity of the rope and wood hanging shelves catch your eye? Or did the idea of a mixed-frame gallery wall spark your imagination? Begin with the project that you are most passionate about, as your enthusiasm will fuel your motivation.
- Embrace the Process, Not Perfection: Every DIY endeavor is a learning experience. You might measure incorrectly, spill a little paint, or decide to change your design halfway through. This is all part of the creative process. The small imperfections are what give your handmade pieces character and a story.
- Combine and Customize: The ideas presented here are springboards, not rigid rules. Feel free to mix and match concepts. Why not add small, custom-painted art pieces to your gallery wall? Or use vintage-style mason jars as planters for a small herb terrarium? The best DIY home decor projects are those that you adapt to perfectly suit your style and needs.
Ultimately, the goal is to curate a space that feels authentically you. By investing your time and creativity, you are not just decorating your walls or shelves; you are building a deeper connection to your environment. You are crafting a sanctuary that tells your story, one handmade project at a time. The confidence you gain from completing one project will empower you to tackle the next, building a home that is truly a masterpiece of your own making.
Ready to add a truly personal piece of art to your new gallery wall or floating shelf? Transform your most cherished memories into a unique work of art with Custom Paint By Numbers. Simply upload your favorite photo and receive a personalized kit that lets you paint a masterpiece, making it the ultimate addition to your collection of DIY home decor projects. Explore your custom options at Custom Paint By Numbers today


