

So, you've spent hours bringing your paint-by-number canvas to life. What's next? Framing is that final, crucial step that transforms your project into a piece of art you'll be proud to hang on your wall. It's not just about looks; it's about protecting your work and giving it a professional finish that truly makes it shine.
A good frame makes your canvas the perfect centerpiece for your home or a thoughtful, high-quality gift.
Why Bother Framing Your Canvas Panel?
Let's be honest, after all that painting, it's tempting to just call it done. But taking the time to frame your canvas panel really pays off.
Think of it this way:
- It protects your work. A frame shields the edges and corners from accidental bumps and general wear and tear over time.
- It elevates the presentation. A frame creates a clean visual border, drawing the eye right to the painting and making the colors pop.
- It adds durability. A simple frame adds much-needed structural support, keeping a thin canvas panel from warping or bending as the years go by.
Picking a Framing Style That Fits
You've got a few great options, and each one gives your artwork a completely different feel.
A DIY stretched frame gives you that classic, gallery-wrapped look—clean, timeless, and all about the art. If you're going for something more contemporary, a float frame creates a cool illusion, making the canvas appear to levitate inside the frame for a really sophisticated, modern vibe. And of course, a traditional rabbeted picture frame opens up a world of decorative possibilities, letting you perfectly match the art to your home's decor.
Framing is more than a finishing touch; it’s an act of preservation. By properly framing your work, you are ensuring its longevity and respecting the time and creativity you invested in it.
This whole process is part of a larger story about art preservation, a concept that's crucial when documenting art exhibitions. Every choice you make, right down to the frame, contributes to the life and story of your artwork.
It’s a smart move, too. The global market for art and craft materials hit USD 23.56 billion in 2023 and is expected to soar to USD 40.68 billion by 2034. That's a huge wave of interest in creative hobbies. For your canvas panel, something as simple as a DIY stretcher frame can boost its perceived value by as much as 38%. You can dig deeper into these trends with research on art and craft material markets from places like Fortune Business Insights.
Gathering Your Essential Framing Tools
Before you start wrestling with a canvas or measuring a frame, let's talk about getting your workspace in order. Having the right tools laid out and ready to go is what separates a frustrating afternoon from a project you’re actually proud of.
The first thing you need is a clean, flat surface to work on. A big table, a dedicated workbench, or even a protected spot on the floor will do the trick. Just make sure it’s stable and won't scratch up your frame or your new masterpiece.
The Core Toolkit for Any Framing Job
No matter which framing method you land on, a few key tools are always part of the equation. These are the basics you'll reach for time and time again.
- Measuring Tape: Don't skimp here. A good quality, retractable steel tape is your best friend for accurate cuts and perfect alignment.
- Pencil: Simple, but essential for marking up the back of your frame or canvas.
- Craft Knife or Box Cutter: A sharp blade is non-negotiable for clean cuts. You'll need it for everything from trimming a dust cover to just opening the packaging.
- Straight Edge or Ruler: I recommend a metal one. It’s perfect for guiding your craft knife and drawing dead-straight lines.
With these basics at your side, you're already halfway to making the process of framing a canvas panel feel much less intimidating.
Tools for Your Chosen Framing Method
Alright, now let’s get specific. The tools you need from here on out depend entirely on the framing style you've picked.
For a DIY Stretched Canvas
This is the classic approach for that authentic gallery-wrapped look. It’s a popular choice, especially since many paint-by-number kits, like those from Custom Paint By Numbers, often include an optional DIY stretcher frame right in the box.
- Stretcher Bars: These are the interlocking wooden pieces that form the skeleton your canvas wraps around.
- Staple Gun: You’ll need a real one for this—either electric or a heavy-duty manual model. An office stapler just won’t have the power.
- Staples: Make sure they're short enough that they won't poke through the front of the wood. 1/4 inch staples are usually a safe bet.
- Canvas Pliers (Optional but Recommended): This handy tool is designed to grip the canvas and pull it taut, helping you get that satisfying, drum-tight finish.
For a Modern Float Frame
A float frame is all about creating that cool, contemporary illusion where the artwork seems to hover inside the frame.
- Float Frame: These are built differently than standard frames, with an inner ledge for the canvas to rest on.
- Offset Clips (or Z-Clips): This is the magic hardware. These little Z-shaped brackets screw into the back of both the canvas and the frame, holding everything securely.
- Screwdriver or Drill: You'll need this to attach the offset clips. Using a small drill bit to make pilot holes first is a pro move that keeps the wood from splitting.
Expert Tip: Pay close attention to the depth of your offset clips. The "offset" number has to match the distance from the back of your canvas to the back of your frame, otherwise, it just won't fit right.
For a Traditional Rabbeted Frame
This is probably the most familiar method. It just involves using a standard picture frame—the kind with an inner lip (called a "rabbet") that holds the artwork in place.
- Rabbeted Picture Frame: Any off-the-shelf frame works, but always check the rabbet depth. You want to make sure your canvas panel doesn't stick out from the back.
- Framer’s Points or Glazier Points: These are small, flat metal tabs that you push into the wooden frame to secure the panel.
- Point Driver Tool (Optional but Recommended): While you can use a flathead screwdriver in a pinch, this tool makes inserting the points a thousand times easier and safer.
- Framing Tape: This is a self-adhesive paper tape that seals up the back of the frame, giving it a professional look and keeping dust out.
Framing Method Tool and Material Checklist
Feeling a little overwhelmed by the options? Here's a simple checklist to help you see exactly what you'll need for each approach at a glance.
| Item | DIY Stretcher Frame | Float Frame | Rabbeted Frame |
|---|---|---|---|
| Core Tools | ✅ | ✅ | ✅ |
| Stretcher Bars | ✅ | ||
| Staple Gun & Staples | ✅ | ||
| Canvas Pliers | Recommended | ||
| Float Frame | ✅ | ||
| Offset Clips | ✅ | ||
| Drill/Screwdriver | ✅ | ✅ | |
| Rabbeted Frame | ✅ | ||
| Framer's/Glazier's Points | ✅ | ||
| Point Driver Tool | Recommended | ||
| Framing Tape | ✅ |
Use this table as your shopping list once you’ve decided which framing style is the right fit for your artwork.
Stretching Your Canvas on a DIY Frame
If you're after that classic, gallery-wrapped look, stretching your canvas panel over a wooden frame is the way to go. This method gives your art a clean, professional edge and is a go-to for many paint-by-numbers kits, which often come with their own DIY stretcher bars. The whole point is to create a taut, drum-like surface that lets your painting shine without any sagging or wrinkles.
First things first: you have to assemble the stretcher bars. These wooden pieces have mitered corners designed to slot together, creating a perfectly square base for your art. Don't rush this part. A frame that isn't perfectly square will throw off the tension and make the rest of the job a real headache.
This diagram shows the essential tools for the three most common framing methods you'll encounter.
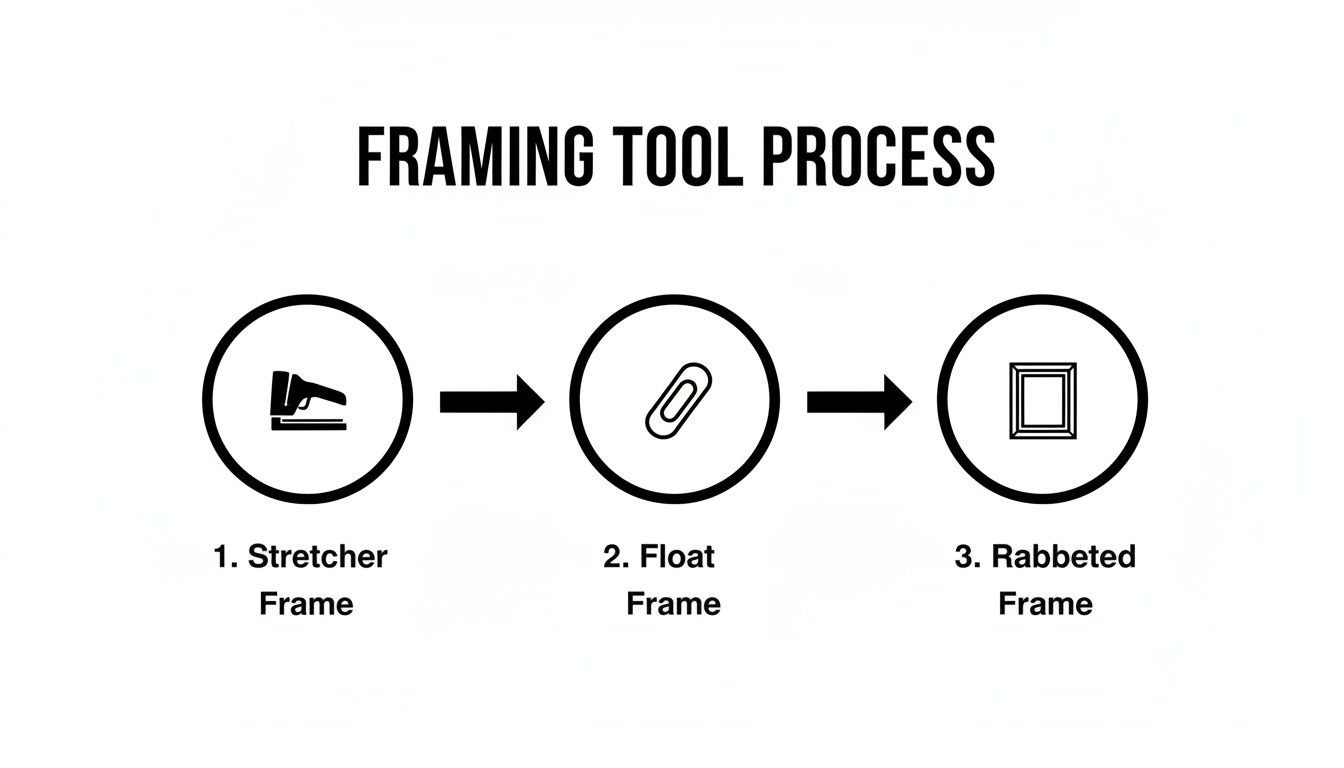
As you can see, the staple gun is the hero for a stretcher frame, which really speaks to the hands-on nature of this popular DIY approach.
Assembling Your Stretcher Frame
Before you even touch the canvas, make sure your frame is solid. Stretcher bars usually fit together with a simple tongue-and-groove system. Just lay the four bars out on a flat surface with the raised outer edge—the part the canvas will actually rest on—facing up.
Gently but firmly push the corners together. You might need to give them a little tap with a rubber mallet or even a hammer (just be sure to cushion it with a piece of scrap wood) to get a snug fit. Once they're together, grab a T-square to double-check that all four corners are at a perfect 90-degree angle.
Pro Tip: If a corner joint feels a little wobbly, a small dot of wood glue before you connect the pieces will add a ton of long-term stability. Just be sure to wipe away any excess glue with a damp cloth right away.
Knowing how to do this is becoming more and more valuable as the DIY art scene explodes. The paint-by-numbers market alone has seen over 12% yearly growth, feeding into a global art supplies industry valued at a whopping USD 45 billion. Many kits lean into this by offering optional stretcher frames, making the assembly a core part of the creative experience.
The Art of Stretching and Stapling
With a solid frame ready, lay your finished canvas painting face down on a clean, flat surface. Place the frame on top of it, also face down, and make sure it's perfectly centered over your artwork. You should have an equal border of extra canvas on all four sides.
The real secret to a wrinkle-free finish is applying even tension. Whatever you do, don't start at a corner and work your way around. Instead, follow this time-tested method:
- Start in the Middle: Pull the top edge of the canvas taut over the center of the top stretcher bar and pop in a single staple.
- Create Opposite Tension: Now, go directly to the bottom bar. Use canvas pliers (or just your fingers) to pull the canvas snugly and place another staple right in the center of that bar.
- Repeat on the Sides: Do the exact same thing for the left and right sides, putting one staple in the middle of each. Your canvas is now anchored at four central points.
- Work Your Way Out: Go back to the top bar. Add staples about two inches to the left and right of your center one. Then, jump to the bottom bar and do the same. Keep this pattern going—alternating between opposite sides and working from the center outwards—until you’re about two inches from each corner.
This "center-out" technique distributes the tension evenly across the entire surface. It's the best way to prevent the canvas from pulling diagonally and creating those dreaded creases. For anyone new to this, we also have a great guide that visually walks you through how to stretch a painted canvas.
Creating Professional Folded Corners
The corners are what separate a professional-looking job from a truly amateur one. Don't just bunch the fabric up! You want to create a neat, mitered fold, almost like you're wrapping a gift.
Once you’ve stapled up to within a few inches of the corners, focus on one corner at a time. Pull the very tip of the canvas fabric straight over the point of the frame and staple it directly to the back. This will leave you with two "wings" of fabric on either side.
Next, take one of those wings and fold it neatly over that first staple, creating a clean 45-degree angle. Pull it tight and secure it with another staple. Finally, fold the second wing over the first to create a sharp, flat corner, and staple it down securely. Repeat this for the other three corners, and you'll have a flawless, gallery-worthy finish.
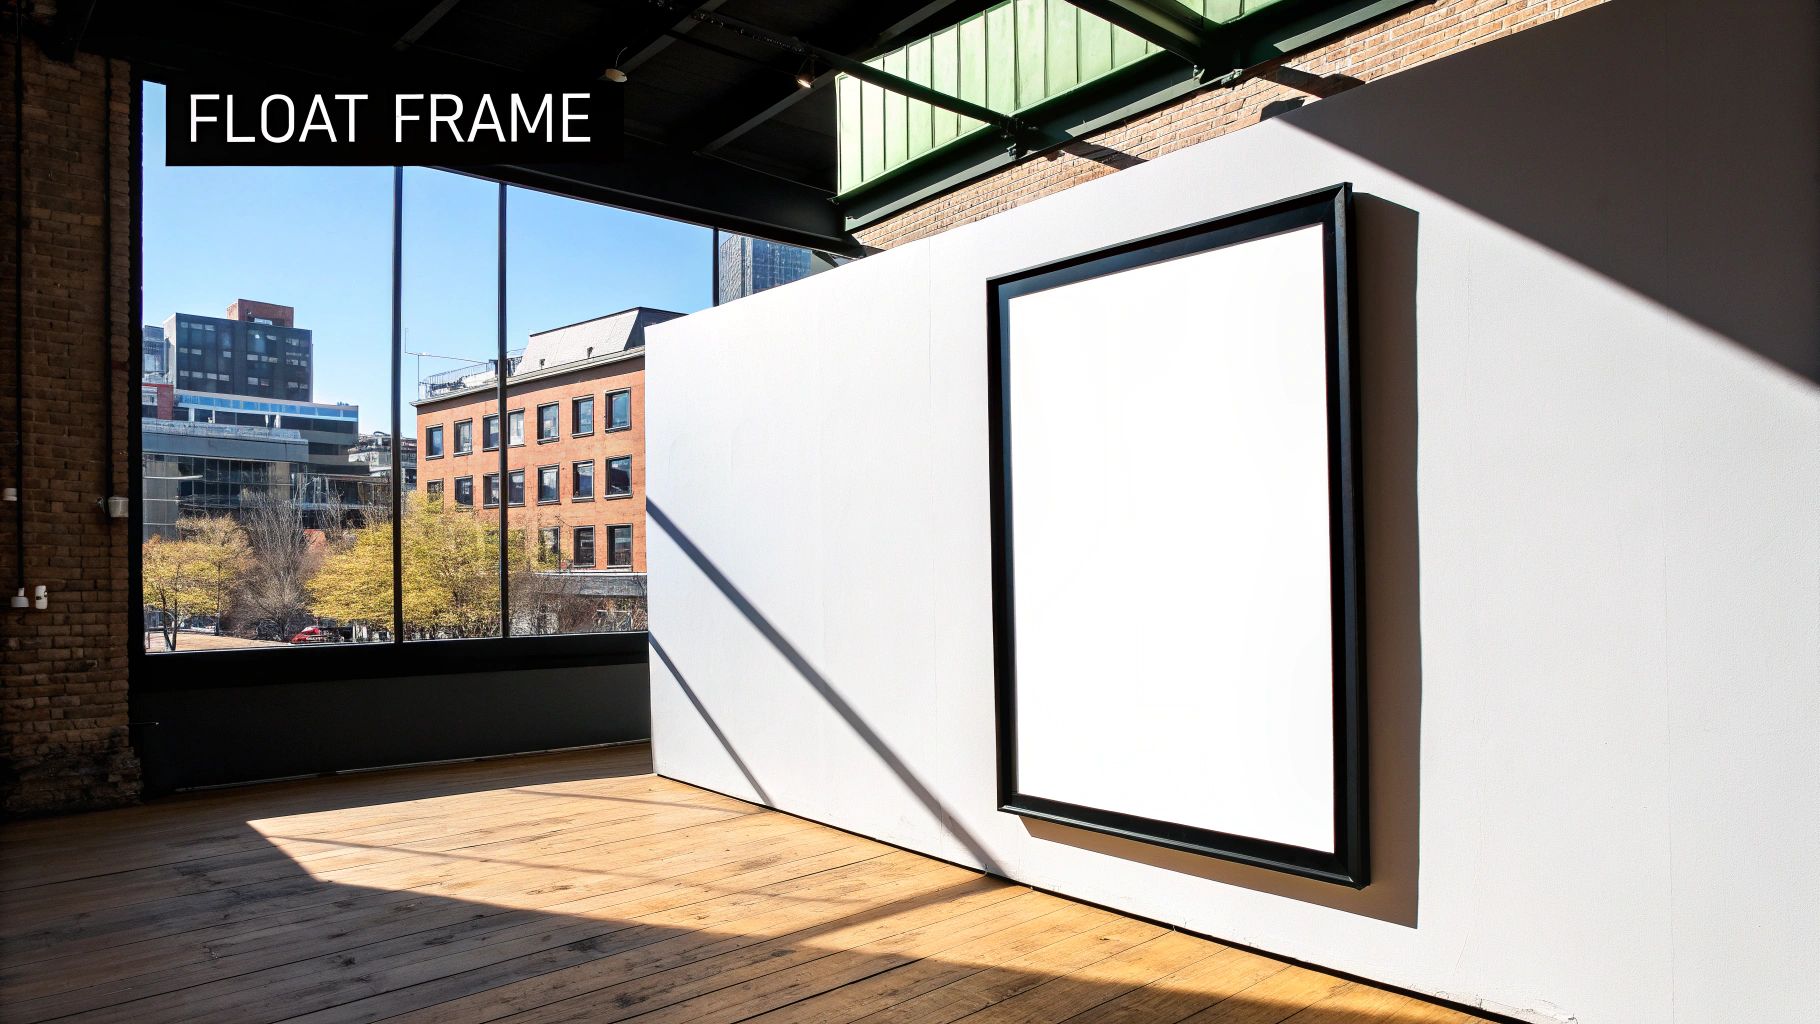
Creating a Modern Look with a Float Frame
If you're after that clean, contemporary look you see in art galleries, a float frame is the way to go. It’s my favorite method for a few reasons. It creates this really cool illusion that your artwork is suspended in mid-air, with a thin, shadowy gap separating it from the frame. This simple trick adds a surprising amount of depth and makes the whole piece feel more significant.
This style is perfect for showing off painted canvas edges or giving your finished paint-by-number panel a truly professional touch. A traditional frame will cover up the sides of your art, but a float frame puts the entire piece on display.
Selecting the Right Float Frame
First things first, you need to pick the right frame. You can't just grab any old picture frame and hope for the best; float frames are built specifically for canvases and panels. There are two measurements you absolutely have to get right:
- Frame Depth (Rabbet): The "rabbet" is just a fancy word for the inner recess of the frame where your artwork sits. You need to make sure this depth is greater than the thickness of your canvas panel. So, if your panel is 1/8 inch thick, look for a frame with at least a 1/4 inch rabbet. This ensures your artwork doesn't poke out the back.
- Shadow Gap: This is the space between your art and the inside edge of the frame. It's what creates the "floating" magic. Most off-the-shelf float frames have a standard gap of around 1/4 inch or 5 mm, which is a great starting point.
Don't forget about color and material, either. A simple black or white frame gives you that classic gallery vibe. On the other hand, a natural wood finish can bring a lot of warmth, especially if your painting has earthy tones.
Measuring and Preparing Your Canvas
Precision is your best friend here. That perfectly even gap all the way around is what makes this look work. To start, place your canvas panel inside the frame from the front—don't attach anything yet, just set it in place.
With a ruler handy, gently shift the panel around until the gap looks equal on all four sides. I find it’s best to do this part by eye. Just stand directly over the frame and look straight down to check your alignment.
Expert Tip: To nail the spacing every time, create your own spacers. I just cut a few small scraps of cardboard or foam board to the exact width of the shadow gap (say, 1/4 inch). Then, I wedge them between the canvas and the frame on each side. They’ll hold your panel perfectly centered while you secure it.
Mounting the Panel with Offset Clips
With your canvas perfectly centered, it's time to lock it in. The go-to hardware for this job is a set of offset clips, which you might also hear called Z-clips. They’re just small, Z-shaped metal brackets that work like a charm.
Carefully flip the frame over, holding the panel firmly so it doesn't move an inch. You'll be screwing one end of the clip into the frame and letting the other end press down on the back of your panel, holding it snug.
Here's how to do it:
- Position the Clips: Place at least one clip on the middle of each of the four sides. If you're working with a larger piece, I'd recommend using two clips per side for extra security.
- Drill Pilot Holes: Trust me on this one—don't skip this step. Wood frames can split easily if you just crank a screw into them. Use a tiny drill bit (one that’s a bit smaller than your screw's diameter) to make small pilot holes first.
- Secure the Screws: Now, use a screwdriver to attach the clips. You want them tight enough that the panel doesn't wiggle, but don't overtighten and risk damaging the frame or your art.
Once the clips are in, you're done! That's all it takes. Learning how to put a canvas in a frame this way is surprisingly simple and gives you a result you can be proud of.
Using a Traditional Rabbeted Picture Frame
Sometimes, the perfect frame for your canvas panel isn't a modern float frame but a beautiful, traditional picture frame you find at a local shop or even a thrift store. This approach opens up a huge world of style possibilities, from ornate and classic to sleek and modern. It’s all about finding that perfect match for your art and your home.
The secret to making this work is understanding the frame's rabbet—that little inner lip or groove designed to hold the glass and backing in place. With a few simple adjustments, you can make this space work perfectly for your canvas panel.
Prepping the Frame and Panel
First things first, let's get that frame ready. Flip it over and carefully remove the backing board and the sheet of glass. Your canvas panel is sturdy and the paint is durable, so the glass isn't necessary. In fact, it often creates unwanted glare and can trap moisture against your artwork.
With the frame empty, just give the inside of the rabbet a quick wipe with a clean cloth to get rid of any dust. Now, place your canvas panel face down into the opening. It should fit snugly and rest flush against that inner lip. This quick test confirms you've got the right size.
Check the Rabbet Depth
This is a small but absolutely critical detail. The rabbet needs to be deep enough to hold the entire thickness of your canvas panel. If the panel is thicker than the rabbet is deep, it will stick out from the back of the frame, making it impossible to secure properly or hang flat against the wall.
Always check this before you buy a frame. Just grab a ruler and measure the distance from the inner lip to the back edge of the frame. For instance, if your canvas panel is 1/8 inch thick, you need a rabbet depth of at least 1/8 inch. A little extra room is always a good thing.
Securing the Panel Inside the Frame
Okay, your panel is sitting nicely in the frame. Now you just need to keep it there. Since a canvas panel is too thin to screw into directly, you'll need some specific hardware to press it firmly against the frame's lip.
You have a couple of great, professional-grade options:
- Framer's Points (or Glazier Points): These are small, flat metal tabs that you press or shoot into the wood of the frame. They act like tiny, strong wedges, holding the panel tight.
- Offset Clips: If your panel sits a bit below the back edge of the frame, these are your best friend. They're Z-shaped clips that screw into the frame, with a little "step" that reaches down to hold the panel securely.
Pro Tip: A dedicated point driver tool makes inserting framer's points a breeze and keeps you from slipping and scratching the frame or your art. If you're in a pinch, a sturdy flathead screwdriver can do the job, but you’ll need to apply pressure very carefully.
For a standard 16x20 inch frame, I always use at least two points on the shorter sides and three on the longer sides. This ensures even pressure all around and stops the panel from rattling or shifting over time.
Learning this framing technique is a fantastic skill to have. The market for personalized art and frames is booming—it was valued at USD 6.10 billion in 2023 and is only expected to grow. People love turning custom art into cherished gifts for weddings or anniversaries, and knowing how to frame it yourself makes it even more special. You can find more insights on this growing market on Cognitive Market Research.
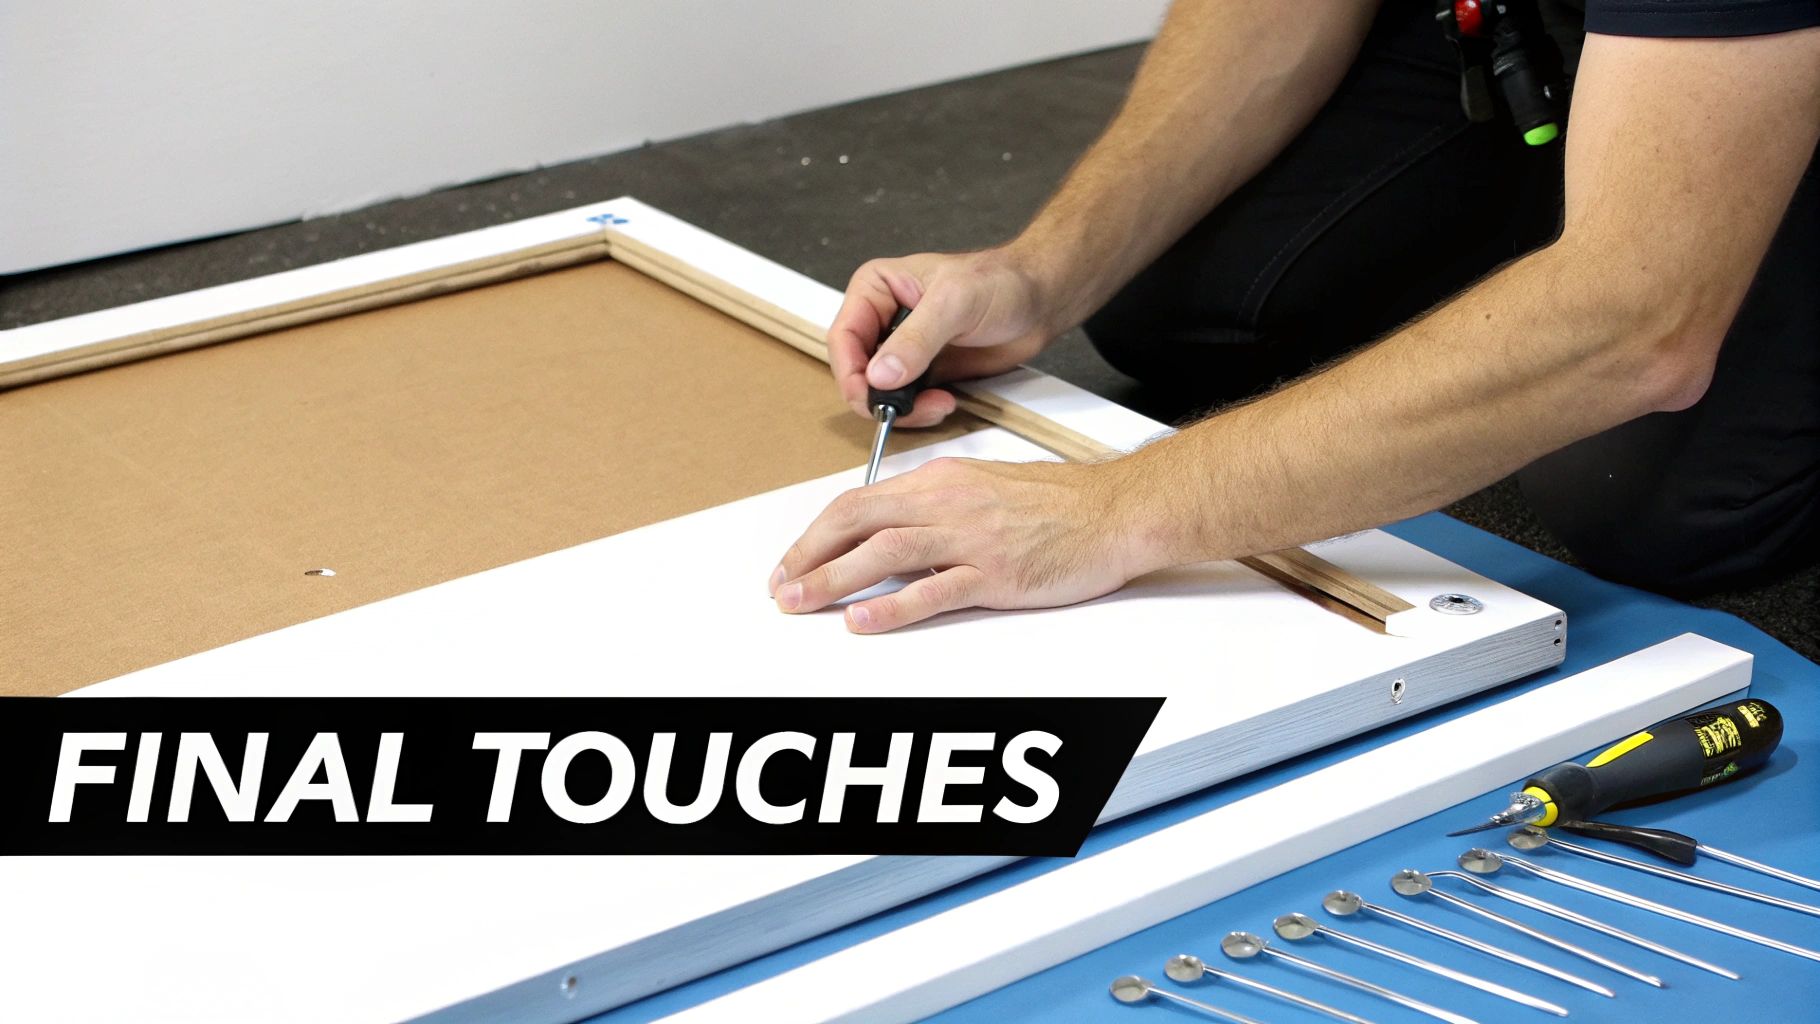
Finishing Touches and Common Framing Fixes
Alright, your canvas is snug in its new frame. You're in the home stretch now, and these last few steps are what really make the difference. This is where you go from a DIY project to a professional-looking piece of art that's ready to show off. Let's get the hardware on and sort out any little hitches you might have run into.
First things first, let's make it wall-ready. Adding hanging hardware is pretty simple, but what you choose really depends on the size and heft of your framed artwork.
Installing Hanging Hardware
Picking the right hardware is key to making sure your art hangs level and stays put. For smaller, lighter pieces (think under 5 lbs), a sawtooth hanger is the quickest way to get it done. Just find the center of the top edge of the frame, and a few light taps with a hammer will set it in place.
For anything bigger, D-rings and picture wire are the professional's choice. They offer more stability and make leveling the frame on the wall much easier.
- Measure about one-third of the way down from the top on both the left and right sides of the frame.
- Use a pencil to mark these two spots.
- Screw a D-ring into each mark, making sure they're facing inward.
- Snip a piece of picture wire that's roughly six inches longer than the frame is wide.
- Loop the wire through both D-rings and twist the ends back on themselves to secure it. You'll want a bit of slack—when you pull the wire up at its center, it should sit an inch or two below the top of the frame.
A little tip from experience: Don't pull the wire too tight or leave it too loose. If it’s too tight, the nail or hook on the wall might peek out over the top. If it’s too loose, the frame will lean forward off the wall. You're looking for that happy medium.
Troubleshooting Common Framing Problems
Even the most careful framer runs into small issues. Don't sweat it. Most of these have quick fixes that will get your project looking perfect. Part of learning how to frame a canvas panel is knowing how to handle these little quirks.
Slight Canvas Wrinkles or Loose Spots Notice a small pucker in the canvas after you've mounted it? You can often fix this without having to pull out all your staples. Just grab a spray bottle with clean water and lightly mist the back of the canvas right over the wrinkled spot. As it dries, the canvas fibers will shrink and tighten up, pulling that wrinkle right out.
Paint Flaking at the Edges Sometimes, the pressure from stretching can cause tiny bits of acrylic paint to chip off right along the edge. To avoid this, it's smart to protect your painting before you even start the framing process. You can learn more about how to seal acrylic paint on canvas, which is a great step for adding durability anyway.
The Frame Isn't Perfectly Square If you built the frame yourself and it’s just a little bit wonky, it's usually correctable. Lay it on a flat floor and gently press on the two corners of the longer diagonal until it lines up. Once you have it square, you can screw small L-brackets into the back corners to hold it firmly in place. And if you're painting your custom frame, choosing the best paint for interior woodwork can make all the difference in achieving that polished, final look.
Common Questions About Framing Your Canvas
Once you've finished a painting, a few questions always seem to pop up before you start framing. I've been there. Let's walk through some of the most common ones I hear from artists and hobbyists to get you on the right track.
Do I Really Need to Varnish My Painting First?
Yes, you absolutely should. Think of varnishing as the final, crucial step before framing. It’s not just about protecting your hard work from dust and sunlight—it also pulls the whole piece together by evening out the sheen of your acrylic paints.
This one simple step makes a world of difference, giving your art a more polished, professional finish.
Varnishing is your best bet for ensuring your artwork's longevity and visual pop. You can pick up a matte, satin, or gloss finish depending on the final look you're going for.
What if My Canvas Panel Is a Little Warped?
Don't sweat it. You can definitely still frame it, and in many cases, the framing process itself will fix the problem. The steady, even pressure from a good frame is often all it takes to straighten out a slight warp.
- DIY Stretcher Frame: As you stretch the canvas, the tension naturally pulls it taut and flattens it out.
- Float or Rabbeted Frame: When you secure the panel with offset clips, it gets pressed firmly against the frame's backing, which usually corrects any curve.
If you're dealing with a more stubborn warp, try this trick: lay the panel face down on a clean, flat table and place a few heavy books on top of it. Let it sit for a day or two before you start framing.
What's the Best Way to Clean My Framed Art?
The golden rule here is to be gentle and keep it dry. A soft, clean brush (a new makeup brush works wonders) or a dry microfiber cloth is all you need. Lightly dust the canvas surface and the frame to keep it looking fresh.
Steer clear of water, household cleaners, or any kind of chemical spray. Moisture can easily damage the acrylic paint and the canvas itself, so a simple, dry dusting is always the safest route.
Ready to transform your favorite photo into a painting you can frame? At Custom Paint By Numbers, we take the guesswork out of it. We send you everything you need—from the custom canvas to the paints and brushes—so you can dive right into the creative part.


