

When it comes to preserving your acrylic paintings, the secret isn't some complicated restoration process. It's all about preventive care. This means taking small, consistent steps like gentle cleaning, applying a protective varnish, and being mindful of where you display or store your art. These simple actions are what will keep your artwork looking vibrant for decades.
Your Guide to Lifelong Acrylic Painting Preservation
Let's walk through the practical steps for protecting your cherished acrylic paintings. There's a common misconception that acrylics are bulletproof, but from my experience, they have their own unique vulnerabilities that need specific attention. The key isn't waiting for something to go wrong; it’s about adopting a preservation mindset from the very beginning.
https://www.youtube.com/embed/cvQsOyR05NY
This guide will break down the essentials, from simple, routine maintenance to more robust, long-term protection. You'll quickly see why being proactive is so much more effective than trying to fix damage after the fact.
Why Preventive Care Is So Important
At its heart, preserving your art is all about prevention. Unlike oil paints, acrylics dry to a softer, more porous finish. This surface is a magnet for dust, dirt, and grime. It wasn't until around 2007 that conservation science really started to highlight this, shifting the thinking from "acrylics are indestructible" to "acrylics need specific preventive care."
Keeping your painting's surface clean is critical because trying to scrub away embedded dust from that delicate film is a real challenge. You can dig deeper into the science behind these techniques over at The Tate.
Key Takeaway: The best defense is a good offense. Protecting your acrylic art starts with preventing damage. A stable, clean environment and a quality protective varnish are your two most powerful allies in this effort.
Before we dive deeper, here's a quick overview of the core principles.
Core Preservation Principles at a Glance
This table breaks down the fundamental actions for preserving your acrylic paintings, outlining the goal and the key action for each.
| Preservation Area | Primary Goal | Key Action |
|---|---|---|
| Cleaning | Remove surface contaminants | Gentle, regular dusting with soft tools. |
| Varnishing | Create a protective barrier | Apply a removable, archival-quality varnish. |
| Environment | Minimize physical/chemical stress | Control light, temperature, and humidity. |
| Handling/Storage | Prevent accidental damage | Use proper techniques and acid-free materials. |
Think of these as the four pillars of keeping your art safe and sound for the long haul.
Building Your Preservation Toolkit
The good news is you don't need a professional conservator's lab to do this right. Having just a few basic materials on hand makes preservation an easy habit to form.
Start with simple things like a few soft-bristled brushes for dusting and some clean microfiber cloths. One of the single best investments you can make for your art’s future is a high-quality artist's varnish.
For anyone just starting out, getting the right supplies from day one is a huge advantage. You can check out this helpful list of essential art supplies for beginners to make sure you have what you need to both create and protect your paintings. A little bit of preparation now really does go a long way in keeping your art as brilliant as the day you declared it "finished."
What Puts Your Acrylic Paintings at Risk?
If you want your acrylic paintings to last a lifetime, you first need to know what you’re up against. Acrylics are pretty tough, but they aren't invincible. The paint itself, even when fully dry, is a surprisingly soft and porous film. It’s not a hard, glassy shell like you might imagine. This unique texture is what makes it vulnerable.
Because the surface isn't rock-solid, the environment around your painting plays a massive role in its survival. Most of the time, the biggest threats are the ones you can’t even see.
- Dust and Grime: We’ve all seen it. That fine layer of dust that settles on everything. On an acrylic painting, those tiny particles can actually get embedded into the soft paint film over time, making them a real headache to clean without damaging the art.
- Wild Temperature Swings: Extreme heat or cold can really mess with the paint. Think of it like a piece of plastic left out in the elements—it gets brittle in the cold and soft in the heat.
- Humidity Changes: Too much moisture in the air can cause the canvas to swell, while dry air makes it shrink. The paint layer tries to keep up, but this constant push and pull can lead to stress and cracking.
The Sticky Science of Temperature
Let's get a little technical for a moment. There's something called the glass transition temperature (Tg). In simple terms, this is the temperature where the acrylic polymer in the paint goes from a harder, glass-like state to a softer, more rubbery one. For most acrylic paints, this happens right around room temperature.
So, what does that mean for your painting hanging on the wall? On a warm summer day, the surface of your painting can become slightly tacky. This stickiness acts like a magnet, grabbing onto any dust, pet hair, or pollutants floating in the air.
On the other hand, if you store your painting in a cold attic or garage during the winter, the paint can become brittle. A small bump or flex of the canvas could be enough to cause it to crack. Understanding how your materials behave is key, and knowing different https://paint-by-number.com/blogs/learn-about-paint-by-numbers/canvas-painting-techniques can also help you manage how thickly the paint is applied and how it cures.
Why a Stable Environment is Everything
I can’t stress this enough: a stable environment is the single most important factor for preserving your art. Even small, gradual changes in temperature and humidity add up over the years, accelerating the aging process. It’s why museums are so obsessed with climate control.
Here's a quick look at the science. Acrylic paint is made of about 41% water and 32% polymer binder, making it incredibly sensitive to its surroundings. Keeping your art in a space that stays between 18-22°C (65-72°F) and maintains 40-55% relative humidity is the gold standard. Anything outside that range dramatically increases the risk of the paint either softening or cracking.
Hanging a painting above a fireplace or radiator is a recipe for disaster. So is storing it in a damp, musty basement. The constant cycle of heating and cooling or swelling and shrinking will eventually cause the paint film to fail, leading to cracks or even delamination, where the paint literally peels away from the canvas.
Your first step in protecting your art is simply giving it a safe place to live.
How to Clean Acrylic Paintings Without Causing Damage
Every painting eventually collects dust and grime from the air. It’s just a fact of life. But with acrylics, you have to be extra careful. The paint itself cures to a surface that's surprisingly soft and porous, making it vulnerable. If you get too aggressive with cleaning, you can easily cause permanent scratches, lift the color right off, or leave a cloudy film.
So, learning how to clean your acrylic paintings is less about elbow grease and more about gentle, methodical maintenance.
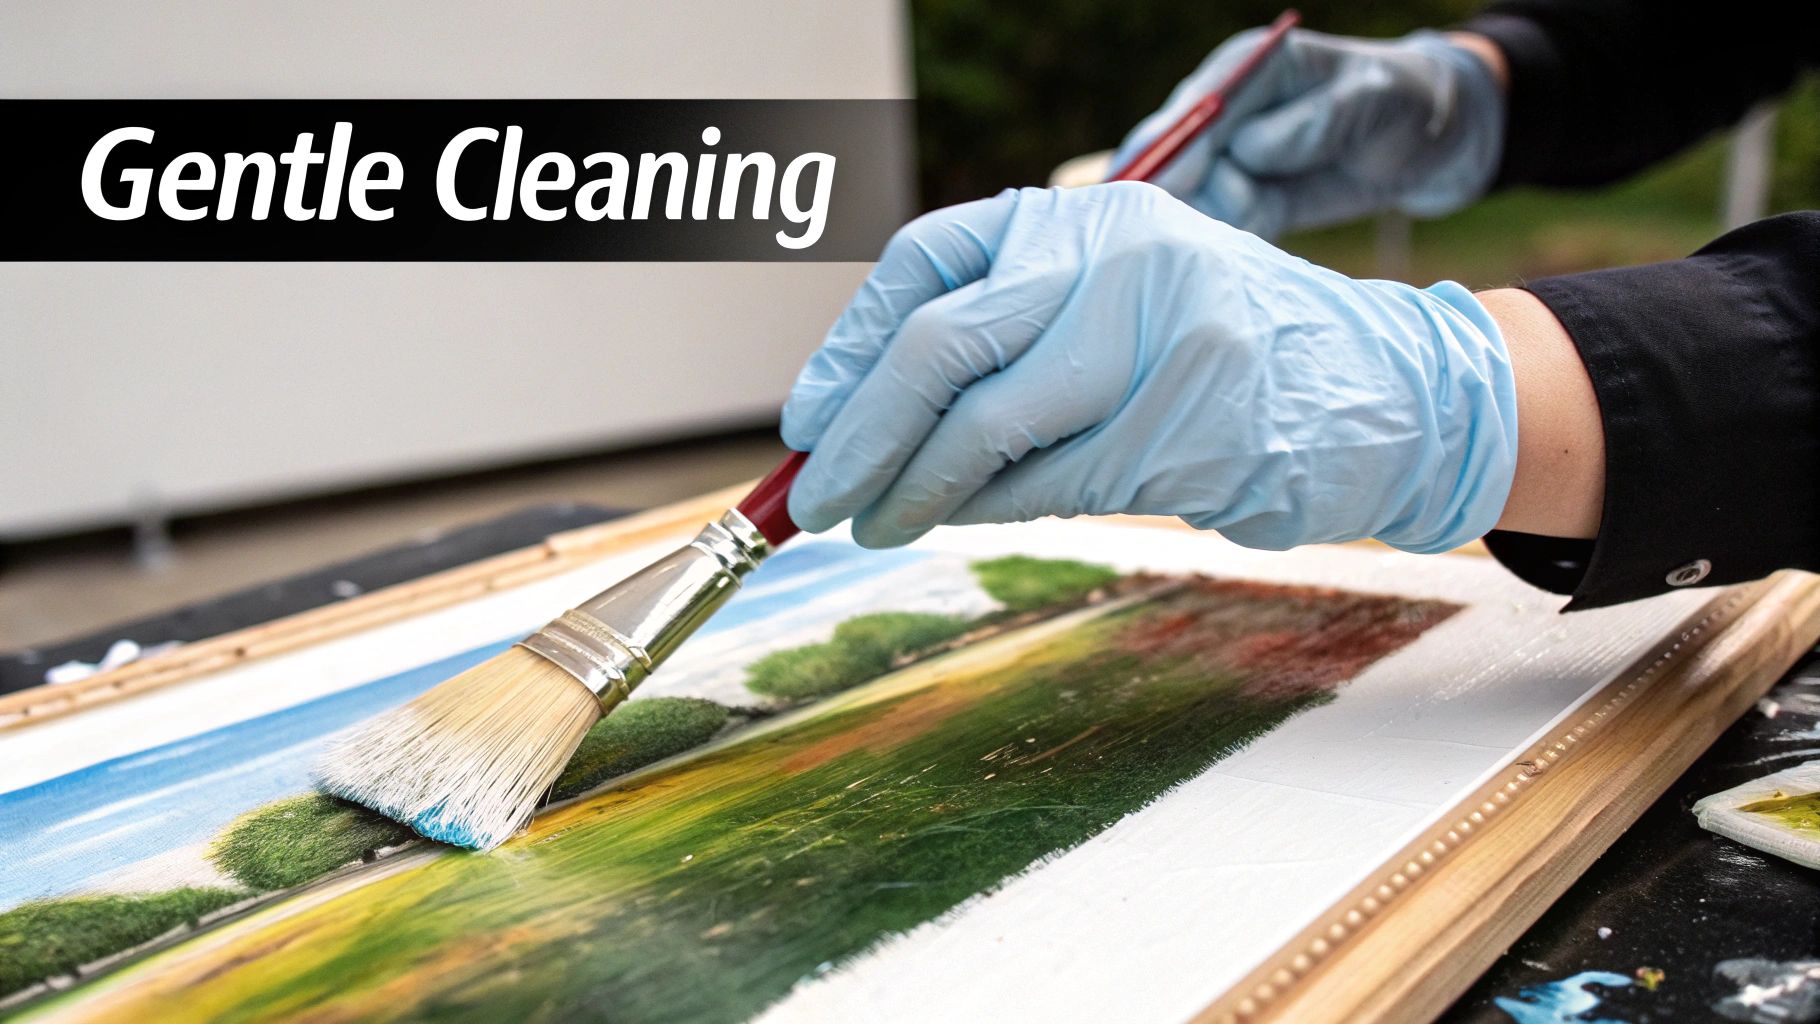
The real aim here is to get rid of the surface stuff—dust, dirt, whatever's settled on it—without messing with the delicate paint layer underneath. That means using the right tools and, even more importantly, the right touch.
Your Cleaning Toolkit
Before you even think about touching the canvas, get your supplies ready. Having the right gear makes the whole process safer and way more effective. You don't need a professional conservator’s lab, just a few simple items.
- A Soft Artist's Brush: This is your first line of defense. A wide, soft-bristled brush, like a hake or goat hair brush, is perfect for gently whisking away loose dust without scratching the paint.
- Microfiber Cloths: Make sure they're clean and dry. The tiny fibers on a good microfiber cloth are amazing at grabbing dust particles instead of just pushing them around.
- Cotton Swabs: Got a stubborn little spot? Cotton swabs give you the precision to clean a tiny area without affecting the rest of the painting.
- Distilled or Deionized Water: If you absolutely have to use moisture, never use tap water. It's full of minerals that can leave a crusty residue behind. Pure, distilled water is the only way to go.
A Quick Tip from Experience: Always work in a well-lit space. Good lighting helps you actually see the dust you're trying to remove and ensures you aren't accidentally pressing too hard.
Always Start Dry
Your first move should always be the least invasive one. For most routine dusting, a completely dry approach is all you'll need. It's by far the safest bet for your painting.
You can either lay the painting on a stable, flat surface or leave it hanging securely on the wall. Take your soft brush and, starting from the top, gently sweep downwards in a single, consistent direction. This simple technique stops you from just flicking dust back onto the areas you just cleaned.
After that first pass with the brush, you can go over it again with a dry microfiber cloth to snag any lingering fine particles. Just remember to use light, directional wipes—no circular rubbing. A simple dry clean like this every few months will prevent any serious dust from building up.
When (and How) to Use Water—Very Carefully
Sometimes, dry dusting just won't cut it. For older paintings or those that have been hanging in a kitchen or a busy hallway, you might be dealing with a layer of grime that needs a bit more help. This is where a tiny amount of water can come in, but you have to proceed with caution.
The way we think about cleaning acrylics has changed a lot. Before the 1990s, they were often treated just like oil paintings. We now know better. Research showed that acrylics behave differently and need their own cleaning rules. In fact, studies in the early 2000s highlighted that controlled washing with soft, 100% woven cotton cloths was the best way to minimize damage, shifting the focus to careful prevention. You can read more about these fascinating insights into modern acrylic care from conservation experts.
If you need to try this, slightly dampen a cotton swab or a small corner of your microfiber cloth with distilled water. And I mean dampened, not wet. Squeeze out every last drop of excess water.
Gently roll the swab or dab the cloth on a small, hidden spot on the painting, like a bottom corner. Let it dry completely and look closely for any change in the color or finish. If everything looks good, you can carefully continue cleaning the rest of the surface, working in small sections and letting each one dry as you go.
And whatever you do, never reach for household cleaners, solvents, or alcohol. They will absolutely ruin the paint film for good.
Using Varnish as a Protective Shield
Think of varnish as the final, critical step in bringing your painting to life. It's more than just a shiny topcoat; it’s a suit of armor that shields your hard work from dust, grime, and the slow, damaging effects of UV light.
Applying varnish correctly is an art in itself. Done right, it will make your colors pop and keep them vibrant for decades. But a hasty job can introduce streaks, bubbles, or even damage the paint surface. Let's walk through how to get a flawless, professional finish every time.
The Crucial First Step: The Isolation Coat
Before you even think about the final varnish, you have to apply an isolation coat. This is a permanent, clear acrylic layer that acts as a buffer between your painting and the removable varnish you'll apply later.
Why is this so important? Because the final varnish layer is meant to be removable. Decades from now, a conservator might need to remove a yellowed or dirty varnish layer to restore the painting. Without an isolation coat, they could accidentally strip off bits of your original paint right along with the old varnish. It’s a simple step that provides massive protection down the road.
My Go-To Method: I always use a soft gloss gel medium for my isolation coats. Mix it with water—a good ratio is 2 parts gel to 1 part water—to get a smooth, brushable consistency. Apply it evenly with a soft brush and let it dry for at least a full day. This creates that permanent, protective barrier.
Choosing Your Varnish and Finish
Once the isolation coat has fully cured, it's time to pick your varnish. This is where you get to decide the final look and feel of your piece. Here’s a quick guide to help you choose the right product for your needs.
Varnish Type Comparison Guide
| Varnish Type | Best For | Application Tips | Removability |
|---|---|---|---|
| Polymer (Water-Based) | Most acrylic paintings; artists who want low odor and easy cleanup. | Apply with a soft, synthetic brush. Cleans up easily with soap and water while wet. | Removable with ammonia-based solutions. |
| Mineral Spirit-Based (MSA) | Achieving maximum clarity and a very hard, non-porous finish. Requires good ventilation. | Use a natural bristle brush. Requires mineral spirits or turpentine for cleanup. | Removable with mineral spirits. |
| Spray Varnish | Textured or delicate surfaces where brushing could cause damage. Great for quick, even coats. | Apply in a well-ventilated area. Use several light, sweeping coats rather than one heavy one. | Depends on the formula (check the can). |
Your choice of finish is purely about aesthetics and how you want the viewer to experience your art. A gloss finish makes colors look deep and saturated, almost like they're still wet. A matte finish provides a flat, non-reflective look that can feel very modern and soft. If you can't decide, satin is the perfect middle ground, offering a subtle sheen without distracting glare.
Applying the Varnish for a Perfect Finish
Precision is key here. Rushing the application is the number one cause of streaks, dust nibs, and an uneven finish.
First, find a clean, dust-free space. I can't stress this enough. Lay your painting completely flat, propped up on some blocks of wood or a couple of spare cans. This prevents the varnish from pooling at the edges as it dries.
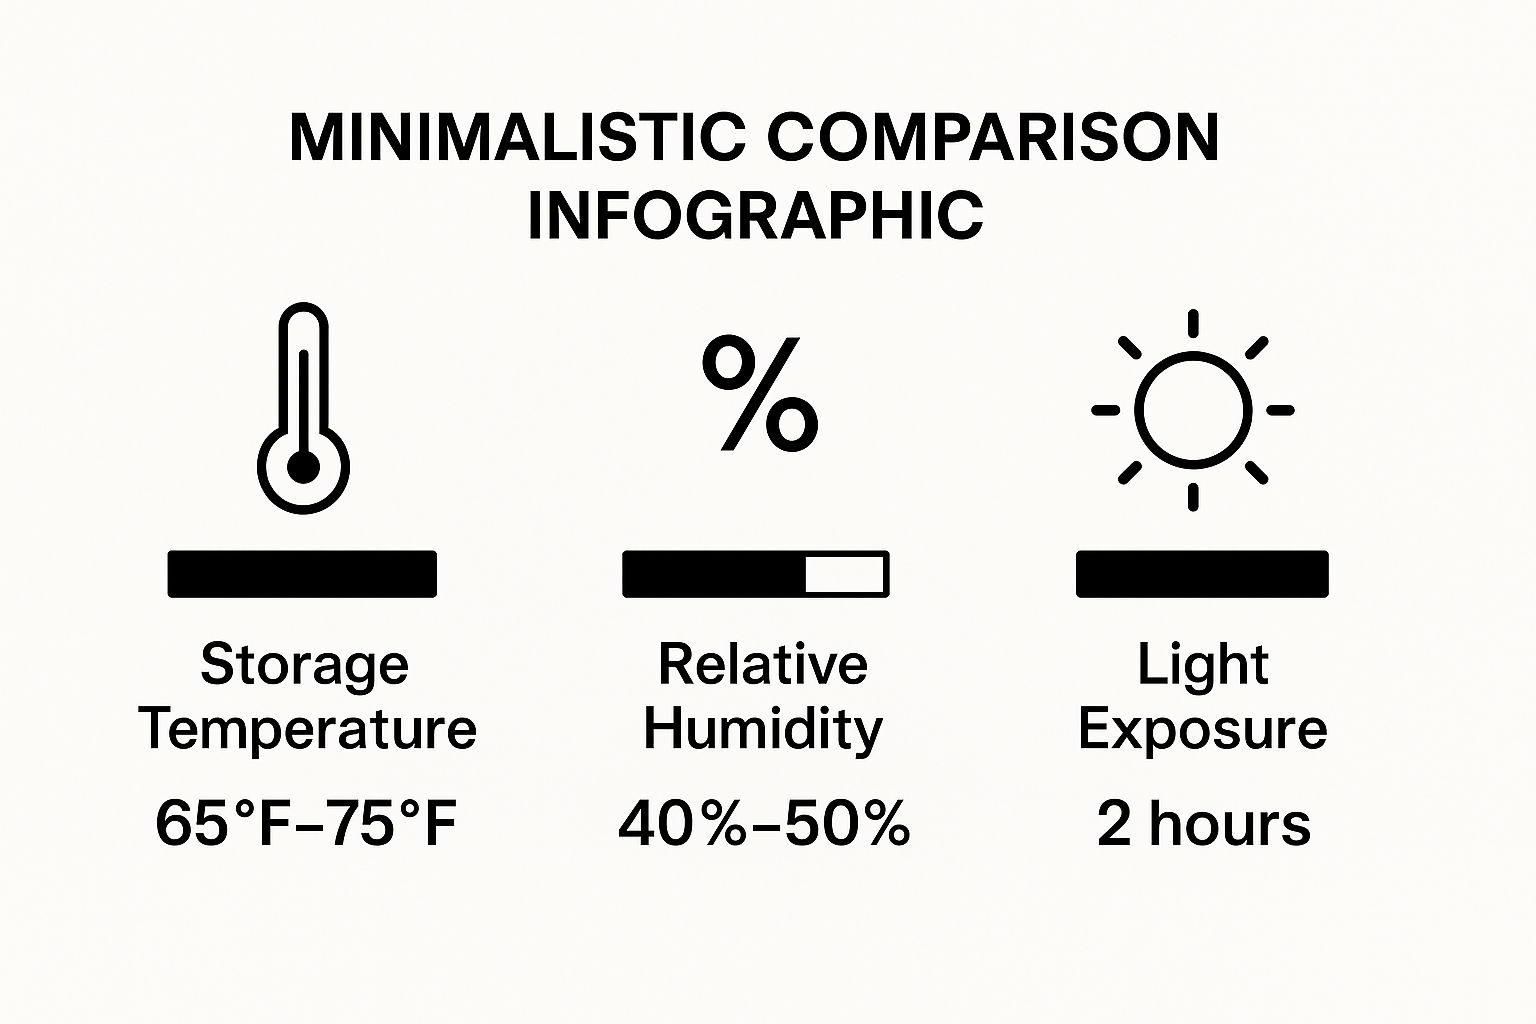
As the infographic shows, the environment matters immensely. Stable temperature and humidity are just as important for varnishing as they are for the long-term health of your painting. A steady environment helps prevent a whole host of problems.
Now, grab a wide, soft-bristled brush that you use only for varnishing. Dip it in the varnish and apply it in long, parallel strokes across the entire surface. Work methodically from one side to the other. Resist the urge to go back over areas that are starting to set—that’s how you get bubbles and streaks.
Let that first coat dry completely, which usually takes a few hours. For the best protection, you’ll want a second coat. This time, apply it in the opposite direction (e.g., vertically if your first coat was horizontal). This cross-hatching technique ensures you get full, gap-free coverage.
Once the second coat is on, leave it alone. Let it cure for at least a few days in that clean, flat spot before you even think about moving or hanging it. Patience here will pay off for years to come.
Smart Storage and Display Strategies for Your Art
You’ve put in all the work to clean and varnish your painting, but where you hang or store it can make or break its lifespan. The environment is the single biggest factor in preserving your acrylic paintings, so a little strategy here goes a long way in preventing damage before it even starts.

Think like a museum curator, even if it’s just for your own living room. The mission is to create a safe, stable home for your art that protects it from the everyday hazards that cause slow, irreversible harm.
The Best Places to Display Your Art
The sweet spot for any painting is an interior wall, well away from the temperature swings and light changes you get near windows and exterior doors. Direct sunlight is your painting’s worst enemy. Those UV rays will bleach the life right out of your vibrant acrylic pigments faster than you’d think.
Watch out for air vents and radiators, too. The constant blasts of hot, cold, dry, or humid air force the canvas and paint to expand and contract over and over. Over time, that stress is exactly what causes cracking and flaking.
A Note on Framing: A good frame is so much more than just a pretty border. Getting your artwork framed behind UV-protective glass or acrylic is one of the smartest investments you can make. It blocks up to 99% of damaging UV rays and puts a physical shield between your art and dust, moisture, and accidental knocks.
How to Store Paintings Safely
Whether you're moving, swapping out pieces, or just plain out of wall space, storing your art correctly is critical. First, let's talk about where not to store them: damp basements and sweltering attics. The extreme humidity and temperature shifts in these spots are a guaranteed recipe for disaster.
Instead, a closet in a climate-controlled part of your house is a much better choice. The key is finding somewhere cool, dry, and stable. And most importantly, never let the painted surfaces of two canvases touch.
Here are a few rules I always follow for safe storage:
- Wrap It Right: Cover each painting individually. Acid-free glassine paper is ideal, but a clean, old cotton sheet works in a pinch. Never put bubble wrap directly on the painting's surface. In warmer temperatures, the plastic can fuse to the varnish or paint and leave permanent imprints.
- Stack Vertically: Always store paintings standing on their edges, like books on a shelf. I like to slip a piece of cardboard or foam board between each one to keep them from leaning and warping. Stacking them flat on top of each other is a no-go; the weight will stretch the canvases out of shape.
- Give Them Space: Make sure air can circulate around your stored art. This simple step helps prevent any trapped moisture from turning into a mold or mildew problem.
If you’re just getting started and need some inspiration for what to paint next, our guide on https://paint-by-number.com/blogs/learn-about-paint-by-numbers/beginning-painting-ideas has some great projects you'll be proud to preserve.
When you don’t have a suitable space at home, especially for a large or valuable collection, a professional facility is a fantastic option. For situations requiring more robust protection, looking into professional long-term storage solutions can give you total peace of mind.
Got Questions? Let's Talk About Preserving Your Acrylic Art
Even after you've got the basics down, you’ll probably run into some tricky situations when caring for your acrylic paintings. It happens to everyone. Let’s go through a few of the questions I hear most often from artists and collectors.
What Do I Do About a Scratch or Crack?
This is a tough one, and how you handle it really depends on the severity of the damage.
For a tiny surface scuff—the kind that just barely grazes the varnish—you might be in luck. Sometimes, applying a fresh, very thin coat of varnish can be just enough to fill that little imperfection, making it seem to disappear. It's a simple trick for minor abrasions that haven't actually dug into the paint itself.
But if you're looking at a deep scratch or a crack that's gone through the paint layer, my advice changes completely: you should always consult a professional art conservator. Seriously. Trying to patch it up yourself with more paint or some kind of filler can go wrong fast. You could end up with a clumsy repair that’s impossible to reverse, which can tank the painting's value. A pro has the right skills and materials to make a seamless repair without hurting the artwork's integrity.
My rule of thumb is simple: if the damage is deeper than the varnish, it's time to call a professional. It's just not worth risking the original piece for a DIY fix that could cause more harm than good.
How Long Do I Really Have to Wait Before Varnishing?
Patience is key here, and I can't stress this enough. An acrylic painting might feel dry to the touch in just a few hours, but it’s not fully cured.
Curing is the chemical process where all the water slowly evaporates out of the paint film. This allows the acrylic polymers to cross-link and form that tough, stable surface we're aiming for. If you jump the gun and varnish too early, you're trapping moisture inside. This can cause a cloudy, hazy finish and, over time, can even damage the paint underneath.
So, how long is long enough?
- For thin layers of paint: I’d wait at least 72 hours to be safe.
- For thick, heavy impasto: You need to give it much more time. Think one to two weeks, and if you've really laid the paint on thick, waiting a full month isn't being overly cautious.
When in doubt, wait a little longer. A flawless finish is worth the extra time.
Is Cleaning with Water a Bad Idea?
Using water to clean an acrylic painting needs to be handled with extreme care. Yes, acrylics are water-based, but a fully cured painting can still be surprisingly vulnerable to moisture, especially if it's unvarnished. Water can actually pull some components out of the paint film or cause the surface to swell.
If you have to use moisture to lift some stubborn grime, be incredibly gentle. Take a soft, lint-free cloth or a cotton swab and dampen it—don't soak it—with deionized or distilled water. Squeeze out every last drop of excess before it even thinks about touching the canvas.
Always, always test it on a small, hidden spot first, like the very edge of the canvas. And honestly, for any painting that has real value, just stick to a dry, soft brush for dusting. If it needs more, talk to a conservator before you bring any liquids near it. The risk of causing permanent water damage is just too great.
Ready to turn your favorite memories into a masterpiece worth preserving? With Custom Paint By Numbers, you can create a personalized paint-by-number kit from any photo. Our high-quality kits come with everything you need to get started. Create your own custom artwork today.


