

So you've got a stubborn splotch of dried acrylic paint on your favorite shirt. The trick is to break down that hardened plastic with a solvent like isopropyl alcohol, gently scrape it away, and then treat the fabric with a cold water wash. Since dried acrylic is basically a layer of plastic fused to the fabric, your goal is to dissolve its binder without hurting the material underneath.
The key to success? Acting fast and picking the right approach for your specific fabric.
Why Is Dried Acrylic Paint So Hard to Remove?
That colorful stain isn't just a mark—it’s a thin, flexible film of plastic. Fresh out of the tube, acrylic paint is a mix of pigment, water, and an acrylic polymer binder. But as soon as the water evaporates, those polymer particles lock together and form a tough, water-resistant surface.
This is exactly why a wet spill wipes right up with a damp cloth, while a dried one seems like it’s there to stay. The paint becomes water-resistant remarkably quickly, sometimes in just a few minutes. If you can't treat it properly right away, the best thing you can do is at least keep the stain wet until you can give it your full attention.
The Science Behind the Stain
Picture the wet paint as a liquid glue seeping between the individual fibers of your clothing. Once it cures, it grabs onto those fibers, creating a surprisingly strong bond. Your mission, should you choose to accept it, is to use a solvent to weaken that bond, turning the hardened plastic back into something soft enough to lift off the fabric.
Understanding how the paint works is a big help, especially for artists who are constantly mixing colors. To learn more about this, check out our acrylic paint mixing guide.
The real challenge is dissolving the plastic without damaging the fabric's fibers or fading its color. Patience and the right tools are your best friends here.
Building Your Paint Removal Toolkit
Before you dive in, get your supplies in order. Having everything on hand means you won't have to scramble mid-treatment while a solvent is soaking into your garment. While different stains and fabrics might call for slightly different methods, this core toolkit will prepare you for most situations.
Let's look at some common household items versus more specialized commercial products you might use.
Your Paint Removal Toolkit: Household vs. Commercial Options
This table gives you a quick rundown of your options, from things you probably already have at home to products designed specifically for tough stains.
| Tool/Solution | Type | Best For | Notes |
|---|---|---|---|
| Isopropyl Alcohol | Household | Most fabrics, initial attempts | Go for a high concentration (70% to 99%) for the best results. |
| Dull Knife or Spoon | Household | Mechanical removal | Perfect for scraping off thick, raised paint without snagging the fabric. |
| Soft Bristle Brush | Household | Gentle scrubbing | An old toothbrush is ideal for working solvent into the stain. |
| Commercial Paint Remover | Commercial | Stubborn, old, or large stains | Always test on a hidden spot first and follow the product's directions exactly. |
Most of the time, simple household items like rubbing alcohol and a toothbrush will do the trick. But for really set-in stains, a commercial remover might just save the day.
The Critical First Steps for Stain Preparation
Jumping straight into scrubbing a dried acrylic paint stain is a classic mistake. I've seen it happen countless times—it just grinds the plastic pigment deeper into the fabric's fibers, making your job ten times harder. Before you even think about a cleaning solution, your first task is to get rid of as much of the hardened surface paint as you can.
This initial prep work is what sets you up for success. Think of it like clearing away the rubble before you can fix the foundation. You want to gently scrape or flake off that raised, crusty layer of paint without snagging or ripping the delicate threads underneath.
Scrape Away the Excess Paint
You don't need fancy tools for this; most of the best options are probably already in your kitchen drawer. A dull butter knife, the edge of an old credit card, or even your own fingernail can work wonders here. The goal is to find something with a firm edge that isn't sharp enough to slice through the fabric.
Start at the outside edge of the stain and gently work your way toward the center. This little trick helps keep the paint flakes contained instead of spreading them around. You'll be surprised how much of the stain just pops right off once you get under an edge, especially on smoother synthetic fabrics like polyester. Just be patient. Aggressive scraping will only cause pilling or, worse, a hole.
Pro Tip: If the paint is really thick and stubborn, try bending and flexing the fabric right at the stain. This often helps crack the hardened paint, making it much easier to flake off with your tool.
The Non-Negotiable Patch Test
Okay, once you've removed all the loose bits, it’s time to pick your cleaning solution. But hold on. Before you douse the stain, you have to do a patch test. This is probably the single most important step in the whole process, and it's the one that will save you from accidentally bleaching, discoloring, or weakening your garment.
Find a hidden spot on the clothing to test your cleaner. A few good places are:
- An inside seam or hem
- The fabric behind a pocket
- The tail of a shirt that always gets tucked in
Dab a tiny amount of the cleaning solution onto this spot with a cotton swab and let it sit for a few minutes. Then, blot it with a clean white cloth. If any dye from the fabric transfers to the cloth, or if you notice any color change on the garment itself, stop. That solution is not safe for your fabric.
This simple check is your insurance policy against a much bigger laundry disaster. Of course, knowing which beginner acrylic painting supplies to have on hand can also help you prep your space and prevent spills in the first place.
Using Household Items to Lift Paint Stains
You'd be surprised what you can find in your pantry or medicine cabinet to tackle a dried-on acrylic paint stain. Forget rushing out for specialty chemicals; some of the most effective solutions are things you already own. These simple items are fantastic at breaking down the tough polymer binder in acrylic paint, especially if you get to the stain before it has really set in.
Before you jump in, a little prep work goes a long way. This flowchart lays out the essential first moves: scrape off what you can, test your cleaning solution on a hidden spot, and then get to work on the stain itself.
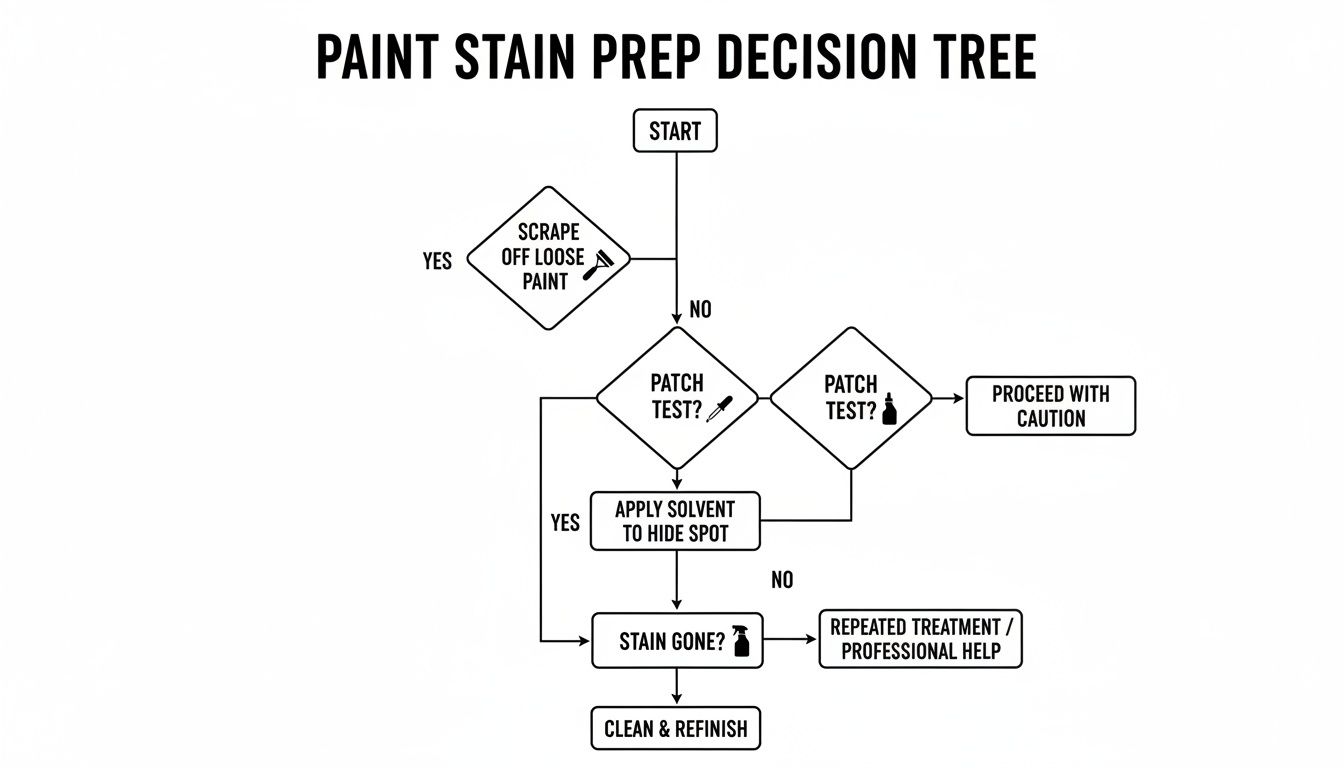
Following these initial steps is the key to success. It prevents you from accidentally spreading the stain or damaging the fabric. For more general DIY tricks, getting familiar with methods for removing set-in stains can give you an edge.
Isopropyl (Rubbing) Alcohol: The Go-To Solution
When it comes to DIY paint removal, isopropyl alcohol is the undisputed champion. It’s a fantastic solvent that gets to work softening that hardened paint, making it pliable enough to lift right out of the fabric’s fibers. For the best results, look for a concentration between 70% and 99%.
Here’s how I do it: Grab a cotton ball or the corner of a clean cloth and saturate it with the alcohol. Lay the stained part of your clothing face down on a thick stack of paper towels. Now, start blotting the back of the stain. This is a crucial detail—it pushes the paint out of the fabric and onto the paper towels, rather than driving it deeper in. You'll have to do this a few times, swapping out the paint-soaked paper towels for fresh ones as you go.
Once the bulk of the paint is gone, you can gently work on any leftover specks with an old toothbrush. After a creative session, your art tools might need a similar deep clean. Keeping your brushes in good shape is just as important, so it’s worth learning a good method for how to clean paint brushes.
Hand Sanitizer: An Unexpected Hero
Caught with a paint stain and no rubbing alcohol in sight? An alcohol-based hand sanitizer can work wonders. Most sanitizers contain a high percentage of ethyl or isopropyl alcohol, which is exactly what you need to break down the paint. The gel texture is actually a big plus—it clings to the stain and doesn't evaporate as quickly as straight alcohol.
Just squeeze a generous blob of sanitizer directly onto the dried paint. Let it sit for about 10-15 minutes so it has time to work its way into the acrylic binder.
Expert Tip: The gel consistency keeps the area moist, giving the alcohol more time to dissolve the paint. This is especially helpful for those thick, globby paint splatters that need a longer soak.
After it’s had time to sit, use the edge of a spoon or a dull knife to gently scrape away the softened paint. Work the leftover gel into the fabric with a soft brush, then give the spot a good rinse with cool water. It’s a lifesaver when you’re on the go and need a quick fix.
Ammonia and Vinegar: A Powerful Combination
For those really stubborn stains on tough fabrics like cotton or denim, a mix of ammonia and vinegar can deliver the knockout punch. Heads up: never use this on wool or silk. The ammonia is far too harsh and can permanently damage these delicate fibers.
To make the solution, just mix equal parts ammonia and white vinegar, then toss in a pinch of salt. Soak a clean cloth in the mixture and dab it liberally onto the paint stain. Let it penetrate for a few minutes before gently scrubbing the area in a circular motion with a brush.
You might need to repeat the process a couple of times for the most stubborn spots. Once the paint is finally gone, rinse the area with clean water before washing the whole garment like you normally would. And remember, always work in a well-ventilated space when using ammonia—those fumes are no joke.
Fabric Safety Guide For Cleaning Solutions
Not all fabrics react the same way to different cleaning agents. What works like a charm on sturdy denim could be a disaster for delicate silk. Before you start, it’s crucial to know what’s safe for your specific garment.
Here’s a quick compatibility chart to help you choose the right household solution for your fabric type.
| Cleaning Solution | Cotton/Linen | Denim | Polyester/Nylon | Wool/Silk |
|---|---|---|---|---|
| Rubbing Alcohol | Safe | Safe | Safe (test first) | Unsafe |
| Hand Sanitizer | Safe | Safe | Safe (test first) | Unsafe |
| Ammonia/Vinegar | Safe | Safe | Unsafe | Unsafe |
| Dish Soap | Safe | Safe | Safe | Safe (use gentle) |
| Hairspray | Safe (test first) | Safe (test first) | Safe (test first) | Unsafe |
Always remember to perform a patch test on a hidden area, like an inside seam, no matter what this chart says. It’s the single best way to prevent an accident and ensure your chosen method won't cause discoloration or damage.
When It's Time to Call in the Big Guns: Commercial Paint Removers
Let's be real—sometimes, household remedies just don't cut it. You've tried the rubbing alcohol, you've scrubbed until your fingers were sore, but that acrylic paint stain is holding on for dear life. When you've exhausted your DIY options, it’s time to head to the hardware store for a commercial paint remover.
These products are the heavy-hitters, specifically designed to break down the tough polymer bonds in dried paint that simple solvents can't handle.
So, when do you make the switch? I usually grab a commercial remover when I'm dealing with:
- An ancient stain: The kind that's been on a jacket for months, fully cured and basically fossilized.
- A huge, thick glob of paint: Think of a big splatter that didn't just sit on the surface but soaked deep into the fibers.
- Tough fabrics: Heavy-duty materials like canvas, work jeans, or thick upholstery can usually handle a more aggressive treatment.
Think of these products as your last line of defense before you either give up and turn that shirt into a paint rag or embrace the new "custom" design.
How to Choose the Right Product
The paint remover aisle can be a bit much, with a wall of cans and bottles all promising miracles. The key is to read the label carefully. You're looking for a product made specifically for latex or acrylic-based paints.
A remover designed for oil-based paints won't work here and might even damage your clothes with harsh chemicals you don't need. Look for phrases like "latex paint remover" or "water-based paint stripper." Many brands now offer fabric-safe formulas, but you have to double-check the label. Never just grab a general-purpose stripper and hope for the best on your favorite hoodie.
A Quick Word on Safety: These are powerful chemicals, so don't mess around. Always use them in a well-ventilated space—your garage with the door open or even outside is perfect. And please, wear chemical-resistant gloves to protect your skin. It's not worth a chemical burn.
The Right Way to Use It
Got your product and your safety gear? Great. The process itself is pretty simple, but you need to be methodical.
First thing's first: always do a patch test. Find an inconspicuous spot, like an inner seam or the hem, and apply a tiny amount of the remover. You need to make sure it won't bleach the fabric's dye or, worse, eat a hole through it.
Once you know it’s safe, lay the stained part of your clothing on a thick stack of old towels. The towels will soak up the remover and the dissolved paint, keeping the mess contained.
Follow the product's instructions to apply the remover directly onto the stain. Some are sprays, others are gels. Let it sit for the recommended amount of time—this could be 5 minutes or it could be up to an hour. This "dwell time" is crucial; it’s when the chemicals are working their magic to soften the paint.
After waiting, grab a soft brush or a plastic scraper and gently start working at the paint. You’ll see it begin to lift and peel away. I find it’s best to work from the outside edge of the stain toward the center to keep it from spreading.
Once you've gotten off as much paint as you can, rinse the area thoroughly with cool water. Then, toss the entire garment in the washing machine by itself. This final wash gets rid of any lingering solvent and makes the clothing safe to wear again.
The Final Wash: Locking in Your Success
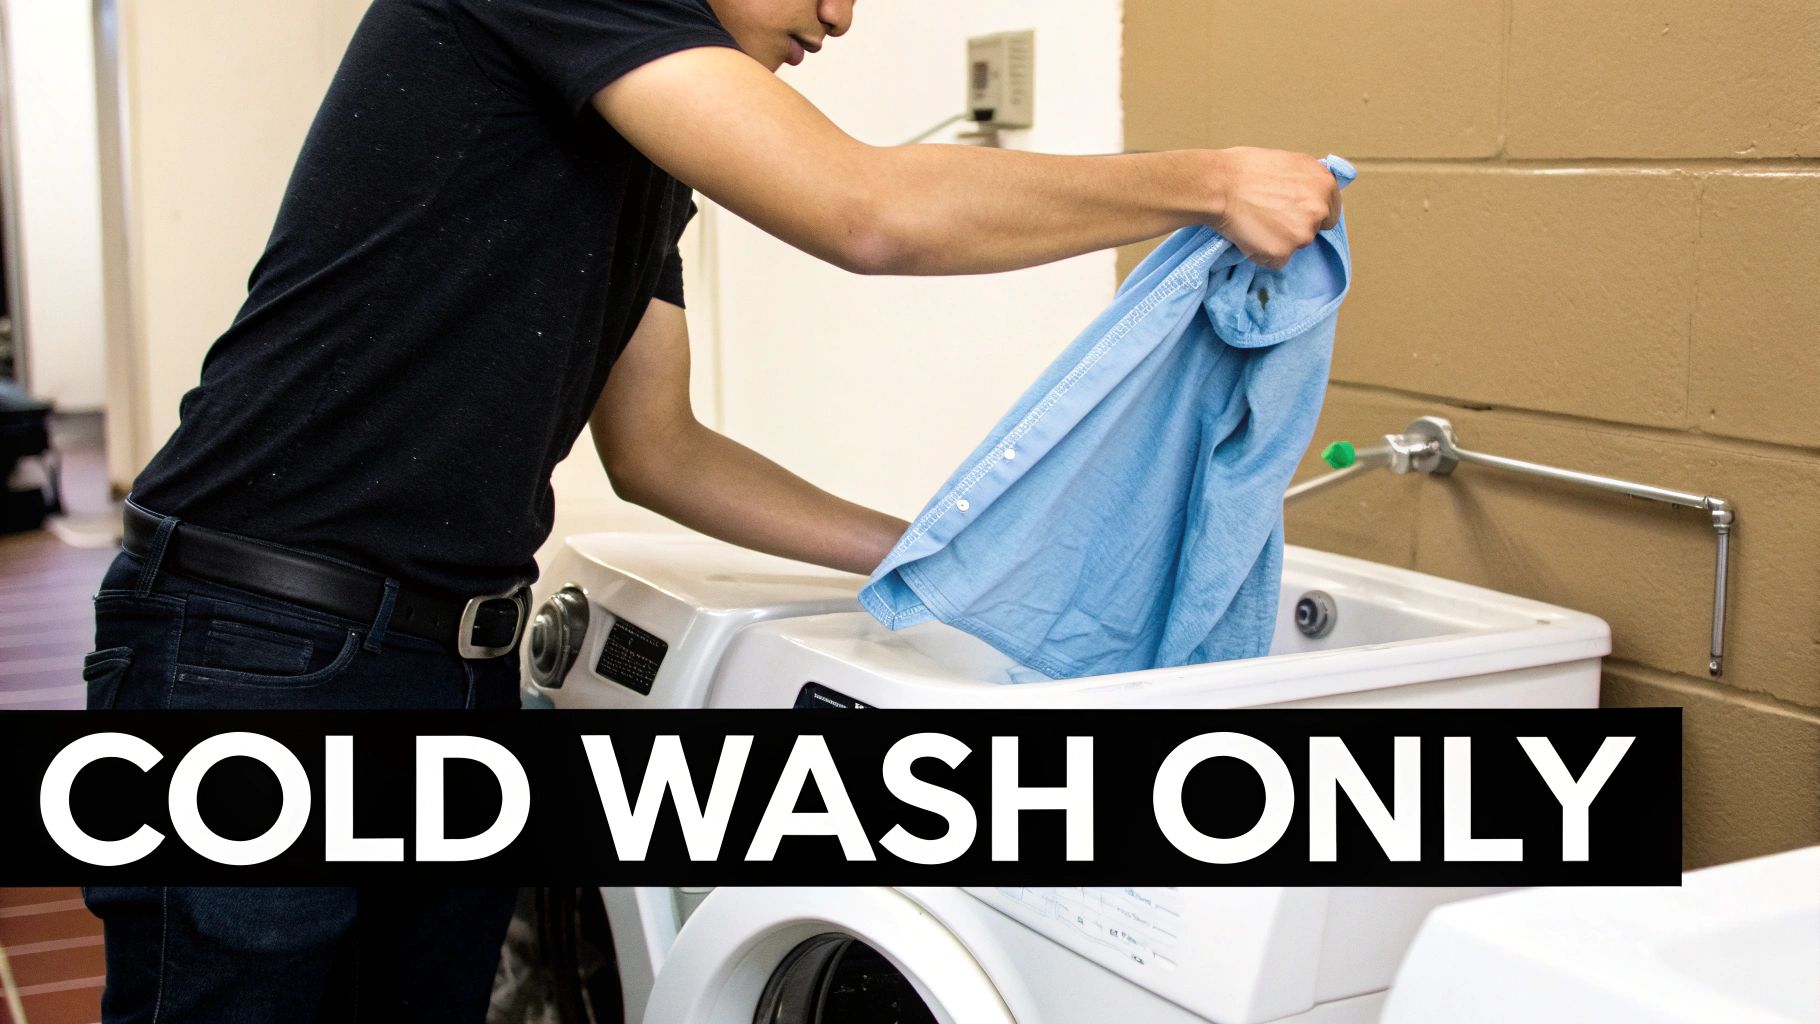
You’ve scraped, blotted, and treated the paint stain. Now it's time for the final, crucial step: the laundry. This isn’t just a simple wash—it’s the make-or-break moment that will either restore your garment or set that stain forever.
The number one rule here is simple but non-negotiable: use a cold water wash. I can't stress this enough. Heat is your enemy. Throwing the garment into a warm or hot cycle will act like a kiln, baking any lingering paint residue deep into the fibers and making it a permanent part of the fabric.
Hands Off the Dryer (For Now)
Tempted to toss it in the dryer to see the final result quickly? Don't do it. A clothes dryer will set a faint acrylic stain so permanently that it’s game over. Patience is key at this stage.
Before you even think about drying, you have to do a thorough inspection. Once the cold wash is done, pull the garment out while it’s still damp and give it a close look.
- Bring it to the light: Hold the fabric up to a window or a bright lamp. This is the best way to catch any subtle discoloration you might otherwise miss.
- Trust your touch: Gently run your fingers over the spot. Can you feel any stiffness or a slightly different texture compared to the rest of the fabric?
- Change your perspective: Look at the area from a few different angles. Sometimes a faint, shadowy outline of the stain only appears when you tilt the fabric just right.
If you see or feel anything that looks like leftover paint, the garment is not ready for the dryer.
My Go-To Tip: A damp cloth can be sneaky and hide a faint stain. If you're on the fence, let the garment air-dry completely first. A dry inspection gives you the clearest possible view of what's left.
What to Do If a Faint Stain Remains
Seeing a ghost of the stain isn’t a sign of failure—it just means the paint is putting up a good fight. It's time for another round.
Just repeat the treatment process you used before—whether it was alcohol, vinegar, or a commercial remover—and follow it up with another cold wash. Some stubborn, set-in stains might even take a third try.
Only when the garment passes your inspection with absolutely no trace of the stain is it safe to dry as you normally would. This final, careful check is what separates a saved piece of clothing from a new paint-splattered rag.
Common Questions About Acrylic Paint Stains
Even when you follow all the right steps, some acrylic paint stains are just plain stubborn. It's easy to second-guess your methods or wonder if a particularly old stain is a lost cause. Here are some quick, field-tested answers to the questions I hear most often when it comes to dried acrylic paint.
Can I Use Nail Polish Remover on a Stain?
You can, but this is a high-risk, high-reward move. The acetone in most nail polish removers is strong enough to break down the plastic polymers in acrylic paint, which is great. The problem is, it can also melt synthetic fabrics like acetate and modacrylic, or strip the color right out of your clothes.
If you're going to try it, a patch test is non-negotiable. Dab a tiny amount on a hidden spot, like an inner seam. If there’s no damage after a few minutes, you're probably safe. Just use a cotton swab to apply it sparingly to the stain in a well-ventilated room, and be sure to rinse the area thoroughly before it goes into the wash.
Is It Possible to Remove a Very Old Set-In Stain?
It’s tough, but not always impossible. An old stain has had time to cure and lock onto the fabric fibers, so you have to be more aggressive. I always start by physically scraping off as much of the surface paint as I can with a dull knife or the edge of a credit card.
Once you’ve done that, don't bother with the gentler stuff. Go straight for a heavy-hitter like a high-concentration isopropyl alcohol (91% or higher) or a commercial paint remover formulated for acrylics. You'll likely need to let the solvent sit on the stain for a good while—sometimes up to an hour—to really penetrate that hardened paint.
Be realistic with your expectations. You'll probably have to repeat the process a few times. While you can often fade the stain dramatically, complete removal isn't always in the cards, and a faint shadow might stick around.
What Do I Do for a Stain on a Dry Clean Only Item?
This one is simple: don't touch it. Trying to treat a "dry clean only" tag at home with water or solvents is a recipe for disaster. You risk shrinking, water spots, or ruining the texture of the fabric. This is a job for the pros.
The only thing you should do is gently flake off any raised bits of paint, being careful not to grind it deeper into the fabric. Then, get it to a professional dry cleaner as soon as possible. Be sure to point out the stain and tell them it's acrylic paint—that information helps them choose the right specialized solvents for the job.
For tips on tackling paint stains on all kinds of kids' clothes, not just those from acrylics, you might find this a general guide on removing paint stains from children's clothing really helpful. It’s a great resource for dealing with those everyday creative messes.
At Custom Paint By Numbers, we believe art should be about joy, not stress. We make it easy to turn your favorite photos into incredible paint-by-number masterpieces with our all-in-one kits. Find your next project at https://paint-by-number.com.


