

Have you ever looked at a photo and wished you could turn it into a real painting? Maybe it’s a candid shot from your wedding, a silly picture of your dog, or a stunning sunset from a vacation you never want to forget. With a custom paint by number from photo kit, you can do exactly that. It’s a wonderfully simple way for anyone, and I mean anyone, to create something personal and beautiful.
Bringing Your Own Memories To Life
This guide is your roadmap from start to finish. We'll cover everything from choosing the right photo to putting that final brushstroke on the canvas and hanging your masterpiece. My goal is to show you how fun and rewarding it is to literally paint your favorite memories. It’s less about technical skill and more about connecting with a moment that truly means something to you.
The whole idea is genius in its simplicity. You upload a photo, and a specialized service converts it into a numbered outline on a canvas. Your kit arrives with a set of paints, each corresponding to a number on the canvas. It breaks down a seemingly complex image into easy, meditative steps.
Why This Creative Hobby Is Exploding
The desire for personalized art is bigger than ever. We're seeing huge growth in the market for adult paint-by-numbers, and custom kits are leading the charge. In fact, personalized kits are on track to make up 40% of the entire adult market by 2027. It’s clear people are looking for projects that offer a real emotional payoff. You can read more about this trend and its market impact.
This boom in popularity makes perfect sense when you think about it. It hits on a few key things we all crave:
- A Personal Touch: Painting a picture of your own pet or a favorite family moment creates a connection that a generic landscape just can't match.
- Mindful Escape: There's something incredibly calming about the focus required. The step-by-step process helps quiet the mind and reduce stress.
- That "I Made This!" Feeling: Finishing a piece of art that looks this good delivers a huge sense of accomplishment. It’s pure pride.
Turning a personal photo into a work of art democratizes creativity. It removes the barrier of "not being an artist" and empowers everyone to create something meaningful and display-worthy from a moment they love.
At the end of the day, a custom paint-by-number project is more than just a craft. It’s an experience. It's a chance to slow down, get creative, and make a tangible piece of your own history.
Choosing The Right Photo For Your Canvas
Your journey to a stunning custom paint-by-number starts with one crucial decision: which picture to use? This choice is the absolute foundation of your project. A great photo translates into a fantastic painting, but a poor one can lead to a lot of frustration. Think of it like this: you're providing the blueprint for your masterpiece. The better the blueprint, the better the final result.
The goal is to find an image with clear subjects and great lighting. The software that maps out your numbered canvas needs to easily tell the difference between things like hair, skin, clothing, and the background. I've found that photos taken on a slightly overcast day are often perfect—the soft, even light prevents harsh shadows from hiding important details, especially on a person's face.
The Anatomy Of A Perfect Photo
As you scroll through your camera roll, keep an eye out for photos with certain qualities that make them ideal candidates. You're looking for high-resolution images that are tack-sharp. A quick test is to zoom in on your subject; if it immediately becomes a pixelated mess, it's probably not the right one.
Here’s what I always look for in a photo destined to become a paint-by-number kit:
- High Resolution: The image needs to be crisp and clear, not grainy. A larger file size is usually a good sign.
- Good Lighting: Try to avoid pictures that are too dark or completely washed out. Natural, even lighting is your best friend here.
- Clear Subject: The star of the show—be it a person, a pet, or a landscape—should be sharp and well-defined.
- Simple Background: A busy, cluttered background can really distract from the main subject and makes for a confusing paint-by-number layout. A clean background helps the subject pop.
This flowchart maps out the simple journey from picking a photo to getting your custom art kit.
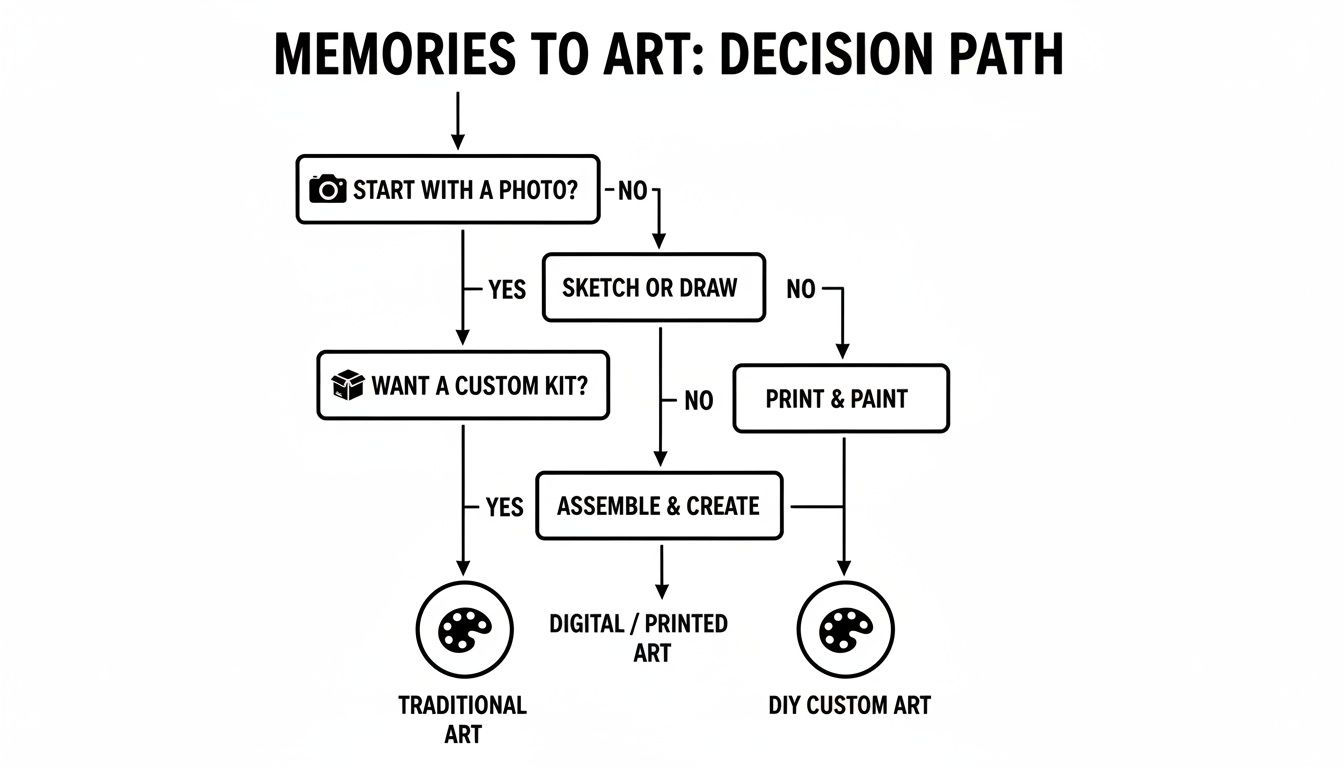
As you can see, a well-chosen photo is the essential first step that leads directly to a successful custom kit and a beautiful final painting.
Common Photo Pitfalls To Avoid
Now, let's talk about what not to choose. Over the years, I've seen certain types of photos consistently produce disappointing results because the automated process just can't interpret them well. A common mistake is picking a photo with harsh shadows, like those from direct, overhead sunlight. This often creates big, unnatural-looking dark patches on the final canvas.
Another classic issue is using group photos where everyone is too far away. When faces are tiny, the software can't map out individual features, and you end up with a bunch of indistinct blobs. You want every person to be clear and recognizable. For a deeper dive into how these elements play together, check out our guide on color and composition for more tips.
The best photos for a custom paint-by-number have one to three clear subjects, are well-lit with minimal shadows, and have a simple, uncluttered background. That combination is the secret sauce for a detailed and accurate painting map.
To make it even easier, here's a quick checklist comparing good and bad photo examples.
Photo Selection Checklist: Good vs. Bad Examples
| Attribute | Ideal Characteristics (Good Photo) | Problematic Characteristics (Bad Photo) |
|---|---|---|
| Focus | The subject is sharp and in focus. | The image is blurry, out-of-focus, or has motion blur. |
| Lighting | Bright, even lighting without any harsh shadows. | The photo is too dark, washed out, or has deep, obscuring shadows. |
| Composition | Your subject is close-up and fills most of the frame. | The subject is too far away, tiny, or lost in the scene. |
| Background | The background is simple and doesn't distract. | The background is busy, cluttered, or overly detailed. |
Keeping these simple guidelines in mind really sets you up for a fun and relaxing painting experience. It's the best way to ensure your final artwork is something you'll be truly proud to display.
How To Order Your Custom Kit
You’ve got the perfect picture, and now it’s time for the fun part: turning it into a real, physical paint-by-number kit. This is where you get to make the creative calls that will bring your photo to life on canvas. Let's break down the choices you'll face, from the size of your canvas to how many colors you'll be working with.
First things first, you'll need to upload your photo. Most sites make this super simple with a big, obvious upload button or a drag-and-drop area. Once your image is loaded up, you’re ready to start customizing your project.
Selecting The Right Canvas Size
The first big decision is what size canvas you want. This isn't just about how it will look on the wall; it also dictates how long the project will take. So, take a second and picture where you want this finished piece to hang. Are you filling a big, empty space above the sofa, or is it for a smaller nook in your office?
A larger canvas, something like a 24x30 inch (60x75cm), is absolutely brilliant for capturing the tiny details in a sprawling landscape or a busy family portrait. More canvas means more room for detail, which makes for a seriously impressive piece of art. On the other hand, a smaller size like 12x16 inch (30x40cm) is fantastic for a simple portrait, a close-up of your furry friend, or if you're just dipping your toes into custom kits for the first time.
Choosing Your Paint Color Count
Next up is the number of paint colors. This is probably the single most important choice you'll make, as it directly controls the level of detail and realism in your final painting. Most companies will give you a few options to pick from.
Here’s a quick guide to what each level really means for your art:
- 24 Colors: This option gives your painting a bold, graphic look. It simplifies the image into larger blocks of color, creating a more "painterly" or stylized effect. It's perfect for images that already have strong, simple shapes.
- 36 Colors: This is the sweet spot and the most popular for a reason. It strikes a fantastic balance, giving you enough shades to capture realistic details—like the texture in a pet's fur or subtle changes in skin tone—without being too overwhelming.
- 48 Colors: If your photo is packed with detail and has lots of subtle color shifts, like a fiery sunset or a close-up of a bouquet of flowers, this is the way to go. More colors mean smoother blends and a result that's incredibly close to the original photo.
Think of the paint count as a dial for realism. More colors will get you a photo-realistic painting, while fewer colors will give you a more artistic, stylized interpretation. Decide on the vibe you're going for before you choose.
The market for these kits has exploded, with one report showing around 1,224 different paint-by-number products available across major online retailers. That's a lot of options! Knowing how these choices affect the outcome is key to getting something you'll love. You can dive deeper into the market by checking out this review of consumer data on paint-by-number kits.
In the end, your canvas size and paint count are a team. A huge canvas with a 48-color palette is a serious project, but the payoff can be stunning. A small canvas with 24 colors is a more relaxed project that results in a wonderfully charming piece. For a deeper dive, take a look at our complete guide on creating the best custom paint by numbers kits.
Once you've made your choices, just add the kit to your cart and check out. You’re on your way
From Unboxing To Your First Brushstroke
It’s here! After all the anticipation, your custom paint by number from photo kit has finally landed on your doorstep. This is where the magic happens, turning that digital photo you chose into something you can actually touch and create. Opening the box feels like a mini-celebration, revealing the rolled-up canvas, those little numbered paint pots, and a fresh set of brushes.
Before you even think about dipping a brush in paint, spend a few minutes getting your space ready. Unroll the canvas and lay it flat. If the corners curl up, just place a heavy book on each one for a bit—that’ll do the trick. A great little habit to get into is arranging your paints by number. It sounds simple, but you'll thank yourself later when you aren't hunting for #17 in a random pile of pots.
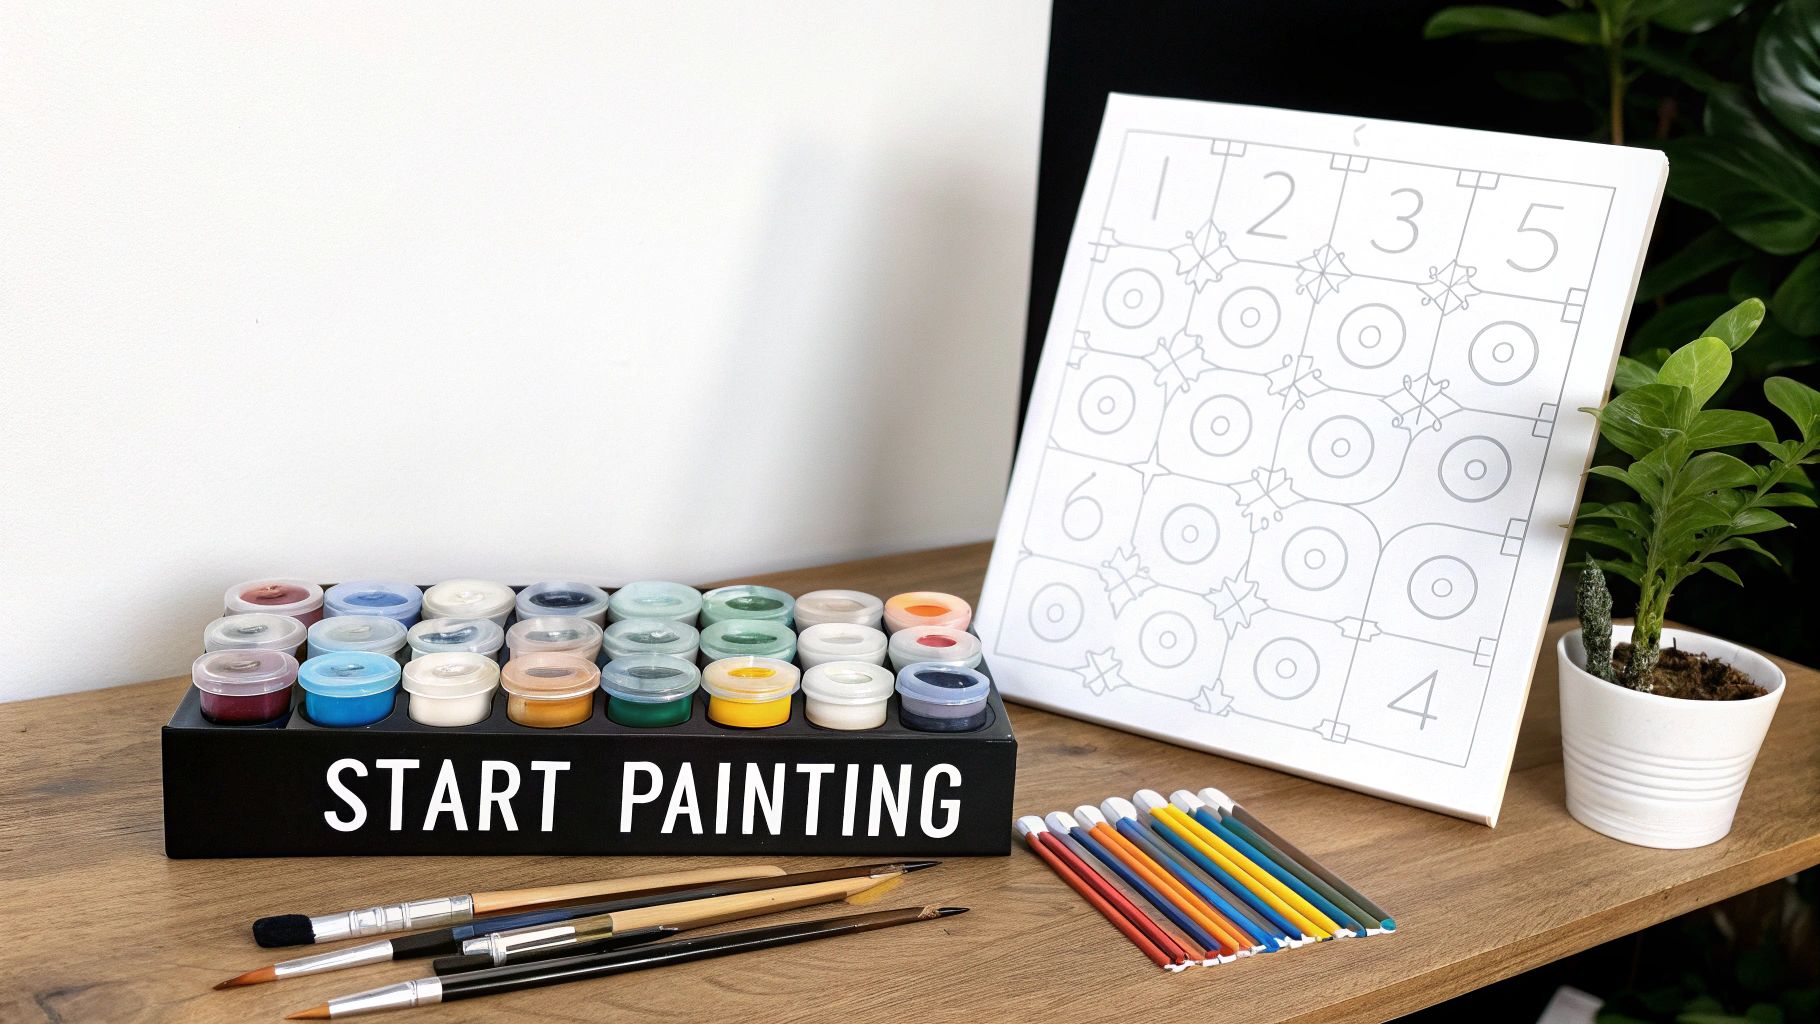
Getting Your Painting Station Ready
A little prep work makes the whole process so much more enjoyable. You don't need a professional art studio; a clear corner of the dining table works perfectly.
Here’s what I recommend grabbing:
- A Protective Layer: Put down some newspaper or an old sheet. Spills happen.
- Water for Rinsing: An old mug or a jam jar filled with clean water is essential for cleaning brushes.
- Paper Towels: Keep a roll nearby to blot your brushes after rinsing and to handle any small drips.
- Good Light: Painting in a dim room is a recipe for eye strain. A simple desk lamp can make a world of difference for seeing those tiny numbers.
Once your station is set, you’re ready to bring that photo to life. The whole point is to relax and get lost in the process. For anyone looking to dive into fulfilling new projects, this is one of the most satisfying creative hobbyist activities you can try.
Smart Strategies For Your First Painting Session
Alright, this is the fun part. While there’s no "wrong" way to start, a few tried-and-true methods can make the experience smoother and your final piece look cleaner.
Lots of painters like to work from the top of the canvas down to the bottom. It’s a practical approach that keeps your hand and sleeve out of the wet paint, preventing accidental smudges. It's a small thing that saves a lot of headaches.
Another common strategy is to paint with the lightest colors first. The logic is simple: if you make a mistake and go over a line, covering a light color with a dark one is a breeze. Trying to do the reverse? Not so much.
Pro Tip: Try to paint all the areas for one number before moving on to the next. This helps you get into a nice rhythm and keeps the color consistent, since you’re not constantly opening and closing the same pot.
Finally, a quick word on the paint itself. The acrylics in your kit should be good to go. But if you open a pot and the paint feels a little thick, just add a single drop of water and stir it with a toothpick. This can really help the paint glide off the brush, especially in those super detailed spots.
Just remember, this isn't about creating a perfect masterpiece on the first try. It's about enjoying the process. Relax, take your time, and have fun watching your photo appear, one number at a time.
Finishing And Displaying Your Artwork
You've laid down that last, satisfying brushstroke. Congratulations, your masterpiece is finished! But don't put the brushes away just yet. Taking a few extra moments to properly finish and frame your work is what separates a completed project from a stunning piece of art ready for the wall. This is where you give your hard work the professional polish it deserves.
A great first step is to apply a clear varnish. While it’s technically optional, I always recommend it. A good acrylic varnish seals the paint, protecting it from dust and UV light that can cause fading over time. It also gives the colors a noticeable pop and unifies the finish, whether you prefer a subtle matte look or a vibrant glossy sheen.
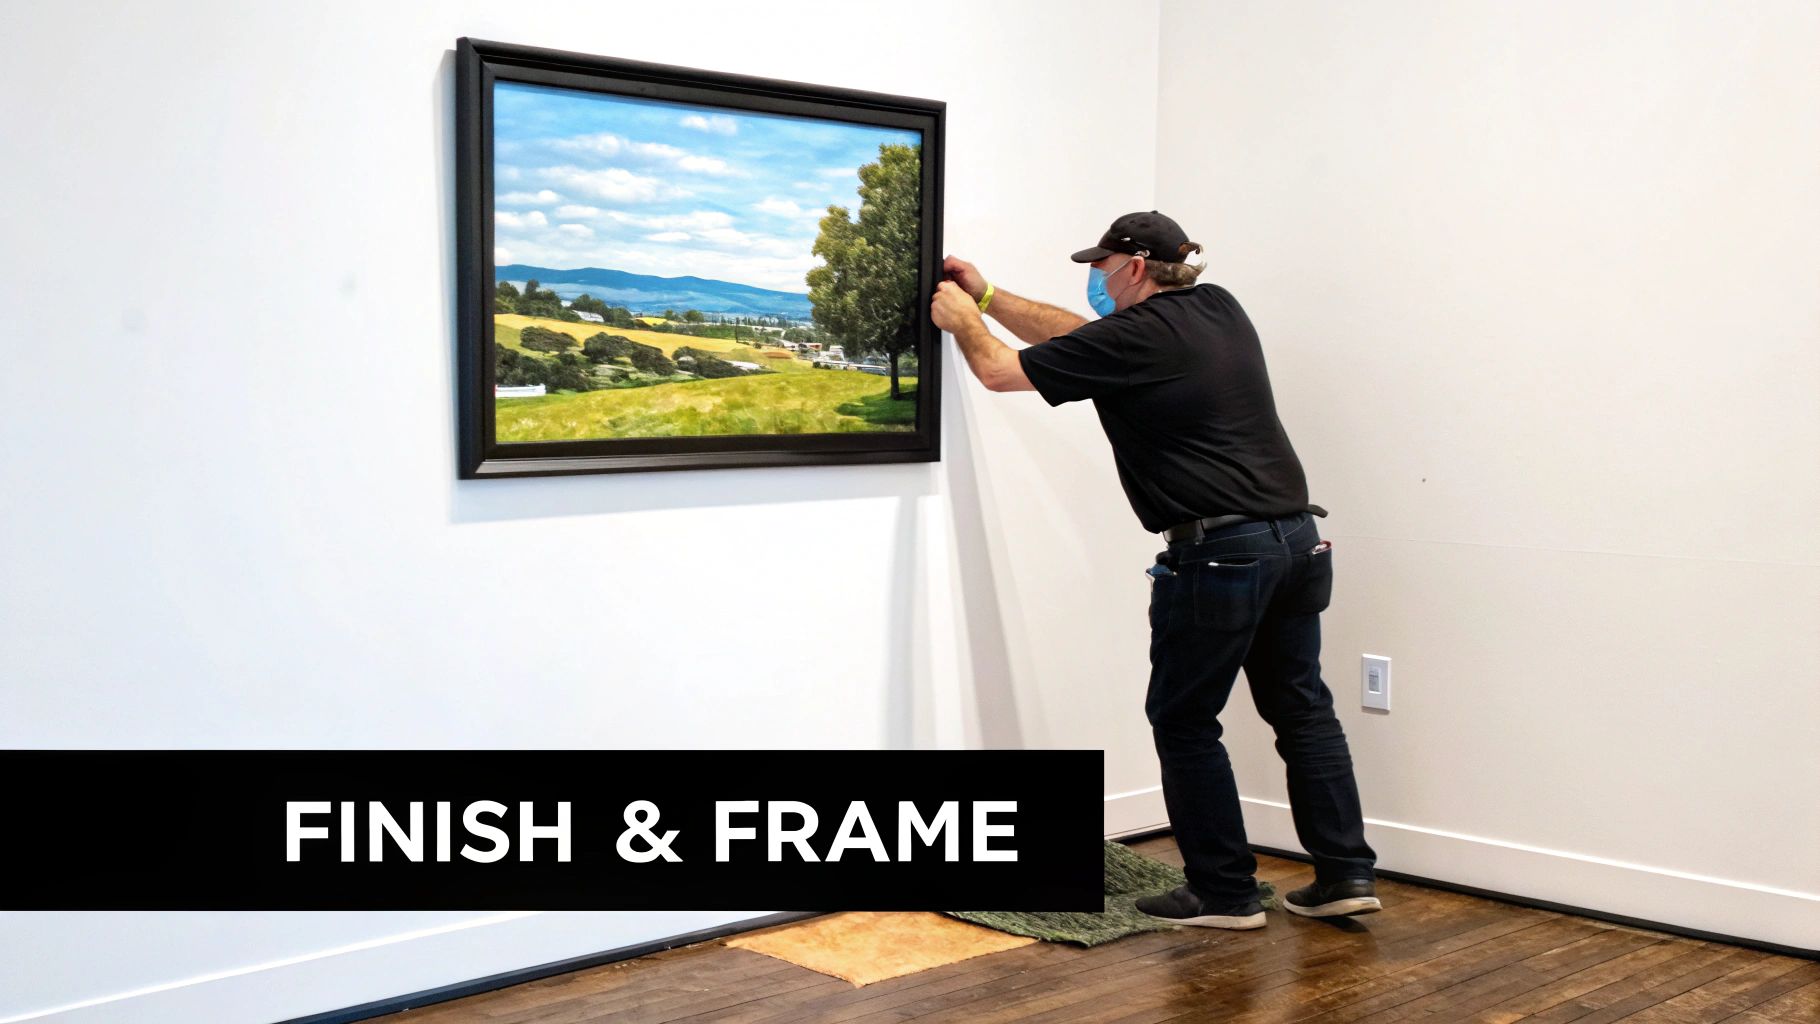
Assembling Your Frame
Many paint by number from photo kits come with a simple DIY wooden stretcher frame. Putting it together is pretty straightforward and it's the best way to get that classic, taut canvas look you see in galleries.
- Lay out the pieces. You'll have four wooden bars with interlocking corners designed to fit together.
- Join the corners. Gently press the corners into place to form the rectangle. If they feel a little snug, a light tap from a rubber mallet or a hammer wrapped in a cloth will get them seated perfectly.
- Position the canvas. Place your painting face-down on a clean, soft surface, like a towel. Center the assembled frame on the back, making sure everything is squared up.
- Secure and stretch. Fold the extra canvas over the frame. Using the included thumbtacks or a staple gun, secure the canvas to the wood. I always start in the middle of one side, then do the opposite side, pulling the canvas tight as I go. Then I do the other two sides the same way, working out towards the corners. This technique gives you a smooth, drum-like surface without any wrinkles.
For a more detailed walkthrough with some helpful visuals, we have a complete guide on how to frame canvas paintings that breaks it down even further.
Ideas For Showing Off Your Creation
Now for the fun part—finding the perfect spot for your art! Your personalized painting is more than just decoration; it's a story you brought to life with your own hands.
Here are a few ways I’ve seen people showcase their work:
- Create a gallery wall. Mix your painting in with other framed photos and prints. It can become the unique, personal anchor for a beautiful collection of family memories.
- Give a heartfelt gift. A hand-painted portrait of a pet or a favorite vacation spot is an incredibly personal and thoughtful gift for birthdays, anniversaries, or the holidays.
- Make it a centerpiece. Let your painting be the star. Hang it above your desk, the sofa, or your bed to create a focal point that injects your personality right into the room.
Your finished paint by number from a photo isn't just a craft project; it’s a tangible piece of your history. Displaying it celebrates not only the memory but also the time and care you invested in creating it.
Looking for even more inspiration on how to display your newly finished piece? I really like this guide to custom framed pictures, which has some great tips for showing off unique creations like yours.
Got Questions About Custom Kits? Let's Talk.
It's totally normal to have a few questions before diving into your first custom art project. You're turning a special memory into a painting, after all! Let's walk through some of the things people often ask, so you can feel confident and excited about the whole process.
Think of this as a quick chat to clear up any of those "what if" moments.
What Happens If My Photo Is Not Good Enough?
This is probably the number one worry I hear, but you can put it out of your mind. Reputable companies, ours included, don't just blindly print whatever you upload. We have a real human design team that looks at every single photo that comes through.
If your picture is a bit too blurry or the background is way too busy for a good paint by number from photo, they won't proceed. Instead, they'll get in touch with you directly. They might suggest a different photo or point out areas that could be tricky, making sure you're 100% on board before anything goes to production.
Think of the photo review as a built-in safety net. It’s there to make sure your starting point—the photo—is strong enough to become a beautiful painting. You’ve got an expert in your corner.
How Long Does A Custom Project Take?
Honestly, it varies a lot, and that’s part of the fun! For a smaller, simpler portrait, you might spend a cozy 8 to 12 hours painting. But if you’ve chosen a huge, detailed landscape with 48 different colors, you could easily be looking at 20 to 30 hours of creative time.
The best part? There’s no rush. Many people love chipping away at it for an hour or so each night. It becomes a relaxing ritual, spread out over a few days or even weeks, letting you just enjoy the process of watching your image come to life.
Can I Request Changes To The Design?
This is a tricky one. The process of turning a photo into a numbered canvas is mostly automated to ensure everything is accurate. Because of this, most companies don't offer a design proof or allow for tweaks after the fact.
That said, if you realize you want something changed right after you hit "order," your best bet is to contact customer service immediately. They can let you know if there's a small window to make an adjustment before your kit is officially in production.
What If I Run Out Of A Specific Paint Color?
Running out of paint is pretty rare. The kits are packed with more than enough of each color to finish the job. But hey, spills happen, or maybe you just got a little heavy-handed with a certain shade.
If you find a pot of paint is running low, don't panic. Just get in touch with the company's customer support. They’re almost always happy to send you a replacement pot of that color, usually for free, so you can finish your masterpiece.
Ready to see your own photo transformed into a work of art? At Custom Paint By Numbers, we guide you through every step of creating a personalized kit you'll be proud to paint. Start designing your custom paint-by-number kit today!


