

Turning a personal photo into a piece of wall art is one of the most satisfying ways to make a house feel like a home. It’s about taking those fleeting moments you’ve captured and giving them a permanent, beautiful space in your daily life.
This guide is your roadmap. We'll walk through the whole process, from picking the right image and giving it a little polish to choosing the perfect format—whether that's a classic canvas, a sleek framed print, or even a fun, custom paint-by-number kit.
Your Guide From Cherished Photo To Stunning Wall Art
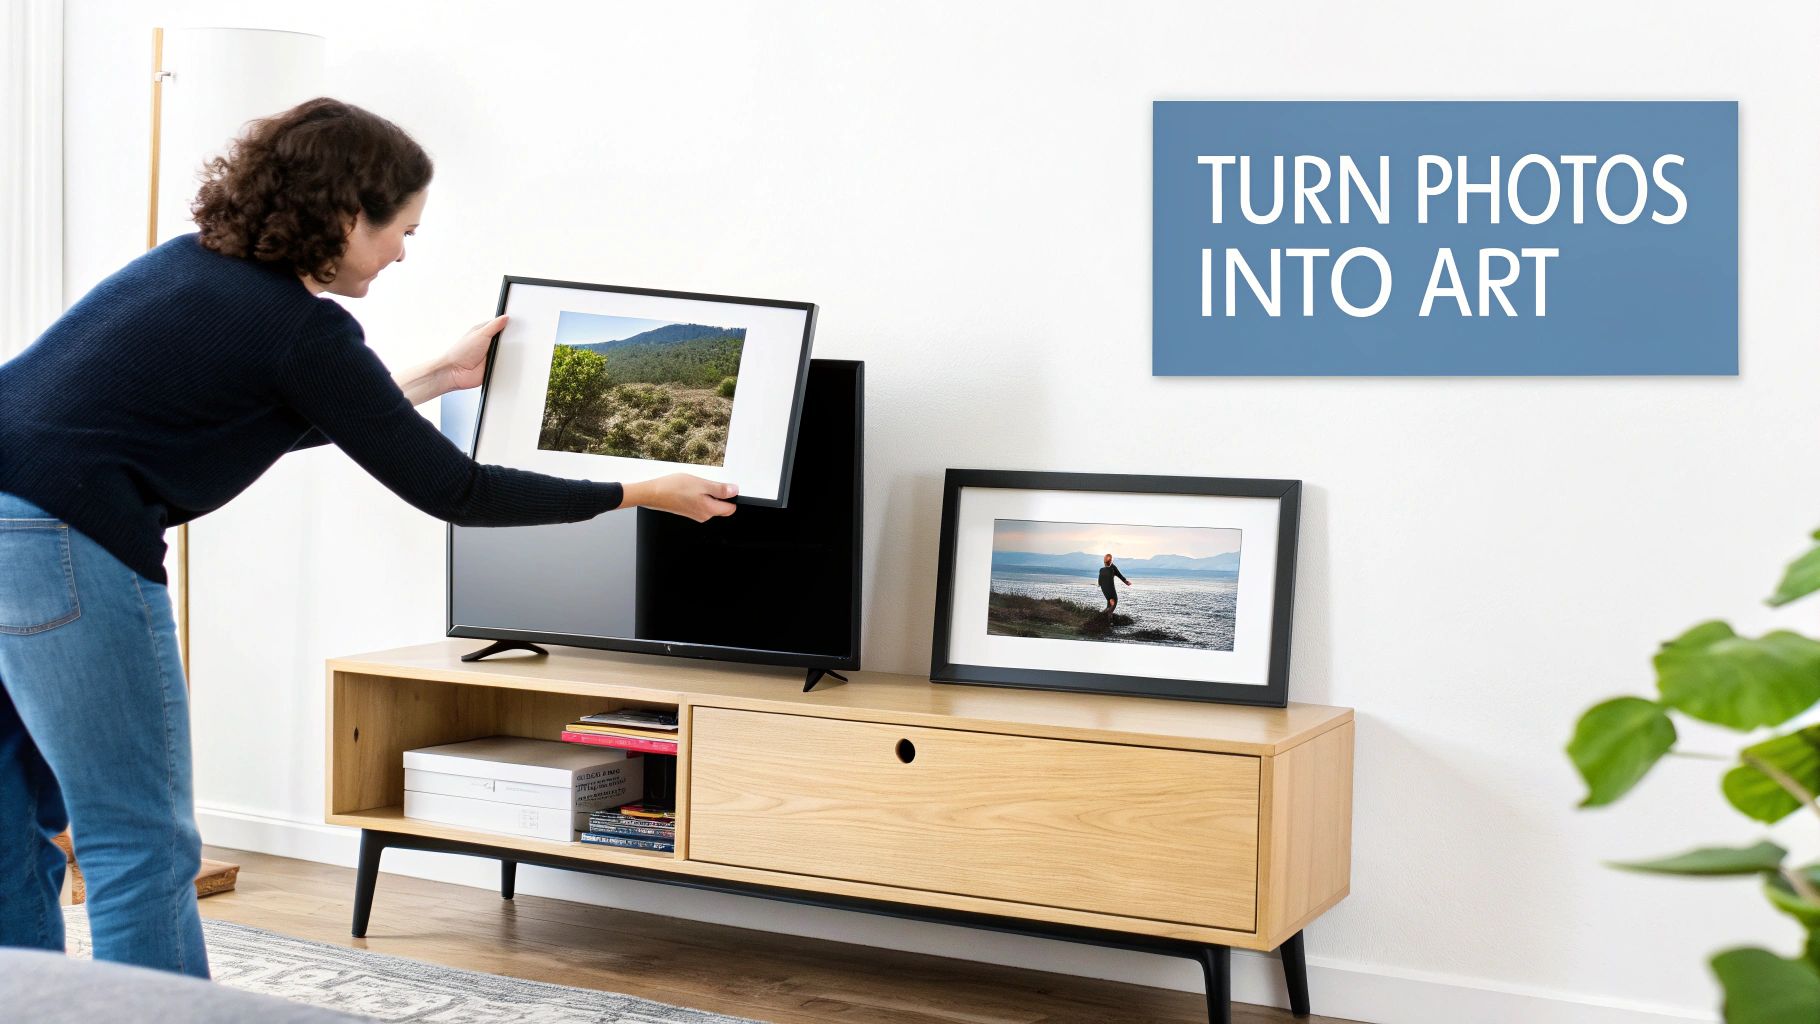
This is about more than just filling an empty wall; it’s about bringing your own stories into your space. That photo of a sunset from a once-in-a-lifetime trip or a candid shot of your kids laughing isn’t just a file on your phone—it's a feeling. Putting it on your wall makes that feeling a part of your home's atmosphere.
The journey from a digital picture to a masterpiece hanging in your living room involves a few key decisions, and I'm here to walk you through every one of them, without the confusing jargon.
What This Guide Covers
Forget just a list of printing companies. We’re going to get into the details that really matter for getting a result you’ll love for years to come. Here’s a peek at what you’ll learn:
- Selecting the Perfect Image: I’ll show you what to look for in a photo—from resolution to composition—to make sure it looks great when enlarged.
- Simple Editing Tricks: You don't need to be a pro. Discover how a few basic tweaks can make your photo truly shine.
- Choosing Your Medium: We'll compare the most popular options, like canvas and framed prints, and even explore unique ideas like custom paint-by-number kits.
- Sizing and Layout: Get my best practical advice for picking the right dimensions and arranging your new art for maximum impact.
The goal here is to create something that’s all you. A personal photo transformed into art is a conversation starter, a daily reminder of a great memory, and a true reflection of your life and style.
Ultimately, this is about making something with meaning. Whether you go for a modern framed print or get your hands dirty with a custom painting kit, the final piece will be far more special than anything you could grab off a store shelf. Let's get started.
How To Choose And Prepare The Perfect Photograph
It all starts with picking the right photo. This is probably the most important step in the whole process, because not every picture that looks good on your phone is going to translate well into a piece of art for your wall. The best images have two key ingredients: emotional connection and technical quality.
Think about the story behind the photo. Is it that candid shot of your family laughing, a breathtaking landscape from a memorable trip, or just your dog making a goofy face? The art that means the most comes from these moments. You're not just decorating a wall; you're putting up a daily reminder of a memory you love.
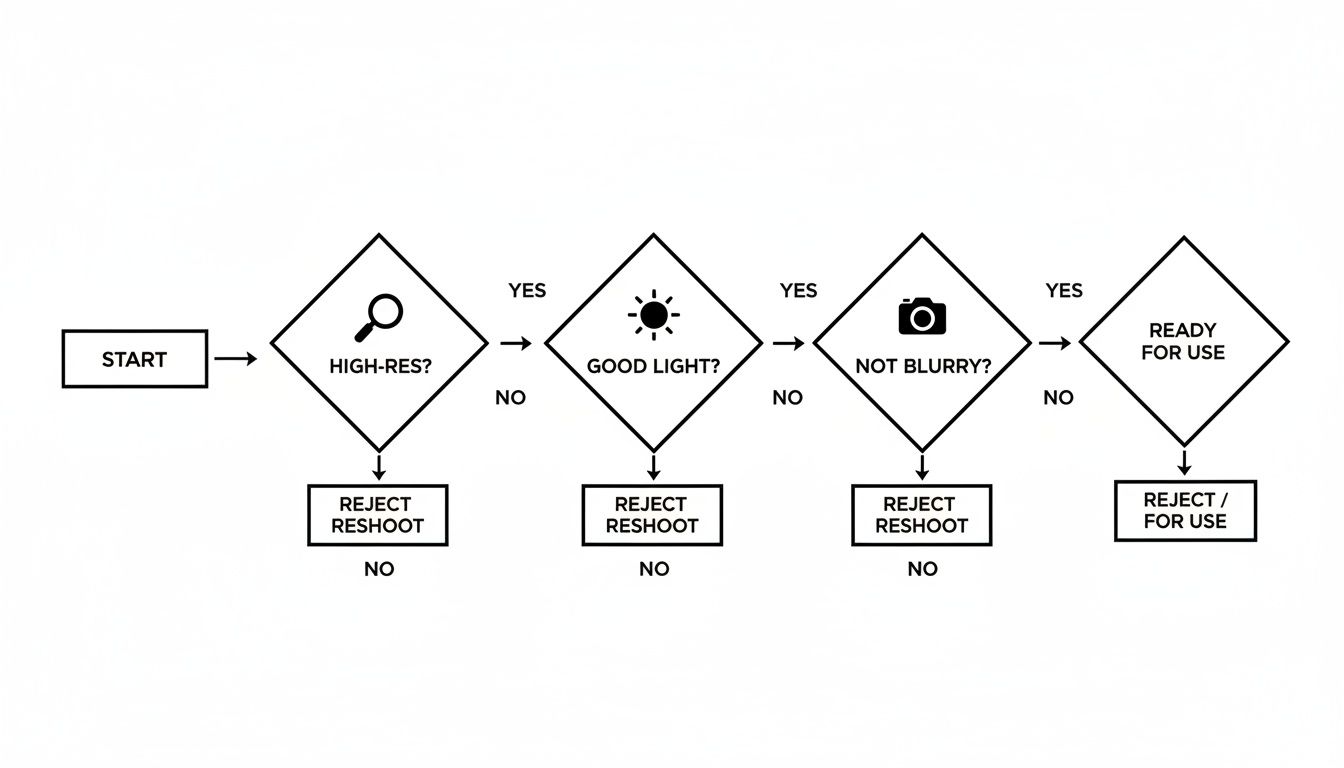
Vetting Your Photo For Print Quality
Okay, before you fall head-over-heels for a particular photo, you need to play detective and check its technical specs. A picture that looks tack-sharp on a 6-inch screen can easily turn into a blurry, pixelated mess when blown up to 16x20 inches. This is where resolution is everything.
In the printing world, we measure this in DPI (dots per inch). The gold standard for a crisp, high-quality print is 300 DPI at the size you want to print. So, if you're aiming for a 16x20 inch piece, you'll need an image file that's at least 4800x6000 pixels. Don't stress about the math, though—most good printing services will flag your photo if the resolution is too low for the size you've selected.
Here's a quick checklist I run through myself:
- Is it the original file? This is a big one. Always, always use the photo straight from your camera or phone. Photos you've saved from social media or that have been sent through a messaging app are almost always compressed, which kills the quality needed for printing.
- Is the focus sharp? Zoom way in on the most critical part of the photo—a person's eyes, the detail on a flower, whatever is the main subject. If it looks even a little bit soft or fuzzy, it will look much worse when it’s big.
- How’s the lighting? Steer clear of photos that are super dark, have harsh, distracting shadows, or are blown out with bright white spots. Good, even lighting makes for a much better print.
Simple Edits For A Professional Look
You don't need to be a Photoshop wizard to make your photo pop. Your phone's built-in editor or free online tools are more than powerful enough for the job. The goal here isn't to fundamentally change the photo, but to enhance what’s already there.
I usually start with these three adjustments:
- Brightness and Contrast: A little bump in brightness can really bring a dull photo to life. A touch of extra contrast will make the colors stand out and give the image more depth.
- Saturation and Vibrance: Go easy on these! A small increase in vibrance is great for making colors richer without looking fake. Saturation is a much stronger tool, so a gentle hand is key.
- Cropping and Straightening: Is the horizon line crooked? Is there a distracting trash can in the corner of the frame? A quick crop or straighten can instantly make your composition feel more intentional and professional. Getting this right is especially important when you're turning your own paintings or drawings into prints. For a deeper look, our guide on how to photograph artwork for prints has some great tips.
Pro Tip: Before you start tweaking, always save a copy of the original file. That way, you can always go back to square one. Trust me, the best edits are the ones that are so subtle you don't even notice they're there.
Once you’ve polished your image, you're ready for the next phase. The next logical step is to upload your prepared photograph to the printing service you plan to use. By taking a few minutes to get this prep work right, you've already done most of the heavy lifting to ensure your final piece of art is something you'll be proud to display.
Choosing How to Bring Your Photo to Life
Alright, you've selected and polished your photo. Now for the fun part: deciding how to turn that digital file into a piece of art for your wall. The medium you choose is a huge part of the creative process. It sets the tone, defines the style, and ultimately shapes how you and your guests will experience the image every day.
Think of it as choosing the right voice for your story. Do you want it to be classic and elegant, modern and bold, or something you had a hand in creating yourself?
Before you get too far, a quick final check on your photo is always a good idea. Is it sharp? Is the lighting good? Is the resolution high enough for the size you're thinking of?
Running through these basics ensures you're building on a solid foundation. Once you're confident your photo is ready, let's explore your options.
Ready-to-Hang Classics
If you're looking for a direct route from screen to wall, these timeless options deliver a finished product with professional polish.
-
Classic Canvas Prints: There's a reason canvas is so popular. It has a beautiful, subtle texture that gives photos a warm, almost painterly feel. It’s also incredibly forgiving. If your photo isn't tack-sharp, the woven surface can soften the image just enough to make it look intentionally artistic. This makes it a go-to for portraits and sweeping landscapes.
-
Elegant Framed Photos: You can't go wrong with a classic frame. It's the ultimate way to customize your art to perfectly match your room's decor. With endless combinations of frames, mats, and glass types, you can elevate a simple photo into a gallery-worthy centerpiece that feels both personal and high-end.
-
Modern Metal Prints: For a sleek, contemporary vibe, nothing beats a metal print. Your image is infused directly onto a sheet of aluminum, creating an incredible vibrancy and depth that seems to glow from within. They're durable, scratch-resistant, and perfect for high-contrast, colorful shots—like that killer sunset from your last vacation.
The Hands-On, Creative Approach
What if you want to be more involved than just clicking "order"? There's a really meaningful way to connect with your memory by physically creating the art yourself.
A custom paint-by-number kit is a fantastic way to do this. You upload your photo, and a company like Canvas by Numbers converts it into a detailed, numbered canvas, sending you all the paints and brushes needed to bring it to life.
Instead of just hanging a memory, you get to relive it with every brushstroke. It’s a slow, mindful process that forges a much deeper connection to the final piece.
The finished painting tells two stories: the story of the moment captured in the photo, and the story of the hours you spent lovingly recreating it. It becomes an instant heirloom.
This isn’t just a niche hobby; it’s a booming trend. People are craving personalized, hands-on experiences. The paint-by-numbers market is projected to grow at a CAGR of 7.1%, reaching an estimated $2.87 billion by 2033. This explosion in popularity, as detailed in reports on the growth of paint-by-number kits, highlights a real shift towards art that is both personal and interactive.
Comparison of Wall Art Mediums
To help you decide, here’s a quick breakdown of how these options stack up against each other.
| Medium | Aesthetic & Feel | Interactivity Level | Average Cost | Best For |
|---|---|---|---|---|
| Canvas Print | Warm, textured, classic, artistic | Low | $$ | Portraits, landscapes, softening slightly less-sharp images |
| Framed Print | Polished, traditional, versatile, sophisticated | Low | $$-$$$ | Gallery walls, formal spaces, any photo you want to elevate |
| Metal Print | Modern, vibrant, luminous, sleek | Low | $$$ | High-contrast photos, colorful travel shots, contemporary decor |
| Paint-by-Numbers Kit | Hand-painted, personal, unique, textured | High | $$ | Meaningful gifts, creating a family heirloom, a mindful project |
Ultimately, the best choice comes down to what you're looking for. Consider the photo itself, the style of your home, and how much of a personal touch you want to add. Do you want an instant "wow" factor, or the deep satisfaction of creating something with your own two hands? Whichever path you choose, the goal is the same: to create something you'll love seeing on your wall every single day.
Designing Your Wall Art Layout For Maximum Impact
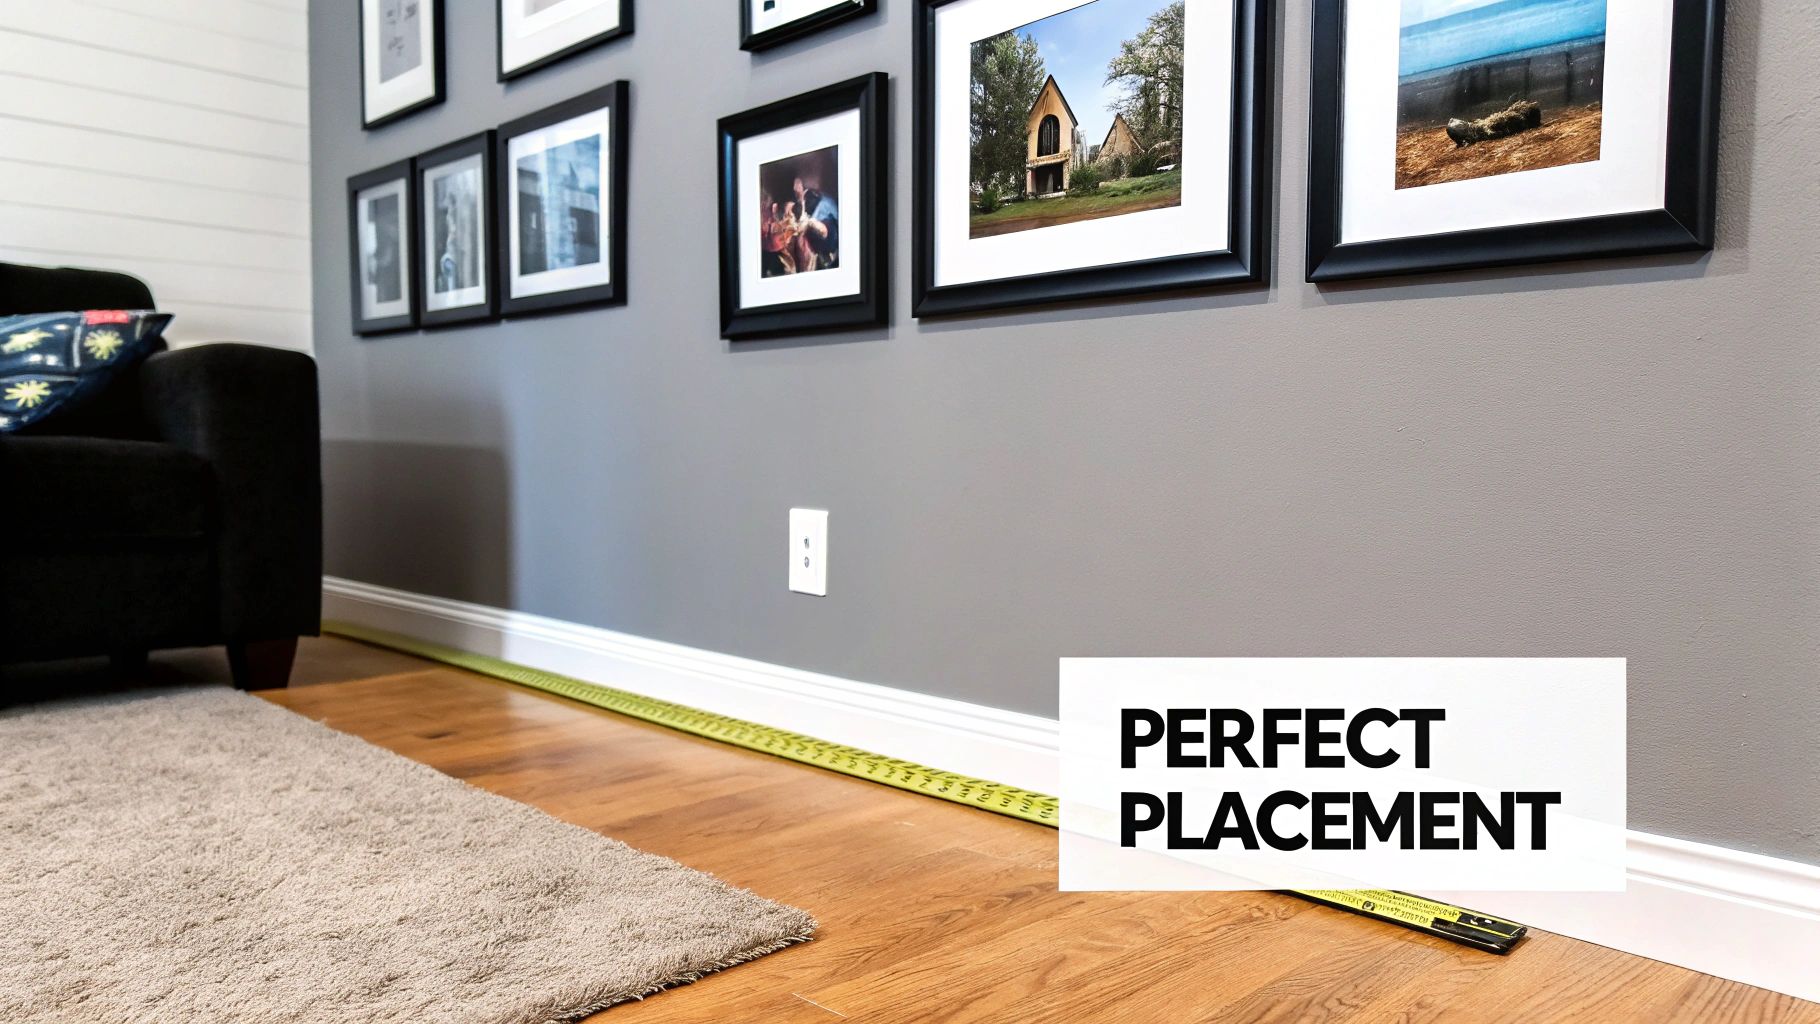
You’ve nailed the perfect photo and picked out your canvas or frame. But the real magic happens when you figure out exactly where—and how—to hang it. The size and placement of your art are what separate a good-looking room from a great one.
A piece that's too small will look like a postage stamp lost on a big wall. Go too large, and it can completely dominate the space. Don't leave it to guesswork! There are a few tried-and-true design tricks that will make your new art feel right at home.
Finding The Perfect Height And Size
Here’s a secret straight from art galleries and interior designers: the 57 inches on center rule. All this means is that the very center of your artwork should hang 57 inches from the floor. Why? It's the average human eye level, making it the most natural and comfortable height for viewing.
If you’re hanging something over a piece of furniture, like a couch or a headboard, the rules change just a bit. You’ll want the bottom of the frame to be about 6-8 inches above the furniture. This creates a visual anchor, making the two pieces feel connected. As for width, aim for your art to be about two-thirds the width of the furniture below it.
Key Takeaway: Before you even think about ordering, grab a measuring tape. Use painter's tape to block out the dimensions on your wall. This simple trick lets you visualize the scale in your actual space and helps you order the perfect size with confidence.
If you want to see how different sizes look in a real-world context, our comprehensive canvas sizing guide is a fantastic resource.
Choosing Your Layout Style
So, how do you want your wall to feel? The layout you choose tells a story. Are you showcasing one incredible moment or a collection of memories that belong together?
- The Single Statement Piece: A single, large-scale piece is a showstopper. It creates a powerful focal point and works perfectly for that one breathtaking landscape or a professional portrait that just commands attention.
- The Symmetrical Grid: Clean, modern, and oh-so-organized. A grid of two, four, or six identically sized pieces is ideal for a series of photos that share a common theme or color scheme.
- The Eclectic Gallery Wall: This is your chance to play. A gallery wall is all about mixing and matching different sizes, orientations, and even frame styles to tell a broader story. It’s personal and full of character.
When building a gallery wall, a great tip is to place your largest piece just a bit off-center and arrange the smaller ones around it. Try to keep the spacing consistent—about 2-3 inches between each frame—to keep the whole arrangement from looking chaotic.
The desire for unique home decor like this is huge. The global art and craft materials market was valued at USD 22.57 billion in 2024 and is projected to reach USD 35.29 billion by 2032. It just goes to show how much we all love making our spaces feel uniquely our own.
From Ordering Your Art to Hanging the Final Piece
Okay, you’ve made all the tough design decisions. Now for the exciting part—turning that vision into a real piece of art for your wall. This final stage, from hitting "order" to hanging the finished piece, is where the magic happens. The first step? Picking the right company for the job.
Whether you’re getting a straightforward canvas print or a custom paint-by-number kit, it pays to do a little homework. Look past the slick website and dig into customer reviews. I always search for comments on print quality, color accuracy, and how well the materials hold up over time. The best companies are always upfront about the kinds of canvas, inks, and paints they use.
For the Paint-By-Number Enthusiast
If you went with a custom paint-by-number kit, you’re in for a treat. It’s a hands-on process where the journey is just as rewarding as the final painting. Trust me, the quality of your tools makes all the difference.
Thankfully, it's a good time to be a hobbyist. The North American painting tools market was valued at a whopping USD 3.79 billion in 2024, and it's still growing. With brushes alone making up 40.7% of that market, finding excellent supplies is easier than ever, which is fantastic news for the custom paint-by-number world.
To get the most out of your painting experience, here are a few things I’ve learned:
- Prep your creative space. Find a spot with good light where you can leave everything out for a few days. Put down some newspaper and keep a cup of water nearby for rinsing brushes. Simple, but it helps.
- Go dark first. I always start by filling in the darkest colors. It's an old-school trick that helps create depth and saves your lighter colors from getting smudged and muddy.
- Soften the edges. If you want a more "painted" look instead of distinct blocks of color, try blending the lines. While the paint is still a bit wet, use a clean, damp brush to gently blur the edge where two colors meet.
A custom paint-by-number isn't just a craft project. It’s a chance to slow down and really connect with a memory, one brushstroke at a time. The finished piece is infused with your own time and care, which makes it incredibly special.
Hanging Your Finished Masterpiece
Once your print arrives or your painting is fully dry, it’s time for the final, satisfying step. Hanging your art correctly makes it look professional and keeps it secure. Most pieces come with hardware, but you're in charge of installation.
For lighter canvases, a single sawtooth hanger and a nail will usually do the trick. But for heavier or larger art, you'll want to use two D-rings with picture wire. If you're dealing with drywall, wall anchors are your best friend for extra security. And please, use a level! A crooked frame can distract from even the most beautiful artwork.
The right frame can completely transform your piece, tying it into your room's decor. For canvases, I love "floater" frames—they create a clean, modern look you often see in galleries. If you're looking for more ideas on this, we've put together a whole guide on how to frame canvas paintings.
Finally, don't forget about lighting. The right illumination can take a beautiful piece and make it a stunning focal point. Specialized options like LED framing projector lights can highlight the colors and details, making your art pop, day or night.
A Few Final Questions You Might Have
Even after mapping out the perfect project, it’s natural to have a few lingering questions. That's a good thing! It means you’re invested in getting this just right. Turning a personal photo into art is a big deal, and you want to be sure about the details.
Let's walk through some of the most common things people ask. Think of this as a quick chat to clear up any last-minute uncertainties before you bring your vision to life.
What Resolution Do I Actually Need for Wall Art?
For a print that looks sharp and professional, you'll want to aim for 300 DPI (dots per inch) at the final print size. It sounds technical, but it's pretty simple. For a 16x20 inch print, for instance, you'd want your original digital file to be around 4800x6000 pixels. This ensures every little detail is captured beautifully, without any of that frustrating blurriness or pixelation.
While some materials, like canvas, can be a bit more forgiving if the resolution is slightly lower, a high-quality photo is always your best bet. A great rule of thumb? Always use the original, full-size file straight from your camera or phone. Never use a version you saved from social media or that someone sent you over a messaging app, as those are always compressed.
Can I Really Use a Phone Photo for a Large Print?
Yes, absolutely! Modern smartphones pack some seriously powerful cameras, and the photos they take are often more than good enough for large-scale wall art. The secret is handling the file correctly.
Always, always work with the original image from your phone’s photo gallery. That's the highest quality version you have. The issue is that social media apps and text messages automatically shrink your photos to save space, and that process kills the quality needed for printing. As a general guide, a photo from a phone with a 12-megapixel camera or better is a fantastic starting point for a bigger piece.
Your phone is almost certainly capable of producing a stunning piece of art. The most common mistake isn't the camera—it's using a low-quality, compressed copy of the photo instead of the original file.
Canvas Print or Custom Paint-by-Number Kit?
This decision really boils down to what you want from the experience. Are you looking for a beautiful, finished piece of art right now, or are you craving a creative project?
-
A canvas print gives you that instant gratification. It’s a classic, beautiful way to display your photo with a lovely textured finish. If you want something ready to hang that arrives at your door looking perfect, canvas is the way to go.
-
A custom paint-by-number kit, on the other hand, is all about the journey. It turns the act of creating art into a deeply personal experience. You’re not just printing a memory; you’re recreating it with your own hands. The final piece is a unique, handmade treasure that holds so much more sentimental value.
So, do you want a finished product, or do you want to be part of the creation? There's no wrong answer.
What Kind of Photos Work Best for Paint-by-Number Kits?
For a paint-by-number kit, you'll get the best results with photos that have a clear subject, good contrast, and distinct areas of color. Images with these characteristics translate perfectly into a numbered guide that’s easy and fun to follow.
Here’s what tends to work really well:
- Portraits of people or pets where the subject is well-lit and pops against the background.
- Vibrant landscapes with clear separations, like a bright blue sky, green trees, and a defined horizon.
- Architectural shots that feature strong lines and good lighting.
On the flip side, you'll want to steer clear of photos that are very dark, overly busy with thousands of tiny details, or have soft, subtle color gradients. The technology that converts your photo is pretty amazing, but starting with a strong, clear image will always give you a final painting you’re happier with.
Ready to start your own creative journey? At Custom Paint By Numbers, we make it easy to turn your favorite memories into a hands-on art experience you'll never forget. Create your custom kit today.


