Stretching a painted canvas is all about getting that perfect, drum-tight tension over a wooden frame. This isn't just about making it look good; it's a crucial step to properly display and preserve your artwork. The whole process involves a specific sequence of pulling and stapling the canvas to keep it from sagging and give it that professional, gallery-ready finish.
Why a Good Stretch Is Your Art's Best Friend
Before you grab your tools, let’s talk about what’s really at stake. Learning how to stretch a painted canvas correctly is more about preservation than just assembly. It's the final, critical touch that helps your art look its best and stand the test of time.
Think of proper tension as the guardian of your painting. A perfectly taut canvas provides a stable, flat surface, which keeps the layers of dried paint from cracking or flaking. If the stretch is loose or uneven, the fabric will eventually ripple and sag, and that can cause damage you just can't undo.
The Dangers of a Bad Stretch
When a canvas isn't stretched right, it opens the door to a bunch of problems that are entirely avoidable. These issues don't just hurt the art's visual appeal; they can seriously knock down its long-term value.
You might run into common problems like:
- Warping and Distortion: If the tension isn't balanced across the frame, the image itself can get skewed.
- Sagging and Ripples: A canvas that isn't tight enough will droop over time, creating ugly waves and shadows.
- Cracked Paint: As a loose canvas flexes and moves, the brittle paint layer gets stressed and starts to crack.
A well-stretched canvas is like a solid foundation for a house. If the foundation is weak, everything on top is in jeopardy. This step ensures your art stays as vibrant and impactful as the day it was finished.
Ultimately, putting in the time and effort to stretch your canvas the right way is a direct investment in the life of your art. It’s what separates a piece that looks homemade from one that’s truly ready for the gallery wall.
Getting Your Stretching Tools Together
Before you even think about pulling that canvas taut, you need to set up your workshop. Trust me, trying to stretch a canvas without the right gear is a recipe for disaster—you risk a loose, saggy finish or, even worse, damaging your painting. Taking a few minutes to gather the proper tools makes all the difference.
The foundation of any stretched canvas is, of course, the stretcher bars. These are the wooden pieces that will form your frame. A critical rule of thumb is to choose bars that are at least two inches shorter than your canvas on every side. This gives you plenty of extra fabric to grab, pull, and staple. So, for a 24x36 inch painting, you'd want a frame that's no bigger than 20x32 inches.
The Essential Toolkit
Now for the tools of the trade. You might be tempted to grab a pair of regular pliers from your toolbox, but please don't. A pair of proper canvas stretching pliers is a game-changer. Their wide, rubber-tipped jaws let you get a death grip on the canvas without tearing the fibers or marring the paint. This is how you get that professional, drum-tight finish.
You’ll also need a few other key items:
- A heavy-duty staple gun. Make sure you have the right staples—1/4" or 3/8" usually do the trick.
- A framing square or T-square. This is non-negotiable for making sure your frame is perfectly square with 90-degree angles before you start. A crooked frame means a crooked painting.
- A soft, clean surface to work on. A blanket or a padded mat will protect your painting's surface while you have it face-down.
To make it even clearer, here’s a quick breakdown of what you absolutely need versus what’s just nice to have.
Essential vs Optional Canvas Stretching Tools
| Tool | Purpose | Importance |
|---|---|---|
| Stretcher Bars | Forms the internal frame for the canvas. | Essential |
| Canvas Pliers | Grips canvas securely for tight stretching. | Essential |
| Staple Gun & Staples | Fastens the canvas to the stretcher bars. | Essential |
| Framing Square | Ensures the frame corners are true 90-degree angles. | Essential |
| Protective Mat | Protects the painted surface from scratches. | Essential |
| Gesso & Brush | Seals the back and protects from moisture. | Optional |
| Hammer | Taps in canvas keys or stubborn staples. | Optional |
Having your tools laid out and ready to go is half the battle. It lets you get into a rhythm without having to stop and search for something, which is key to maintaining consistent tension.
A well-organized workspace is your best friend. When everything is within arm's reach, you can focus entirely on the feel of the canvas and getting that tension just right.
Finally, a quick note on tool care. Just as you take the time to learn how to clean paint brushes, giving your stretching tools a quick wipe-down after you're done will keep them in top shape for your next project. With your toolkit assembled, you're all set to prepare your canvas for stretching.
Setting Up Your Workspace and Canvas
Before you even think about picking up your staple gun, let’s get your space set up properly. A successful canvas stretch really begins with a good foundation. The last thing you want is to damage the artwork you've spent so much time on, so a little prep goes a long way.
Find a large, flat surface—a clean spot on the floor or a big workbench is ideal. Lay down something soft, like a clean blanket, a few towels, or a sheet of felt. This creates a safe, padded buffer to protect the painted side of your canvas from scuffs, dirt, or pressure marks while you're working. It’s a simple step, but trust me, it’s a lifesaver.
Prepare the Canvas and Frame
Okay, workspace ready? Now it's time to bring in the main event. Carefully place your painting face down on the soft surface you just laid out. This is a good moment to give the canvas a quick once-over. Look for any brittle spots in the paint or thin areas in the fabric that might need a gentle touch.
Next, lay your assembled stretcher bar frame on the back of the canvas. Grab a measuring tape and make sure the frame is perfectly centered. You should have the same amount of extra canvas fabric sticking out on all four sides. Getting this alignment right from the start is absolutely key to achieving even tension across the entire piece.
Pro Tip: Before you start stapling, do one final check on your frame with a framing square. Make sure every corner is a perfect 90-degree angle. Even a slightly skewed frame can throw everything off and leave you with a warped painting.
With more people getting into visual arts—roughly 50% of U.S. adults now participate—knowing how to handle and present your work is more important than ever. Proper stretching technique prevents the dreaded paint cracking or canvas sagging that can happen over time. If you're interested in the bigger picture, you can find more on stretched canvas market trends over at Verified Market Reports.
Taking your time with this initial setup not only protects your art but also sets you up for a professional, gallery-worthy result.
Getting the Stretch Just Right
Alright, your workspace is ready, the canvas is centered—now for the part that really makes a difference. This is where a little technique goes a long way. We're going to use what pros call the "center-out" method. It's the best way I've found to get perfectly even tension across the entire painting, from the very middle right out to the corners.
The whole idea is to work from the inside out. You'll start by putting one staple in the center of one stretcher bar. Then, you'll go to the opposite side, pull the canvas nice and taut, and put a staple right in the middle there. Do the same for the other two sides. You should end up with four staples forming a plus sign. This simple step locks the canvas in place so it doesn't shift while you work.
Finding Your Rhythm: Pull, Staple, Repeat
Now you can get into a groove. Pick one of the long sides and put a staple about three inches away from your center one. Immediately jump to the opposite side, give the canvas a good pull with your pliers until it feels firm, and place a staple directly across from the one you just put in.
Keep this back-and-forth motion going. Add staples every few inches, always working on opposite sides of the frame. This prevents you from accidentally pulling the image crooked and is your best defense against ripples or sagging.
This method is the absolute foundation for getting a professional-looking stretch every time.
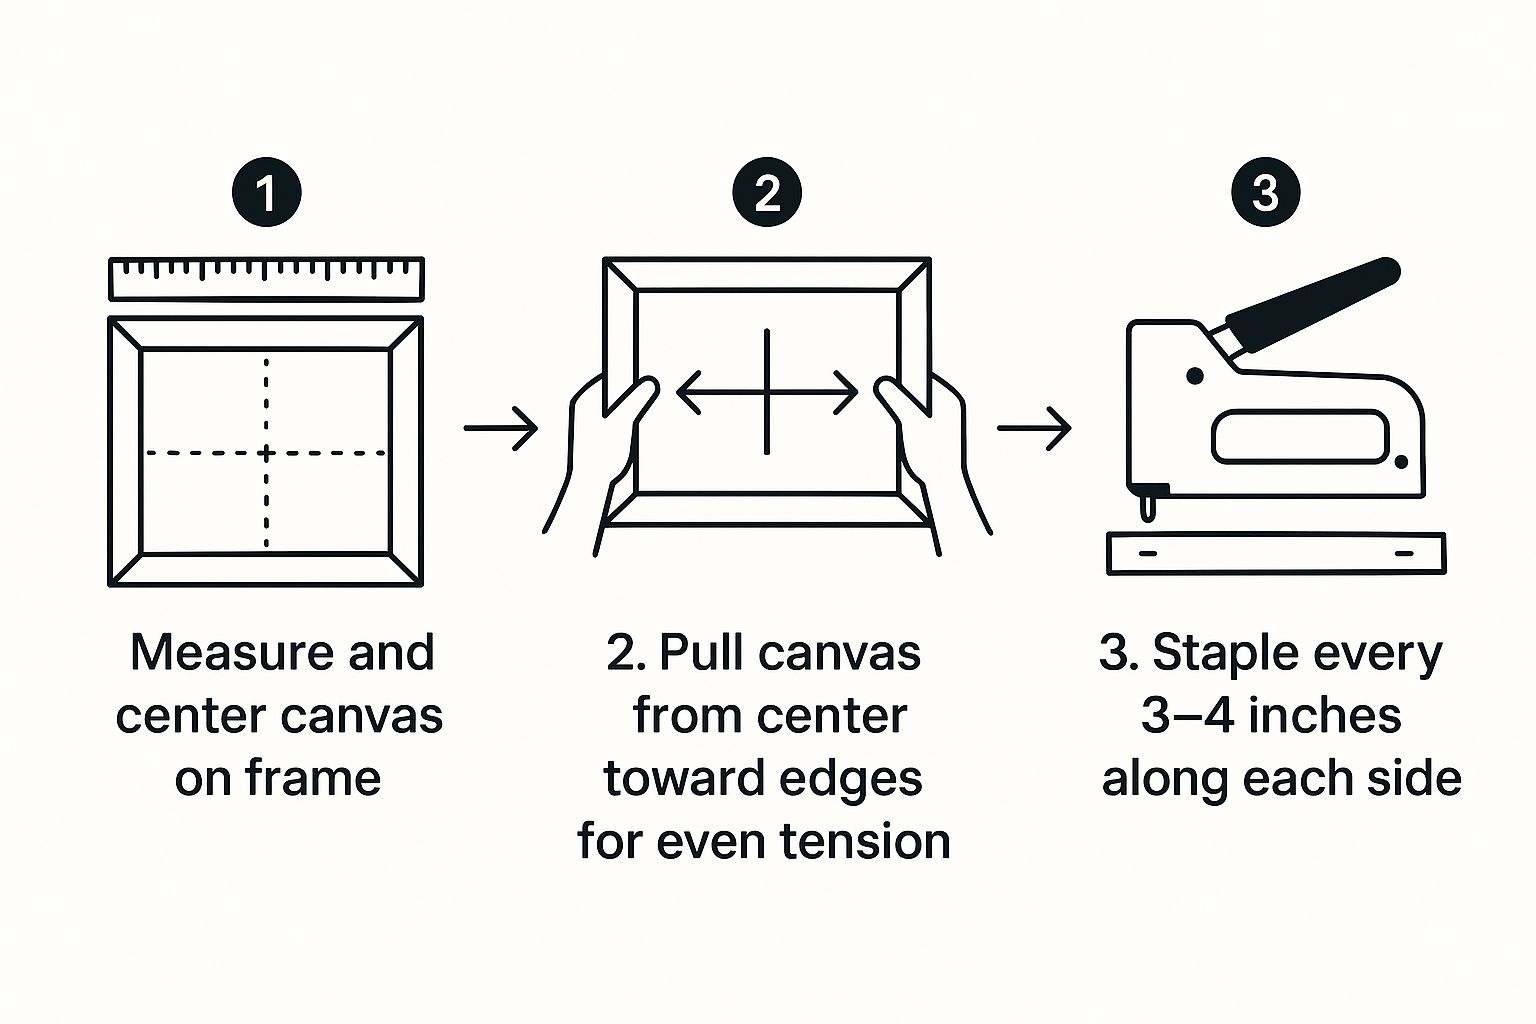
As you can see, it's a systematic process. Starting in the middle and working your way out is what creates that beautiful, balanced tension.
Nailing Those Clean Gallery Folds
As you get close to the corners, stop stapling about three inches from the edge. The corners can feel tricky at first, but a clean "gallery fold" is totally doable once you get the hang of it.
Here’s how I do it:
- Tuck the Corner: Grab the very tip of the canvas corner and pull it straight in toward the center of the frame, right along the diagonal.
- Fold and Crease: Take one of the flaps next to it and fold it tightly over the tucked-in corner. You’re aiming for a sharp, clean 45-degree angle.
- Staple It Down: Pull this folded section tight and pop a staple in to hold it. Then, fold the final flap over the top of everything and secure it with a couple more staples. It should look neat and tidy.
A good rule of thumb is to aim for a surface that feels like a small drum when you tap it. Don't be shy with the canvas pliers—you need a firm grip to get it right. If it’s too loose, the canvas will sag over time. But be careful not to go overboard; pulling too tight can crack the paint or even warp the stretcher bars.
Finishing a canvas properly is a skill in high demand. In fact, the global stretched canvas market is expected to hit USD 2.3 billion by 2032. It's a clear sign that more and more people are appreciating quality art and the techniques behind it.
Once everything is stapled down, you can trim any extra canvas off the back for a tidy finish. Now you've got a perfectly stretched painting, ready to hang. If you want to take it one step further, our guide on how to frame canvas paintings is the perfect next read.
Fixing Common Canvas Stretching Problems
Even the most experienced hands can run into a few snags when stretching a canvas. Don't worry—most of these little hiccups are easy to fix as long as you catch them early.
One of the most frequent issues you'll see is ripples or waves popping up along the edges of the canvas. This is a dead giveaway that the tension is uneven. The fix is pretty straightforward: just carefully remove the staples in that wavy section, give the canvas a good, firm pull with your pliers, and staple it back down. Remember to always pull straight out from the center to keep things even.
Tackling Looseness and Misalignment
What if you finish and the whole thing just feels a bit… loose? If the canvas is just slightly slack, a light spritz of water on the back can do the trick. As the canvas dries, the fibers will shrink and tighten up beautifully. Just be careful not to overdo it; too much water could seep through and potentially harm the paint on the front.
Now, for the more frustrating problem: the image is crooked. I know it's a pain, but the only real solution here is to start over. It's far better to spend a little extra time re-doing it than to live with a painting that's permanently off-center. Take a deep breath, pull out all the staples, and carefully realign your image before starting the stretching process again.
A well-stretched canvas is the first step in protecting your art for years to come. Once you've perfected the stretch, it's also important to understand how to preserve acrylic paintings to keep them vibrant and safe from environmental damage.
A Few Common Canvas Stretching Questions
https://www.youtube.com/embed/xrN5mwkwd8I
Even with the best instructions, a few questions always seem to come up when you're tackling this for the first time. Let's walk through some of the most common sticking points so you can move forward with confidence.
One of the biggest concerns I hear is about stretching older, more brittle paintings. Can it be done? Yes, but you have to be incredibly careful. An old canvas has lost much of its flexibility over time. You'll want to work slowly, apply much less tension than you would on a new canvas, and listen to the painting. If you pull too hard, you risk cracking the paint or even tearing the fragile fibers.
Getting the Tension Just Right
So, how tight is too tight? You're aiming for a firm, flat surface—not a rock-hard drum.
A simple and effective method is the "tap test." Just gently tap the center of your stretched canvas. You should hear a low, tight "thump," almost like a small drum. If the sound is dull or the canvas feels soft to the touch, it's time to add a bit more tension.
Another thing that trips people up is the difference between stretcher bars and strainer bars.
- Stretcher Bars: These have special interlocking corners. They're designed so you can insert small wooden wedges (called keys) to expand the frame and tighten the canvas later if it ever sags. This is almost always what you want for a finished painting.
- Strainer Bars: These have fixed corners that are glued or nailed together. Once they're built, they can't be adjusted.
For any piece you care about, always opt for stretcher bars.
The right materials really do make all the difference. In North America, the demand for quality art supplies is massive, which is a big reason why mastering skills like canvas stretching is so important for artists. You can get a better sense of the stretched canvas market and its growth by checking out the analysis from Business Research Insights.
Hopefully, these quick tips clear up any lingering questions and help you get a professional result you can be proud of.
Ready to create a masterpiece from one of your favorite photos? Custom Paint By Numbers lets you design your very own paint-by-number kit, which makes a fantastic personal project or a truly unique gift. Get everything you need—a high-quality canvas, all the paints, and brushes—by visiting the official Paint By Number website.